
Screenshot testing with jetpack compose
What is Screenshot testing
Screenshot or snapshot testing is a way to automate the validation of the UI components and widgets. It prevents regressions when updating any existing screen or component. A screenshot testing tool helps render a piece of UI (a screen or component), takes a snapshot of it, and then compares it with the existing correct snapshot. If the image doesn’t match, then the test is failed, alerting the developer that something visually has changed. Screenshot tests can be easily integrated with the CI server to run on every build or PR.
NOTE: One thing to understand here is that screenshot testing is just another type of unit testing to make sure your code changes work fine. It does not replace any existing UI testing methodology.
To put things in perspective, below is a demonstration of how a screenshot test works.
Screenshot test report (test failed)
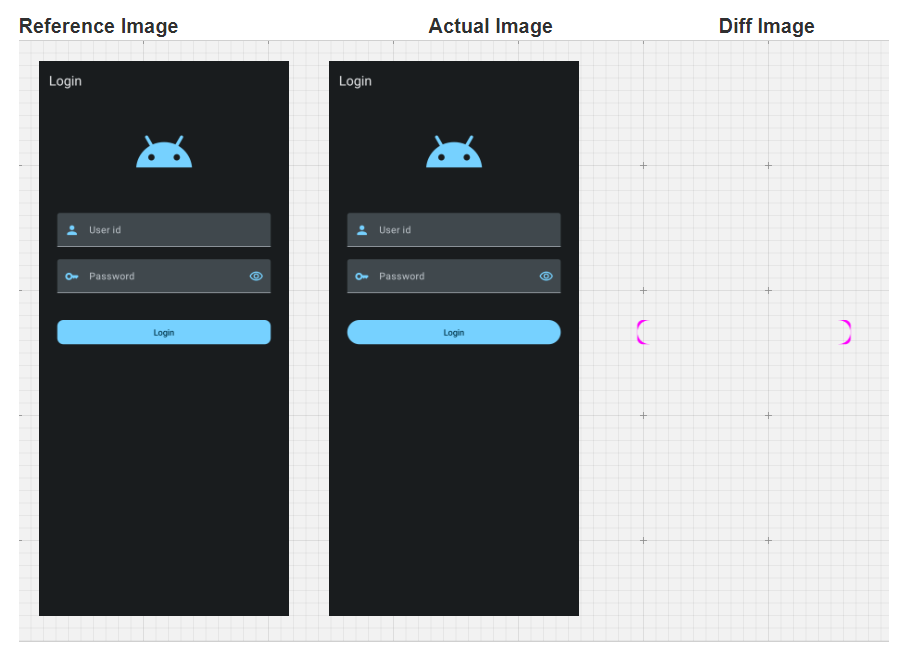
The reference image here is the correct one against which the latest UI design (actual image) is compared, and the diff image shows the differences between the two screenshots (reference and actual).
The test report above shows the test failed because the LoginButton’s radius in the actual image is not the same as the reference image, and the diff image highlights the same.
That’s all for the introduction. Now we will dive into the Compose Preview Screenshot Testing tool and learn how we can use it in our project to create and run screenshot tests.
Compose Preview Screenshot Testing
Compose Preview Screenshot Testing tool is recently released in alpha, it is designed to be as easy to use as composable previews.
To use Compose Preview Screenshot Testing, we need to use following:-
Android Gradle 8.5.0-beta01 or later.
Kotlin 1.9.20 or later
Setup
1. Add the com.android.compose.screenshot plugin and ui-tooling dependency to your project.
 [versions]
 agp = "8.5.0-beta01"
 kotlin = "1.9.20"
 screenshot = "0.0.1-alpha01"
 [plugins]
 screenshot = { id = "com.android.compose.screenshot", version.ref = "screenshot"}
 ...
 [libraries]
 androidx-compose-ui-tooling = { group = "androidx.compose.ui", name = "ui-tooling"}
In the module level gradle file add plugin and dependency:-
 plugins {
   alias(libs.plugins.screenshot)
  }
  dependencies {
    screenshotTestImplementation(libs.androidx.compose.ui.tooling)
   }
2. Next, we have to enable the experimental property for screenshot test in project’s gradle.properties file.
android.experimental.enableScreenshotTest=true3. In android {} block of your module-level build.gradle.kts file, enable the experimental flag to use the screenshotTest source set and ensure that kotlinCompilerExtensionVersion is set to 1.5.4 or later.
 android {
 ...
 composeOptions {
 kotlinCompilerExtensionVersion = "1.5.4"
 }
 experimentalProperties["android.experimental.enableScreenshotTest"] = true
}
Creating a screenshot test
With this, setup is all done, and we are ready to create our first screenshot test. For simplicity, we will use a simple widget to perform the test. We will be creating a button Composable only, and we will change its border radius and horizontal padding to break the test and visualize the test result.
Below is the composable we will be testing:
@Composable
fun PrimaryButton( title:String){
   Button(
     modifier = Modifier.fillMaxWidth(),
     onClick = {},
     shape = RoundedCornerShape(20.dp),
     ) {
        Text(title)
       }
 }
Next step is to create a screenshot test for our composable. First we need to create a new sourceset, named screenshotTest inside src, and create a new test file under it.
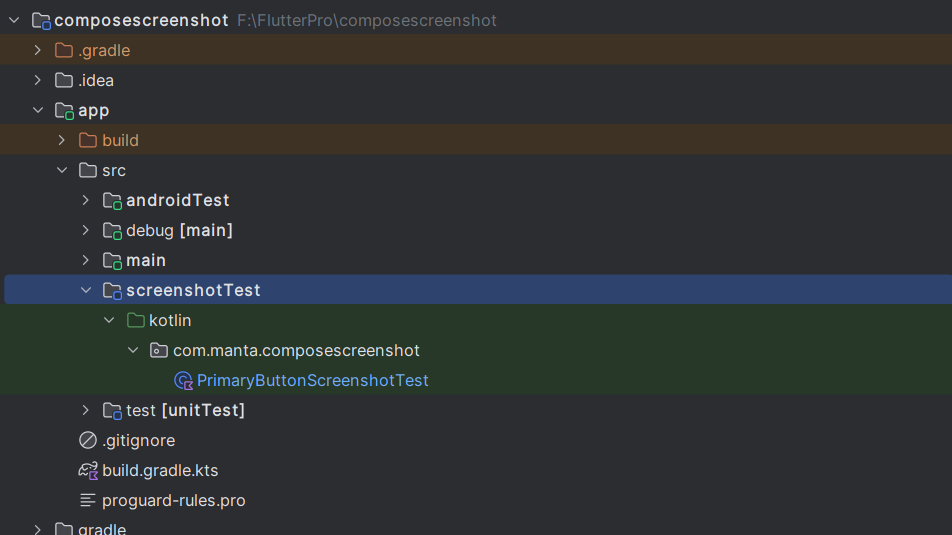
Screenshot test source set
Now we will create our test case for PrimaryButton Composable. Compose Preview Screenshot Testing is designed to be used as easily as a composable preview. We can also use @Preview parameters, such as uiMode or fontScale, and more to help us scale our tests.
class PrimaryButtonScreenshotTest {
@Preview(showBackground = true)
@Composable
fun PrimaryButtonPreview() {
   MaterialTheme {
     PrimaryButton("Login")
     }
   }
}
Generating reference screenshot
Now that we have our test in place, we will generate a screenshot for our preview. This screenshot will be later used to compare with the new one when we make changes to our composable. To generate a screenshot, we have to run the command below.
./gradlew updateDebugScreenshotTest
After running this command you can see that a png image is generated under the same screenshot source set inside the reference directory.

Generated reference image
Validating screenshot for test
Now that our reference image is generated, we can validate our current implementation of composable against it.
we need to run the following command to validate:-
./gradlew validateDebugScreenshotTest
After running this command we can check the test status in the console and also get the generated report. The generated HTML report can be found at {module}/build/reports/screenshotTest/preview/{variant}/index.html
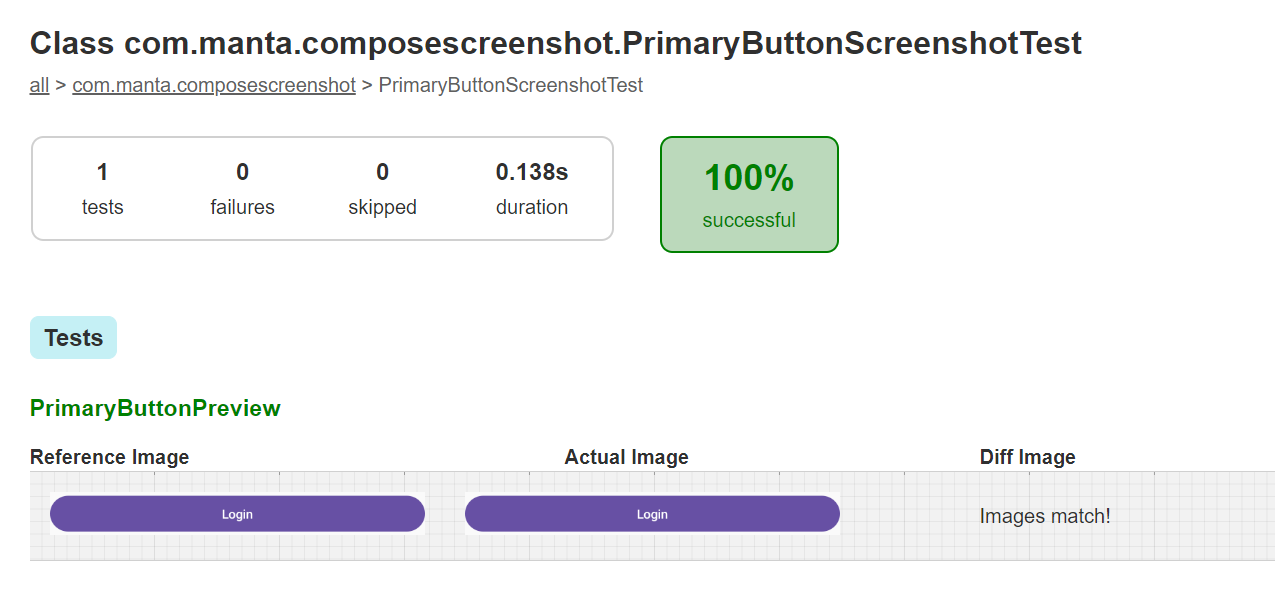
Test successful (build/reports/screenshotTest/preview/index.html)
Since we haven’t made any changes to our Composable yet, the test has passed successfully. Now we will make some changes to the composable under test, which is a button. We will change its border radius to 30 dp, and we will add 20 dp of horizontal padding to it.
@Composable
fun PrimaryButton( title:String){
  Button(
    modifier = Modifier.fillMaxWidth().padding(horizontal = 20.dp),
    onClick = {},
    shape = RoundedCornerShape(30.dp),
       ) {
          Text(title)
         }
  }
Running the same command again –
./gradlew validateDebugScreenshotTest
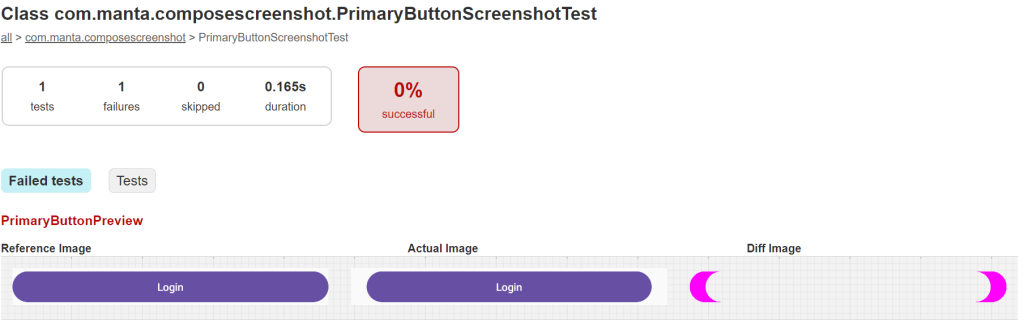
Test failed (build/reports/screenshotTest/preview/index.html)
we can see the test failed because the Composable preview does not match the previous screenshot taken. This failure indicates something visual has changed in our composable. We can visualize the report to find out what exactly made the test to fail and handle it accordingly and avoid any UI regression.
Note
We have used the two commands above: updateDebugScreenshotTest and validateDebugScreenshotTest. When it comes to automating these two tasks, validateDebugScreenshot Tests can be automated to run with the CI server on each pull request or build (aborting it if the test fails).
Automating updateDebugScreenshotTest can cause issues. If we update reference images each time, then we’ll lose the old reference, and the test might not run against the right screenshot.
We should run updateDebugScreenshotTest only in the following cases:
1. When making changes to a component in a design system.
2. When adding or removing components from an existing screen.
3. When creating a new component or screen, which we will test later.
Conclusion
That’s it. Creating and running screenshot tests for Composable involve just these steps. With these tests, we can improve the UI testing process by detecting visual regressions quickly and with very little effort.


