
Raycast in Unity 3D – step by step guide
Introduction
In game development, understanding how to interact with the environment is crucial. One common method to detect objects in a 3D space is raycasting. Whether you’re creating an FPS shooter or programming AI, raycasting can help by detecting objects within the game world. In this blog, we’ll explore what raycasting is and how to implement it in Unity 3D.
What is Raycasting?
Raycasting is a process of projecting an invisible ray from one point in the scene to another and checking if it collides with any objects along its path. Think of it as a laser beam that shoots out from a position and can detect obstacles.
Why Use Raycasting?
- Collision detection: Detect when a ray hits an object.
- Shooting mechanics: Cast a ray to simulate a bullet trajectory.
- AI Vision: Check if an AI can “see” the player by casting rays.
- Line of sight: Verify if there are any obstacles between two points.
Basic Raycasting Example in Unity
We’ll start with a simple raycasting example that detects objects directly in front of the player.
- Setting up the scene
- Create a new 3D project in Unity.
- Add a few objects like cubes or spheres to the scene and add material colour to it.

Unity basic scene design for Raycast
-
- Cube will act as an obstacle, red spheres will act as the enemy and the black sphere is our player.
- Add Rigidbody and Sphere Collider components to the red spheres and the black sphere.
- Assign the “Player” tag to the black sphere.
- Assign the “Enemy” tag to the red spheres.
2. Script
- Create a new C# script file “Enemy” and apply the below code on that script.
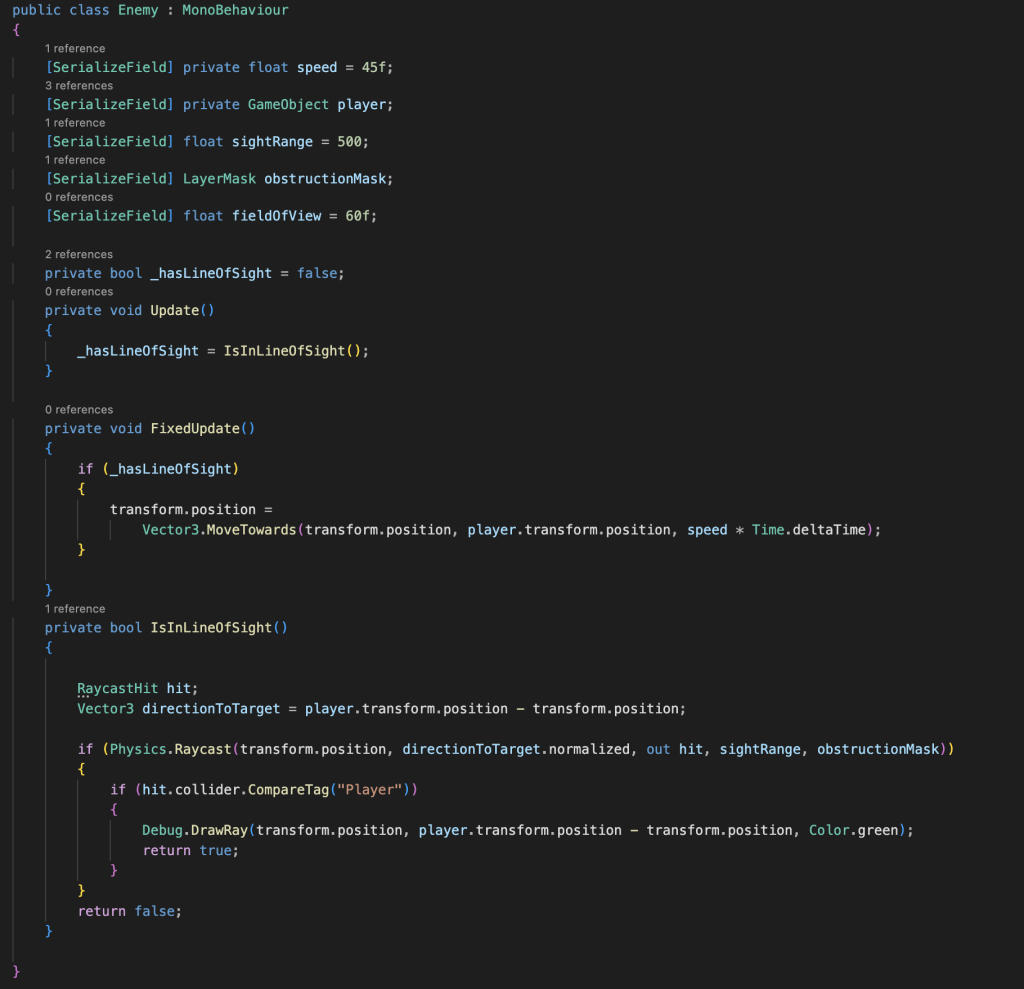
Enemy Script
- Assign this script to a red sphere so that the enemy can fire rays, and move towards the player object.
- Drag the black sphere from the hierarchy and drop it inside the player SerializeField option of the Enemy script.
- Select “Default” for the obstruction mask SerializeField option.
3. Explanation
- RaycastHit: Store information about the hit object
- Physics.Raycast: Casts the ray and returns information if it hits something.
- Debug.DrawRay: A visual aid to see the ray in the Scene view.
4. Debugging Tips for Raycasting
- Use Debug.DrawRay to visualize rays in the scene.
- Set the appropriate ray length (i.e. sight range) to match your needs.
- Always test raycasts with and without layer masks to ensure we are hitting the correct objects.
Conclusion
Raycasting is an incredibly versatile tool in Unity, whether you’re building shooting mechanics, creating AI behavior, or simply detecting objects in space. Raycasting helps you easily implement advanced gameplay features.


