
Live Activities Introduction and Setup – Part 1
Introduction
As iOS users, we are all familiar with live activity. When we buy a pizza through one of the ordering apps, live activity pops up (either on the lock screen or in the dynamic island region) and shows the updated status of our order. Their purpose is to display the most recent data from our apps and update their content.
In this blog, we will focus on live activities from a technical perspective with a deep dive example.
- It doesn’t matter if you are an iOS developer, designer, or anyone else. If you are looking for a live activities inspiration – this is a good place.
- I prepared for you some other content you can enjoy: troubleshooting tips, testing, limitations, and some cool live activity screenshots.

Live Activity Example
Constraints
Given that we’re all part of the Apple ecosystem, it is No surprise that most of the things from Apple comes with their own limitations.
- These limitations start with the ActivityKit framework, which is available from iOS 16.1 onwards. Live Activities pop up on compatible devices, appearing on the dynamic island and at the top of the lock screen notifications list. For devices that don’t have a dynamic island, they appear on the lock screen only.
- The only way to update live activity UI is by ActivityKit framework or by push notifications. It means we cannot perform any operations inside live activity e.g. network requests and then update the UI.
- The live activity image size must not exceed the whole size of the presentation mode it’s displayed in. In minimal presentation mode, the image must have the maximum size of the minimal presentation view. If it’s bigger, it won’t be displayed.
- Live activities have a finite lifespan. If the user or the app doesn’t end the live activity, it remains visible for 8 hours. After that, the system removes them from the dynamic island. On the lock screen, the live activity can be displayed for an additional 4 hours if the user doesn’t manually remove it.
- The live activity dynamic data, which represents the updated data, must be kept small, with a maximum size of 4 KB.
Initial Setup :
The first step in introducing the live activity in our app is to create a Widget Extension. To create a new widget extension, follow these steps: File → New → Target → Widget extension.
The next step is to look into the Info.plist configuration. The Support live activities option in the Widget target and App target has to be enabled.
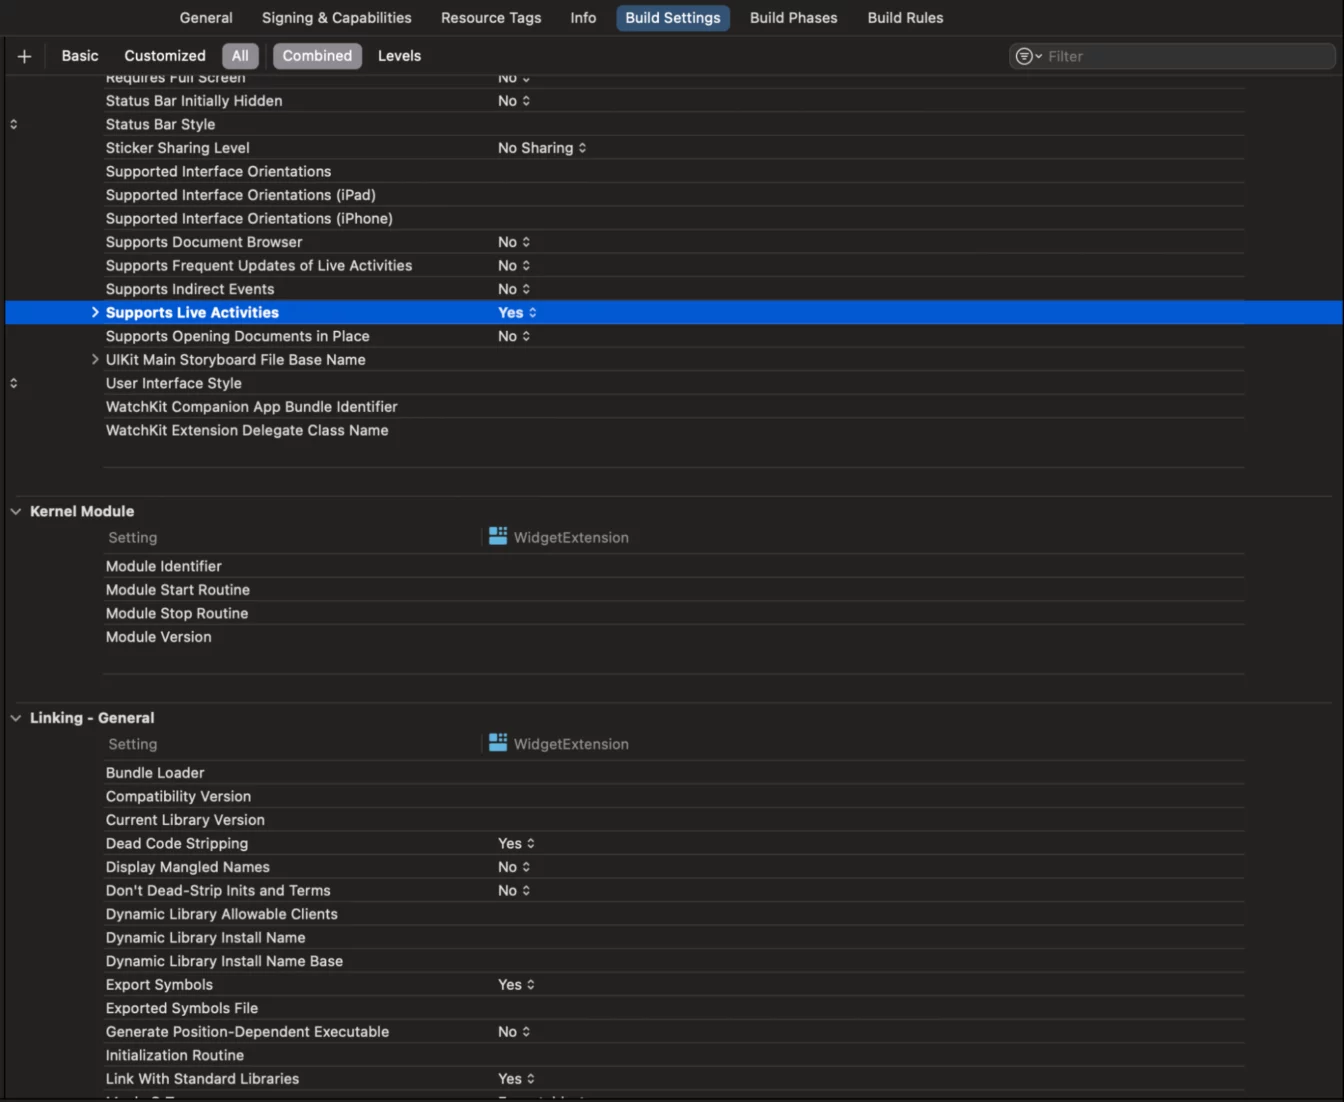
Support Live Activities configuration in Xcode
Our live activity supports push notifications updates. We have to make sure that push notifications are configured properly in our app. Push notifications and their setup are beyond the scope of this blog, so if you have any doubts, you can refer to Apple’s documentation: https://developer.apple.com/documentation/usernotifications/registering_your_app_with_apns
Code
To display live activity data, we create a struct LiveMatchScoreAttributes that conforms to ActivityAttributes protocol. Within the live activity, we have two kinds of data:
- Static data – As the name suggests, it is used to display the data which once displayed, does not change example: order content like pizza, name of the match being played, etc.
- Dynamic data – The data that keeps on changing in the app example order status, runs in a game, etc.
The dynamic data is defined by using an inner type of the ActivityAttributesprotocol, which we call ContentState. This ContentState type needs to be a struct that conforms to the Codable and Hashable protocols. So, to handle dynamic data, we create a structure of this type within the implementation of ActivityAttributes.
The static data is any information within LiveMatchScoreAttributes that isn’t part of the ContentState.
In our case, we want to have static: title, teamOneName, and teamTwoName. The rest of the data should be dynamic. This is what our live activity data representation looks like:

Match Activity Attributes
Live Activity UI Design
Now, let’s start the process of creating the live activity interface. Our goal is to display updates about the match scores directly on lock screen and dynamic island. Hence, let’s walk through the steps to create this presentation for both locations.
Dynamic Island has three presentation modes:
- Compact – This is the standard presentation. Live activity occupies leading and trailing space between the true depth camera.
- Minimal – If multiple live activities are running, the system decides which two live activities display. One is displayed on the leading side, attached to the dynamic island. The second is displayed on the trailing side, detached from the dynamic island.
- Expanded – If the compact or minimal mode is long-tapped this mode is shown.

Dynamic Island
Let’s discuss how to build all those presentations :
- We create a structure that conforms to Widget protocol. Let’s name it LiveMatchScoreActivity.
- To set up presentations we use the ActivityConfiguration structure and specify ActivityAttributes type, in our case, it’s LiveMatchScoreAttributes. As you can see in the code, each presentation has access to context. This gives us static and dynamic data of the live activity.

Live Activity UI Design
We can specify how our live activity looks when displayed in different modes like expanded, compact and minimal. We define the compact view using the compactLeading and compactTrailing closures. We should pass the SwiftUI view declarations here. It’s the same for the minimal presentation – we defined it within the minimal closure.
For the expanded presentation, things get a little more complex. We divide the view into different regions and decide what goes where. For example, we might want to put our brand logo in one region and the main content in another. Check out those regions in the image below.
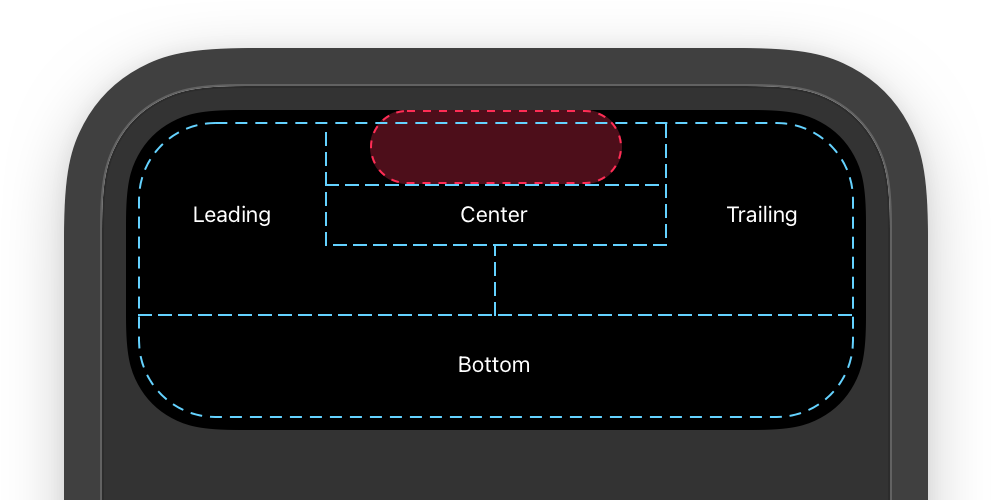
Expanded UI Source: https://developer.apple.com/documentation/activitykit/displaying-live-data-with-live-activities
We need to ensure that the widget extension recognises our newly created widget.
If the widget is the only one in the extension, we can add the @main attribute to it. This informs the extension that the widget is the only one and serves as the starting point. In case of multiple widgets, we create a WidgetBundle. This bundle comprises all the widgets we have, including the live activity one.

Widget Bundle
Live Activity lifecycle
- Managing the lifecycle of a live activity involves starting, updating, and ending. This can be done within the app using the ActivityKit framework or through push notifications.
- For devices running iOS 17.2 and newer, we can start a live activity through push notifications. On older iOS versions, it can only be started using the ActivityKit framework.
Using ActivityKit framework for lifecycle operations
To start a live activity with the ActivityKit framework, we use the request function from the Activity class. We provide the static data as the first parameter. The second parameter is the contentState, which is the dynamic data initial state. Lastly, we provide the optional pushType parameter. If we want to enable push notifications updates, it should be set to PushType.token.

Start Activity
We should use the update function on the activity instance to update the live activity. We got it when the live activity started. When updating, the new dynamic data should be specified.

update live activity
The end can be done by calling the end on the activity instance. You can also provide the final state for the activity, which will be shown to the user before the system removes the live activity.
The dismissal policy determines when the live activity gets removed. The default dismissal policy allows the live activity to remain on the lock screen for a maximum of 4 hours if not manually removed by the user. Additionally, you can specify the after(_ date: Date) policy, which removes the live activity at a specified date but within a 4-hour window.

End Live Activity
Conclusion
That’s it in this part. We learned about how we can manage the live activity life cycle through our app with the help of ActivityKit. In the next part, we will see the magic of push notifications. How we can start, update, and end live activity through a push notification. See you in the next part of this series. Cheers ..!!


This article really sheds light on how the Live activity works, very informative blog