
iOS: CI/CD Integration via FastLane & Firebase using Gitlab : Part – 1
Hello everyone, This is a blog series where we’ll touch up on how to automate our workflow with CI/CD in iOS with the use of tech like Fastlane, Firebase, and Gitlab repository.
This is the 1st part of the series where we’ll cover the setup of the configuration for generating automated builds using Fastlane on the local machine.
Introduction
When we are working on a project and need to share the build for the testing features then there are common steps to generate a build and make an archive via Xcode to share with testers. But this is a repetition process to generate a build via Xcode and also need to manage & keep upto-date the certificate and provision profile. Generally, this can be possible if a developer is available to generate the archive because they have the expertise in their domain. What will happen if a developer is not available to generate the archive then it is not possible without the help of a developer.
After some research, I have discovered that there are some powerful tools available that can help us automate the build, test, and deployment of our app. So we can set up a GitLab repository for our app, and just install the Fastlane on our local machine and in the GitLab repository.
What is CI/CD?
A CI/CD pipeline is an automated process utilized by software development teams to streamline the creation, testing, and deployment of applications. “CI” represents continuous integration, where developers frequently merge code changes into a central repository, allowing early detection of issues. “CD” refers to continuous deployment or continuous delivery, which automates the application’s release to its intended environment, ensuring that it is readily available to users. This pipeline is vital for teams aiming to improve software quality and speed up delivery through regular, reliable updates.
Integrating a CI/CD pipeline into your workflow significantly reduces the risk of errors in the deployment process. Automating builds and tests ensures that bugs are caught early and fixed promptly, maintaining high-quality software.
GitLab comes with CI built-in for all projects, for free.
Fastlane helps you to automate the most time-consuming beta distribution steps including incrementing the build version, code signing, building and uploading the app, and setting a change-log.
What is Fastlane?
Fastlane is an open source suite of tools that allows you to automate your iOS or Android mobile app releases, potentially saving you hours of development time. It is powered by a Ruby configuration file called a Fastfile, in which you can add lanes to serve different purposes.
In this tutorial, you’ll see how to build a local fastlane pipeline that will automate the final steps of the iOS development and deployment process. You’ll add lanes for signing, testing, building, and deploying a simple “Todo_ios” application. At the end of this tutorial, you should have everything you need to build the perfect fastlane pipeline for your next iOS app.
Fastlane Setup/Installation
There are many ways to install fastlane, but we’ll use Homebrew (macOS) for the task. There’s also a Swift version of fastlane that’s currently in beta.
Homebrew (macOS)
This way, you don’t have to install Ruby separately, and instead homebrew installs the adequate Ruby version for fastlane.
$ brew install fastlane
When the installation is complete, confirm it by running the following command:
$ fastlane --version

# Output:
fastlane installation at path:
/usr/local/.rvm/gems/ruby-3.3.1/gems/fastlane-2.221.1/bin/fastlane
-----------------------------
[✔] 🚀
fastlane 2.221.1
Congratulations! You’re ready to use fastlane in your project.
Configuring Fastlane for a project
In this tutorial, we’ll use a demo app called Todo_ios. You can find the complete source code here on Gitlab in case you miss something. You will not required to have a paid Apple Developer account to complete this tutorial.
To get your new app started, open Xcode and create a new app.

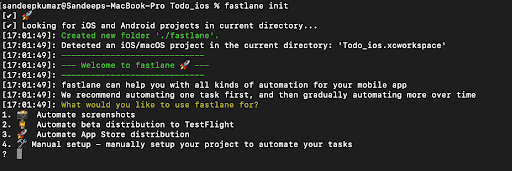
To initialize fastlane inside the project, go to the project’s root directory in your terminal and run the following:
$ fastlane init
Fastlane will prompt you to choose a single automated action to implement, Automated actions are pre-built actions that let you automate various aspects of your development and release workflow. You’ll implement multiple automated actions in this tutorial, so just select manual setup by entering 4 options for this tutorial.
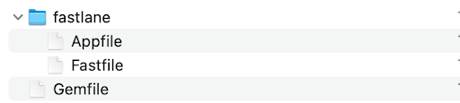
Go to the root directory of the project. We will see a new Gemfile, which includes project dependencies, and a ./fastlane directory containing an Appfile and a Fastfile.
After Completion Setup it your app directory looks like the below:
GEMFILE
If you don’t see GEMFile then create it manually by following the steps:
- Create a ./Gemfile in the root directory of your project with the content.

 source "https://rubygems.org"
 gem "fastlane"
- Appfile – It contains a bundle identifier and your Apple ID.
 app_identifier("APP IDENTIFIER") # The bundle identifier of your app
 apple_id("APPLE ID") # Your Apple email address
2. Gymfile – It contains gym builds and packages for iOS apps. It will take care of all the heavy lifting and makes it super easy to generate a signed ipa or app file.
To create a gym file in your project, you’ll need to run this command from your project directory in the command line.
$ fastlane gym init
Since you might want to automatically trigger a new build but don’t want to specify all the parameters every time, so you can store your default values in a so-called Gymfile.
Example:
 scheme("SchemeName")

 sdk("iphoneos15.2")

 clean(true)

 output_directory("./build")    # store the ipa in this folder
 output_name("AppName")           # the name of the ipa file
3. Fastfile – It contains the fastlane.tools configuration and actions.
Fastfile defines the build steps, since we’re using a lot of the built-in capability of fastlane this is really straightforward. We create a single lane that increments the build number, syncs certificates and builds, and uploads the new build to Firebase App Distribution or TestFlight/App store. Of course, you may want to split these out into different jobs depending on your use case. Each of these steps, get_certificates, get_provisioning_profile, match, gym, and upload_to_testflight are pre-bundled actions already included with fastlane.
Concluding we have covered the Fastlane setup/Installation with multiple files like Appfile, Gymfile, and Fastfile in the Part 1. In the next part of the series, we’ll be covering how to use CI/CD workflow via Fastlane & Firebase on the local machine.


