
Increase Test Efficiency with DataProviders in TestNG
How can we do Data-driven testing in Selenium?
One way is to use Parameters. As we know, we can run our tests with input(Parameter) to verify whether it is valid or invalid. For this, we can use Parameters in TestNG. But what if we want to run the same test for multiple inputs and check if we can cover different scenarios for that one test with more than one input? There are several scenarios when we need to run a single test case multiple times on more than one valid/invalid input.
This is when DataProviders in TestNG come into the picture, where we can run a single test case for more than one data in a single execution. It is a part of the inbuilt TestNG data-driven testing. Instead of duplicating test cases for every variation of input, you can use a single test method and provide various data sets through a DataProvider to maintain Efficiency and Flexibility.
Overview of Data Providers in Selenium
Let us understand this with an example:
TestCase: Verify if the user can sign up or not
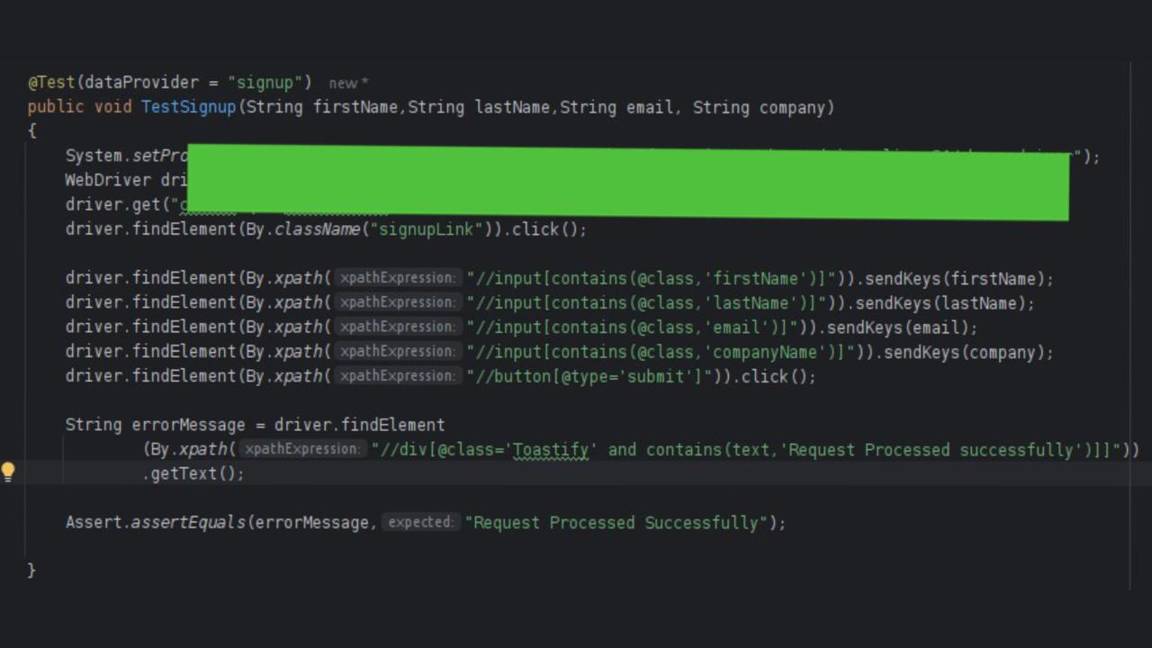
Let’s say, there is a website whose Signup page only accepts Business Emails [not Gmail, Yahoo, etc.]. If a user tries to register with his/her Business Email, then the test case passes, while if the user tries to register using a Gmail or Yahoo account, he/she gets an error “Only Business Email allowed” on screen.
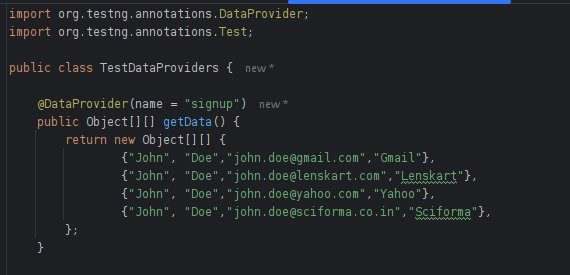
In that case, we can have multiple valid/invalid inputs like
- john.doe@gmail.com
- john.doe@lenskart.com
- john.doe@yahoo.com
- john.doe@sciforma.co.in
And many more combinations can be made.
Out of the above only john.doe@lenskart.com and john.doe@sciforma.co.in are valid inputs.
So for the above test case, john.doe@lenskart.com , and john.doe@sciforma.co.in pass. While for the inputs john.doe@gmail.com and john.doe@yahoo.com fail to get the error message “Only Business Email allowed”.
So we can efficiently run the above test case for these four inputs and verify the results.
Using Data Providers
1. Setting up TestNG
The very first step to using Data Providers is to set up TestNG. If you’re using Maven, add TestNG to your pom.xml file: You can get it on this Link.
2. Defining a Data Provider Method
The second step is to create a method with @DataProvider annotation that returns a two-dimensional object array. Each sub-array represents a set of data for a single test run.
3. Integrating Data Providers into Test Cases
Use the @Test annotation with the dataProvider attribute to link your test method to the Data Provider.
If in case, we are using DataProviders defined in another class, then with @Test annotation, we can use the DataProvider as below. After all setup has been done, we can run our tests, which will execute the same test with each set of data provided.
Best Practices for Using Data Providers
- Keep Data Sets Simple: Ensure your data is relevant and straightforward to avoid unnecessary complexity.
- Use External Data Sources: For more dynamic data, consider pulling data from external sources like databases or spreadsheets.
- Document Your Data: Clearly document the purpose of each data set to make your tests more understandable.
Final Thoughts!
Data Providers in TestNG are a powerful tool for running parameterized tests efficiently. By incorporating Data Providers into your Selenium tests, you enhance the flexibility and scalability of your test suite. With these practices in place, you’ll be able to handle varying test scenarios with ease and maintain cleaner, more manageable test code.

This image shows, setting up our TestNG dependency in our pom.xml file.
how DataProviders can be defined in our code
Integrate DataProviders in TestNG
If DataProviders and Test method are in different classes
