Getting Started with Strapi CMS: A Comprehensive Guide for Developers
Introduction
Strapi CMS is a headless, open-source content management system designed for modern web and mobile applications. Unlike traditional CMS platforms, Strapi is a modern tool where the part that manages content (backend) is separated from the part users see (frontend). This lets developers choose any design or technology for their website or app while Strapi takes care of managing the content. It provides a robust API-first architecture that supports REST and GraphQL, allowing seamless integration with various tools and frameworks.
Strapi’s flexibility lies in its customizable nature you can easily create and manage content types, extend its functionality with plugins, and even connect it to any database of your choice. With a user-friendly admin panel, content creators can manage content efficiently, while developers enjoy full control over the project structure and codebase. Whether you’re building a website, a mobile app, or an eCommerce platform, Strapi empowers you to deliver scalable and flexible solutions.
Key Features & Why Do We Need Strapi CMS
Strapi simplifies content management in modern web development with its headless architecture. Here’s why developers love it:
- Customization: Fully customizable through plugins and extensions.
- API-first: Automatically generates RESTful or GraphQL APIs.
- Headless Architecture: Decouples backend and frontend for flexibility.
- Ease of Use: Simple admin panel for managing content.
- Flexibility: Allows you to use any frontend framework or library.
- Scalability: Ideal for large-scale applications with diverse content needs.
- Open-Source: Free to use with a growing community.
Easy Content Management with Strapi
Strapi makes managing website or app content simple, even for non-technical users. Its user-friendly admin panel allows content managers, marketers, and business owners to update and organize content without writing any code.
- Easy Updates: Add, edit, or delete content quickly through an intuitive dashboard.
- Content Organization: Keep everything structured and accessible without technical know-how.
- Collaboration Tools: Assign roles and permissions to team members for smooth teamwork.
- Quick Publishing: Publish, unpublish, or schedule content with a few clicks.
How to Set Up and Install Strapi CMS
Prerequisites:
Before you install Strapi, ensure the following tools and technologies are installed on your system:
1. Node.js: Strapi requires a minimum Node.js version to operate. At the time of writing, Node.js version 14 or higher is supported. for future release and support always check the official document (Strapi General Requirement) for the latest version requirement.
node -v # To check Node.js version
2. npm or yarn: Installed alongside Node.js. Use either for package management.
npm -v # To check npm version
yarn -v # To check yarn version (if installed)
3. Database: Strapi uses SQLite as the default database its a lightweight, file-based database. Strapi supports multiple databases, such as SQLite, MongoDB, MySQL, and PostgreSQL. It simplifies the setup process and is ideal for quick development.
Why Use an External Database:
- Scalability: External databases handle large volumes of data and concurrent requests more efficiently.
- Performance: Optimized for high-read and high-write operations in demanding environments.
- Features: Support for advanced features like replication, clustering, and advanced querying.
Step 1: Install Strapi CMS
You can install Strapi using the npx command or manually through npm/yarn.
npx create-strapi-app my-project
create-strapi-app: The official tool to generate a new Strapi project.
my-project: The folder name for your project.
Installation Reference Link: – Official Documentation
Understanding the Project Structure
Here’s a breakdown of the folder structure created by Strapi:
- src/: Contains all the source code for APIs, components, and configurations.
– api/: Stores auto-generated and custom APIs.
– components/: Defines reusable components for content types.
– extensions/: Contains plugins or customizations. - config/: Stores environment-specific configurations.
- node_modules/: Contains installed dependencies.
- package.json: Lists project dependencies and scripts.
Note: Strapi uses a cache folder to store temporary data that helps improve performance by reducing the need to re-fetch or recompute certain information. Caching mechanisms can include things like database query results, API responses, or content data that doesn’t change frequently.
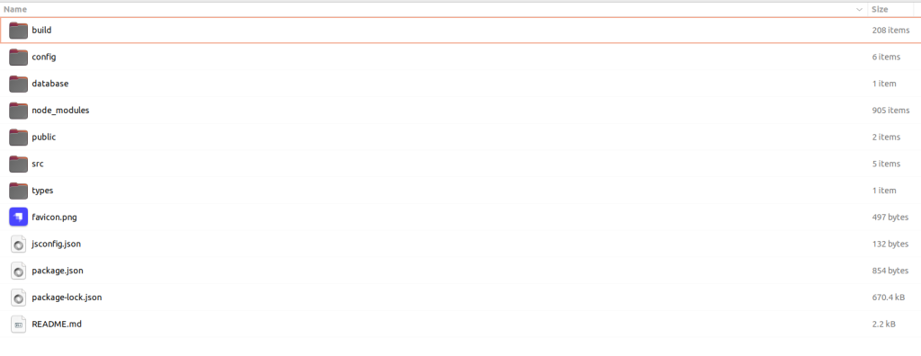
Strapi Folder Structure
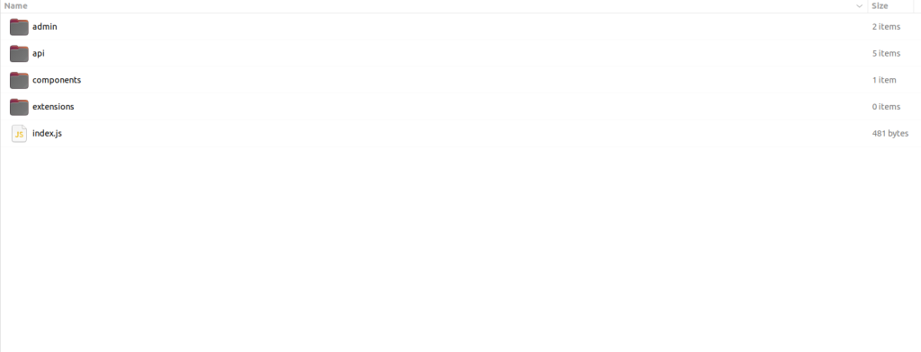
Src Folder Structure
Step 2: Start the Development Server
Once the installation is complete, start the Strapi development server:
cd my-project
npm run develop # This command runs Strapi in development mode, which allows live reloading of changes.
By Default The admin panel is accessible at localhost:1337/admin
Step 3: Create an Admin Account
After launching, Strapi will prompt you to create an admin account to access the dashboard.
Fill in all the details and click Let’s Start
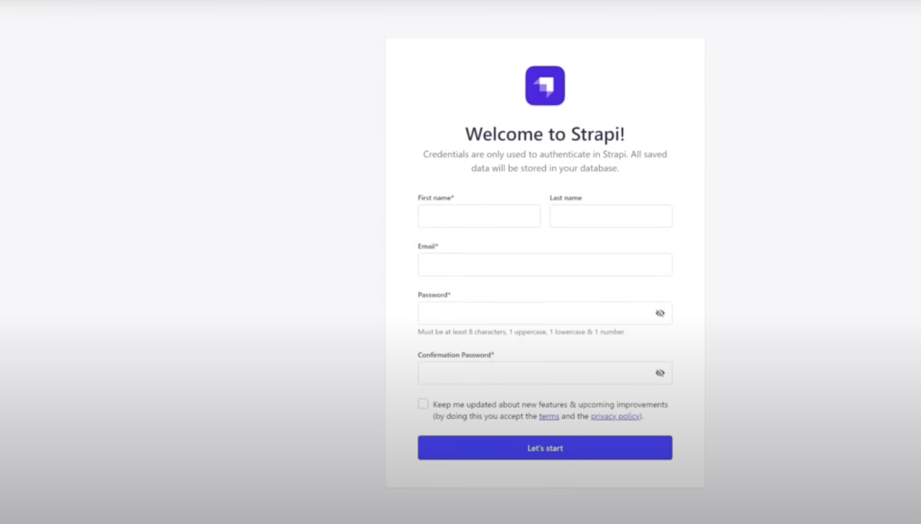
Account Creation
After creating an admin account you will be redirected to the Strapi dashboard –
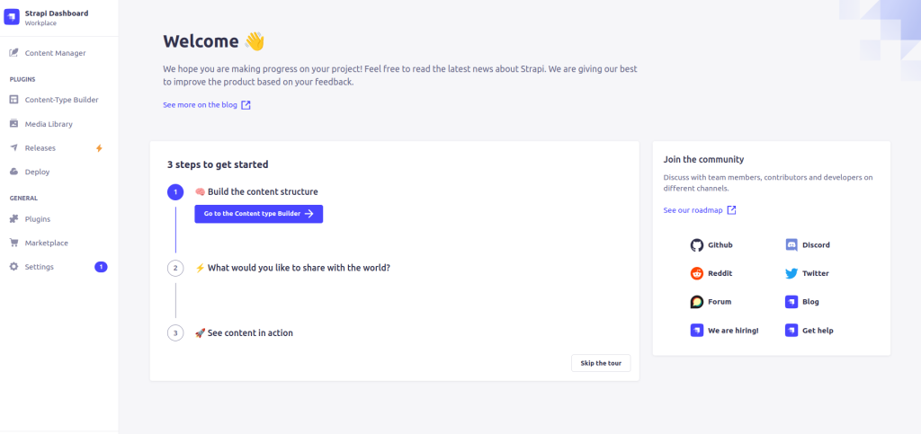
Strapi Dashboard
What is Collection Types and How to Create It:
Collection Types in Strapi define the structure of your content, similar to tables in a database.
- Content-Type Builder: This is where you define the structure of your content, such as creating new content types (e.g., blog, events) and adding fields (e.g., text, rich text, date). It provides a flexible interface to design the data model for your application
- Content Manager: Once content types are defined, the Content Manager allows you to handle the actual data. You can add new entries, edit existing ones, and delete data directly from an intuitive interface designed for non-technical users.
- Components: Components are reusable groups of fields that can be shared across multiple content types. For instance, a “Banner” component with image and video fields can be added to various content types.
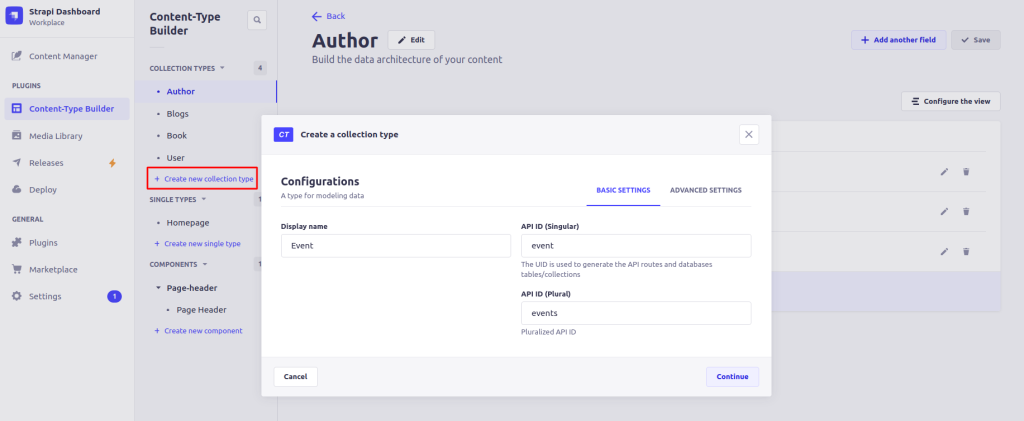
collection types
Steps to Create Collection Type:
1. Go to the Admin Panel: Navigate to the admin panel and click on “Content-Types Builder“.
2. Add a New Collection Type:
– Click Create new collection type.
– Name the collection (e.g., Event).
3. Add Fields: Strapi provides many fields like the below image
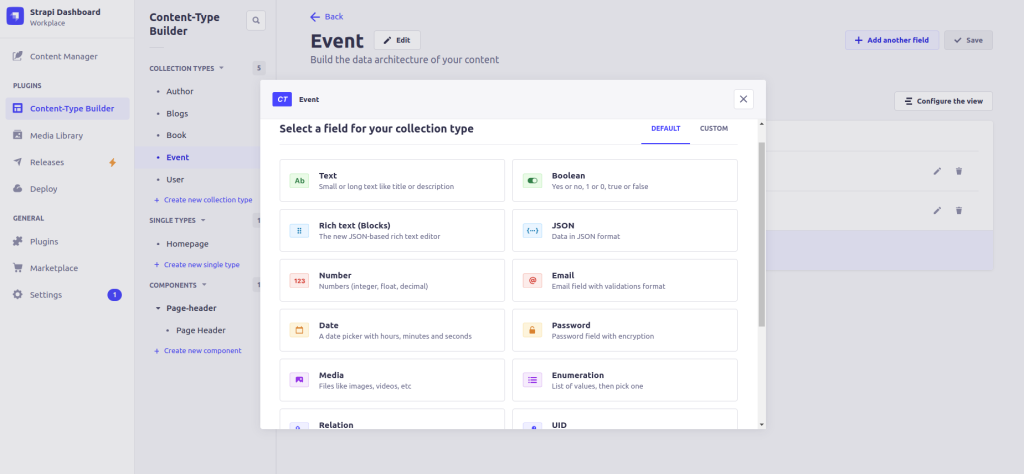
Strapi Fields
Here I have added 2 fields for the Event collection-type :
– EventName (Text)
– Details (Rich Text)
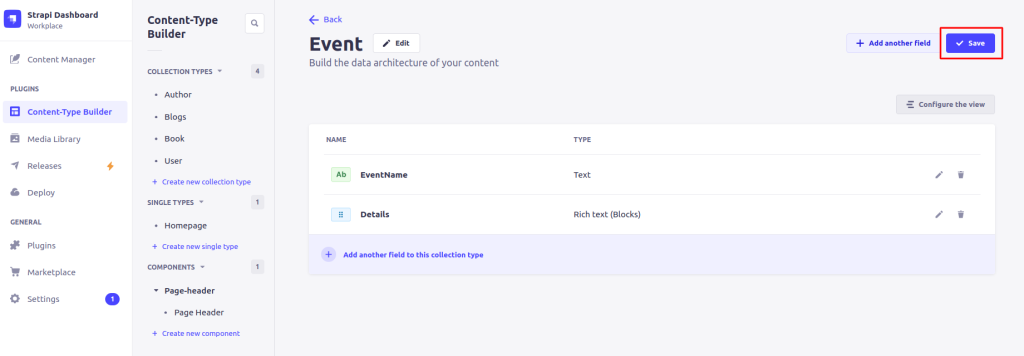
Adding Field
4. Save: Save the collection, and Strapi will automatically create the API endpoints.
How to Create Page Using Content Manager:
- Go to the Admin Panel: Navigate to the admin panel and click on “Content Manager“.
- Choose Content Type: Select the content type (e.g., “Event”) where you want to add a new entry.
- Create New Entry: Click Create New Entry to open the form.
- Fill Details: Add content in the required fields (e.g., EventName, Detail, Banner).
- Save & Publish: Save the entry and publish it to make it accessible via the API.
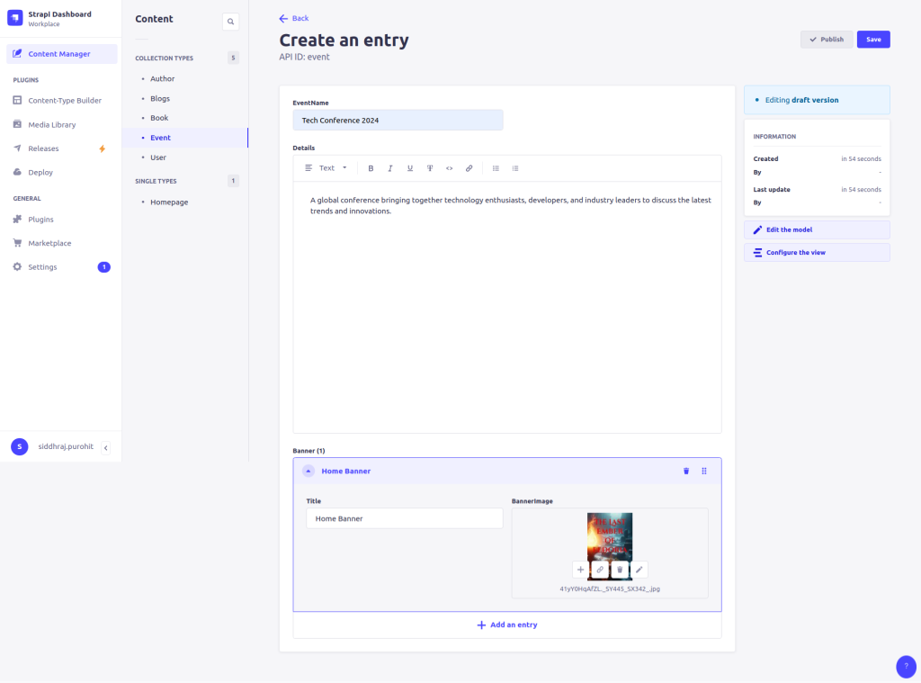
Event Page
Authorize Collection To Access The API’s
Strapi provides built-in authentication and authorization features to secure APIs.
Features:
JWT (JSON Web Token): Used for secure API interactions.
Role-Based Access Control (RBAC): Define roles (e.g., public, authenticated) for accessing resources.
Example:
1. Enable Authentication for an API:
In the admin panel, navigate to Settings > Roles.
Configure the permissions for public or authenticated roles.
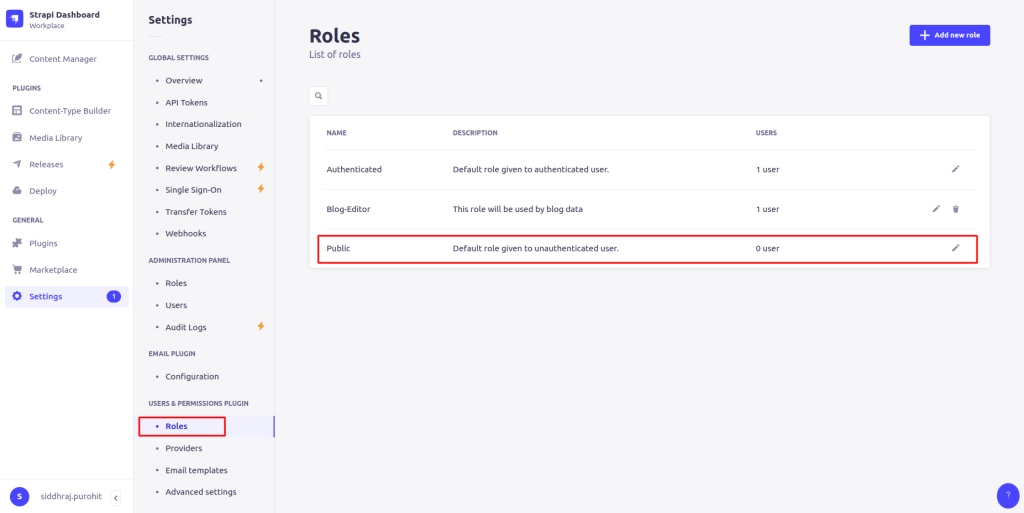
Authentication-Image
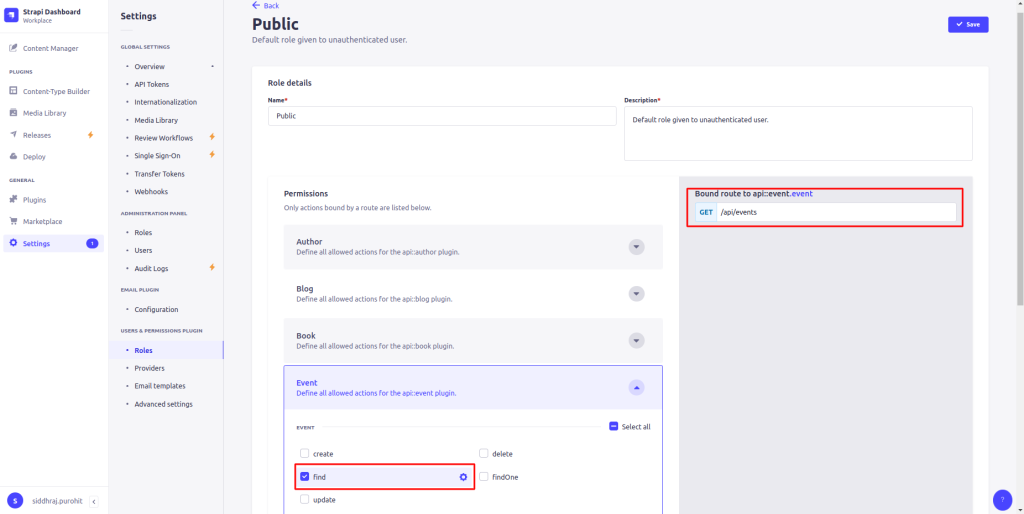
Api-Permission
An Event collection will generate the following API endpoints as shown in the above image:
create => [POST] /api/events
find => [GET] /api/events
update => [PUT] /api/events/:id
delete => [DELETE] /api/events/:id
findOne => [GET] /api/events/:id
2. Generate JWT:
Use the /auth/local endpoint to authenticate users:
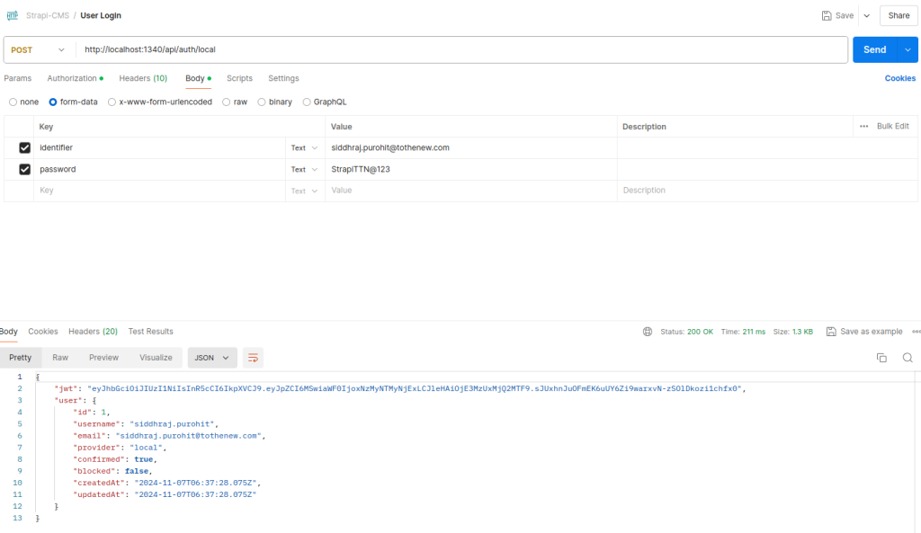
JWT Token
POST localhost:1337/api/auth/local
{
"identifier": "<username>",
"password": "<password>"
}
The response will include a JWT token like the above image.
3. Use JWT for API Requests: Include the token in the Authorization header:
GET localhost:1337/api/event
Authorization: Bearer <JWT_TOKEN>
How to Fetch Strapi Data as an API
Once you’ve created your Event collection type and added data, you can use Postman to test and fetch the data via Strapi’s API. Follow these steps:
- Open Postman
- Set the request method to GET.
- Enter the API endpoint localhost:1337/api/events in the URL field.
- Click Send to make the request.
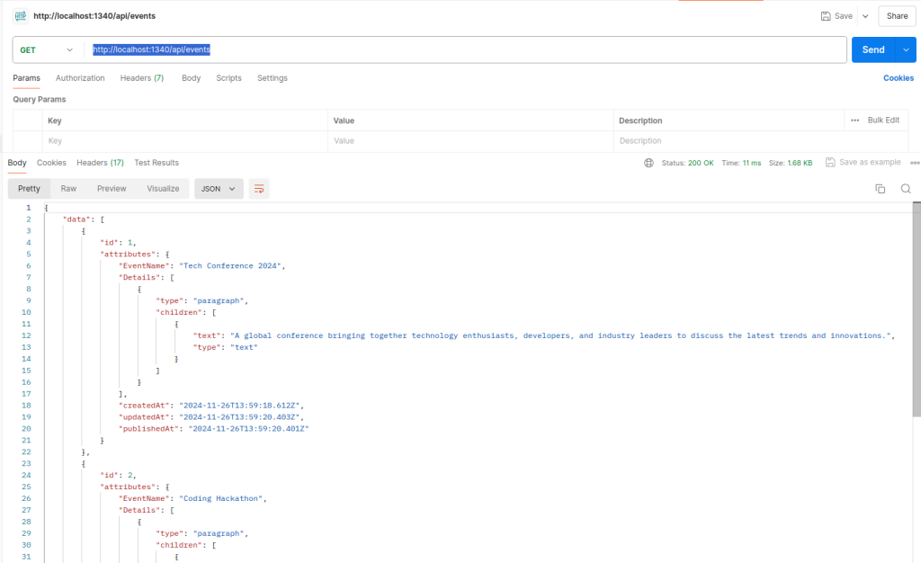
API Response
As you can see in the above image we have all the event data in json.
if you want to fetch only a single entry then we have to pass it by the end of the endpoint like the below –
[GET] /api/events/:id (localhost:1340/api/events/2)
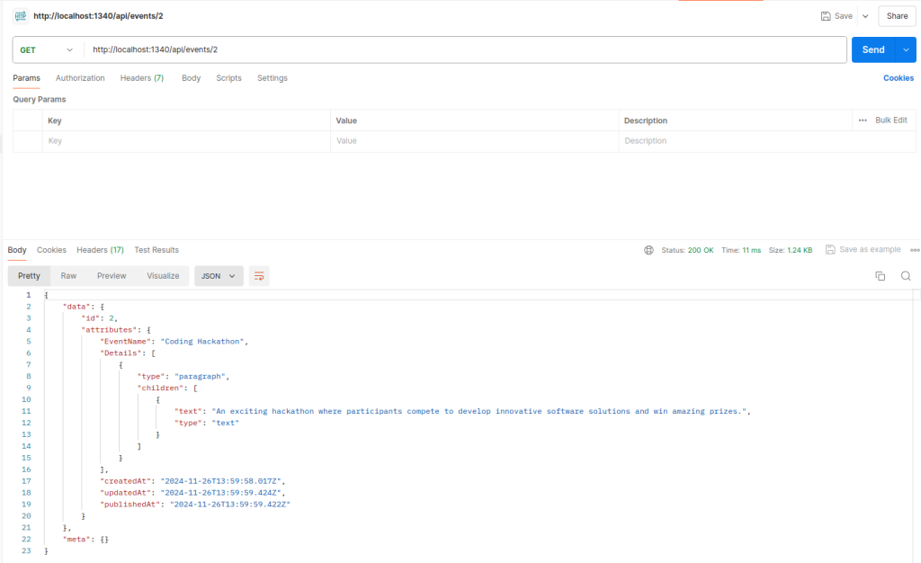
API Result By ID
Conclusion
Strapi CMS stands out as a powerful, flexible, and modern solution for building content-rich applications. Its headless architecture, coupled with an intuitive admin interface, makes it ideal for both developers and content managers. With support for REST and GraphQL APIs, customizable content types, and multi-database compatibility, Strapi offers unparalleled scalability and versatility. Whether you’re developing a web app, mobile app, or API-driven platform, Strapi streamlines your workflow and accelerates development.

