
Enhancing WebRTC audio quality with Web Audio API
Introduction to Web Audio API
The Web Audio API is a powerful tool that allows developers to control and manipulate audio within web applications. From enhancing sound quality in video calls to adding dynamic sound effects in web-based games, the API offers flexibility and power. In this blog, we’ll walk through how to modify microphone streams using the Web Audio API, with practical real-world examples for scenarios like video conferencing, live streaming, and online gaming.
We’ll cover three stages:
- Creating a source node from the microphone stream using the AudioContext interface.
- Modifying the track with Web Audio features such as gain adjustment, filters, and compressors.
- Creating a destination node and replacing the original stream with the modified one.
Stage 1 Creating a source node from the microphone stream –
To begin modifying audio, we need to create an AudioContext and obtain a microphone stream. By using getUserMedia(), we can capture the microphone input and convert it into a source node that can be manipulated by the Web Audio API.
Cross-Browser Compatibility
Different browsers may handle source creation differently. For example, Firefox requires the use of createMediaStreamTrackSource() instead of createMediaStreamSource(). This variation needs to be handled when building applications across multiple platforms.
For chrome/safari –

creating source node in chrome
For Mozilla Firefox –

creating source node in mozilla firefox
Stage 2 Modifying the track –
Now that we have the microphone stream, let’s explore how to modify it for real-world scenarios, such as live streaming and noise reduction in audio calls.
Example 1: Increasing Volume for Live Streaming
If you’re building a live-streaming platform like Twitch or YouTube Live, you might need to adjust the microphone volume. For instance, users might want to increase the volume if they’re speaking softly or if they want to project their voice more clearly.
Here’s how you can use a GainNode to increase the microphone volume:

creating gain node and applying a 150% increase to the original volume
Use the createGain() method to create a GainNode from the AudioContext interface. By using this GainNode, you can dynamically adjust the microphone volume in your live-streaming application. However, be careful with gain values above 5, as this may cause audio distortion. Once values are set, connect the gainNode to the source node object created in stage 1.
Example 2: Reducing Background Noise for Clearer Calls
In real-world scenarios like video calls or online classrooms, reducing background noise can drastically improve the clarity of the audio. You can use a highpass filter to remove low-frequency noises and a lowpass filter to block high-frequency sounds.
Here’s an example that applies both filters to focus on human voice frequencies (100Hz–9000Hz):
For this purpose, we need to create two filters – highpass and lowpass filter. Highpass will act as a barrier to block audio above a certain frequency and low pass filter will block audio below a certain frequency. Create a biquad filter object using an audio context interface object
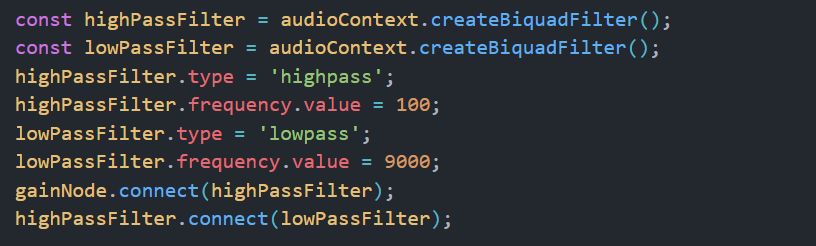
Create High pass and low pass filter using createBiquadFilter() method and apply type and frequency to each one of them to create a frequency range
This setup can significantly improve communication in conference apps like Zoom or Google Meet by eliminating background noise and focusing on voice clarity.
There are many more biquad filters that can be used for a variety of purposes. Mdn documentation provides detailed use cases for each one of them. Check out the MDN Web Audio Biquad Filter documentation
Example 3: Balancing Audio for Podcasting or Streaming
In podcasting or live-streaming scenarios, balancing audio is essential. A compressor is often used to ensure that audio levels remain consistent, reducing loud sounds and amplifying quiet ones.
Here’s how you can implement a compressor:
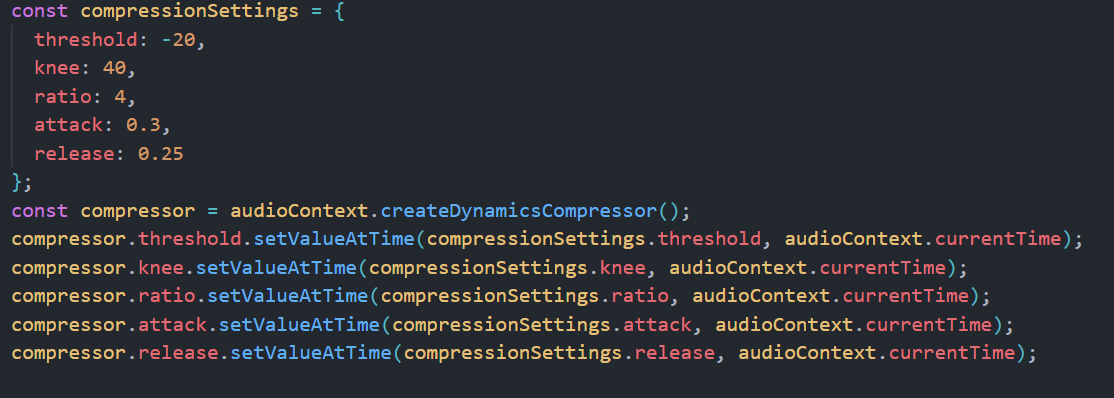
adding compressor node with parameters using setValueAtTime() method
Compressor parameters explained:
Threshold (-20db): This is the volume level where compression starts. Sounds louder than -20 dB will be turned down.
Knee(40db): This softens how quickly compression kicks in, making the volume reduction smoother and less abrupt.
Ratio (4:1): For every 4 dB above the threshold, only 1 dB gets through. This controls how much loud sounds are reduced.
Attack (0.3 seconds): This is how quickly the compressor starts working after the sound gets too loud. A short delay keeps the initial impact of the sound.
Release (0.25 seconds): This is how long the compressor takes to stop after the sound drops below the threshold, ensuring smooth transitions back to normal volume.
This type of compression is ideal for creating a balanced, professional-quality audio stream in real-time. Although feel free to play with these values to achieve an audio quality as per your requirements.
Additional Filters to Explore –
Convolver Node: Besides gain and frequency adjustments, you can use the Convolver Node to add reverb effects. This can simulate different acoustic environments, like making your voice sound as if you’re in a large hall or a small room.
Peaking Filter: Another option is the Peaking Filter, which allows you to boost or cut a specific frequency band. This can help emphasize certain vocal tones or reduce problem frequencies in your audio.
For more detailed information on these and other filters, you can explore the MDN Web Audio API Documentation.
Stage 3 Creating a destination node and replacing the original track –
Once you have applied your modifications, the next step is to create a destination node to output the modified stream. This is essential in WebRTC applications where you want to send the modified stream instead of the original one.
Once you have made modifications to the audio track using audio context, we now need to connect the source with the destination. For that, use createMediaStreamDestination() method to create a destination node and connect the last modified filtered node with the destination node.
Get the list of local senders(audio track being sent out) and use the replaceTrack() method to replace it with the modified stream track

connecting the last modified filter node with the destination node and replacing the original track with modified track
Potential Pitfalls and Cross-Browser Compatibility
- Audio Distortion: Over-boosting the gain can result in distortion. Always test your gain levels to avoid audio clipping, especially when working in high-volume environments.
- Latency Issues: Applying multiple audio effects such as filters, compressors, and gain adjustments may introduce latency, especially in real-time communication. Test your application on different networks to ensure minimal delay.
- Browser Compatibility: The Web Audio API has some inconsistencies across browsers. As noted earlier, Firefox requires createMediaStreamTrackSource(), while Chrome and Safari use createMediaStreamSource(). Make sure you handle these differences to avoid breaking your app on specific browsers.
- Tools like Modernizr can help detect the browser’s capabilities and ensure smooth cross-browser functionality.
Conclusion :
The Web Audio API offers a powerful toolkit for enhancing and manipulating audio in real time, making it ideal for video conferencing, live streaming, and gaming applications. By understanding how to create source nodes, apply effects like gain, filters, and compressors, and handle cross-browser compatibility, you can build immersive and professional-grade audio experiences.
Platforms like Discord, Twitch, and Google Meet heavily rely on the Web Audio API to provide users with clear and dynamic audio experiences. As web technologies continue to evolve, the Web Audio API will remain essential in crafting engaging, sound-rich web applications.
For more in-depth learning, check out the MDN Web Audio API documentation.
