Building Custom GraphQL Queries for Enhanced Development in Adobe Commerce
Introduction
Adobe Commerce has embraced GraphQL as a powerful and flexible query language for API development. Creating a custom GraphQL query can benefit your custom module development, enabling you to tailor the data retrieval process to your specific needs. In this blog, we’ll walk you through the steps to create a basic custom GraphQL query in Adobe Commerce.
Prerequisites
Before we start, ensure you have:
- A working Adobe Commerce installation
- Basic knowledge of Adobe Commerce module development
- Familiarity with GraphQL concepts
Step 1: Create a Custom Module
First, let’s create a custom module. For this example, we’ll call it GraphqlVendor_GraphQLPlugin.
- Directory Structure:
app/code/GraphqlVendor/GraphQLPlugin/
├── etc
│ ├── module.xml
│ └── schema.graphqls
├── registration.php
└── Model
    └── Resolver
        └── CustomData.php
- registration.php:
<?php
\Magento\Framework\Component\ComponentRegistrar::register(
  \Magento\Framework\Component\ComponentRegistrar::MODULE,
  'GraphqlVendor_GraphQLPlugin',__DIR__);
- etc/module.xml:
<?xml version="1.0"?>
  <configxmlns:xsi="http://www.w3.org/2001/XMLSchemainstance"
  xsi:noNamespaceSchemaLocation="urn:magento:framework:Module/etc/module.xsd">
    <module name="GraphqlVendor_GraphQLPlugin" setup_version="1.0.0"/>
  </config>
Step 2: Define the GraphQL Schema
Next, we need to define the GraphQL schema for our custom query.
etc/schema.graphqls:
type Query {
  customData: CustomDataOutput @resolver (class:"GraphqlVendor\\GraphQLPlugin\\Model\\Resolver\\CustomData")
}

type CustomDataOutput {
  message: String
  value: Int
}
Step 3: Create the Resolver
Resolvers are responsible for fetching the data corresponding to a GraphQL query. We’ll create a resolver that returns some custom data.
Model/Resolver/CustomData.php:
<?php
namespace GraphqlVendor\GraphQLPluginModel\Resolver;

use Magento\Framework\GraphQl\Query\ResolverInterface;
use Magento\Framework\GraphQl\Schema\Type\ResolveInfo;
use Magento\Framework\GraphQl\Config\Element\Field;

class CustomData implements ResolverInterface
{
 public function resolve(
  Field $field,
  $context,
  ResolveInfo $info,
  array $value = null,
  array $args = null
) {
 return [
  'message' => 'Hello from Custom GraphQL!',
  'value' => 42
 ];
 }
}
Step 4: Run the Module
Enable the module and clear the cache:
php bin/magento module:enable GraphqlVendor_GraphQLPlugin
php bin/magento setup:upgrade
php bin/magento cache:clean
Step 5: Test the Query
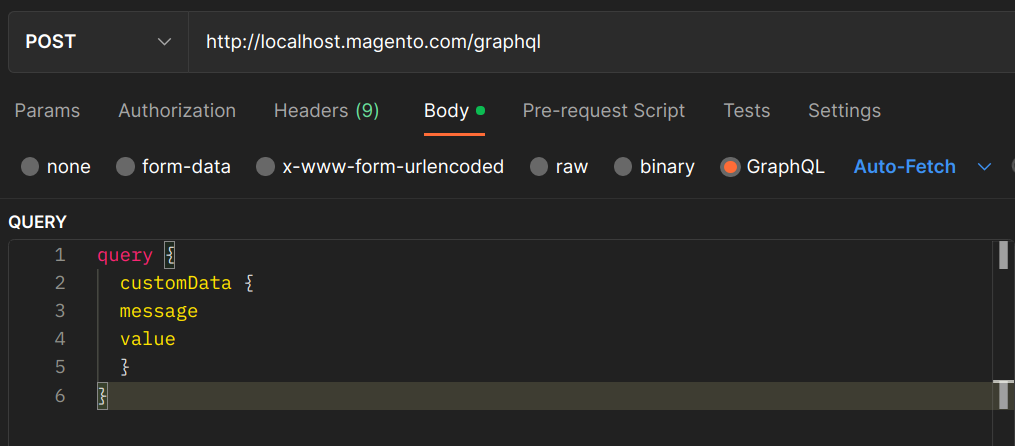
You can test your custom GraphQL query using Adobe Commerce GraphQL Playground or any GraphQL client with /graphql endpoint.
- Query:
If you are using POSTMAN then you can pass the query on body.

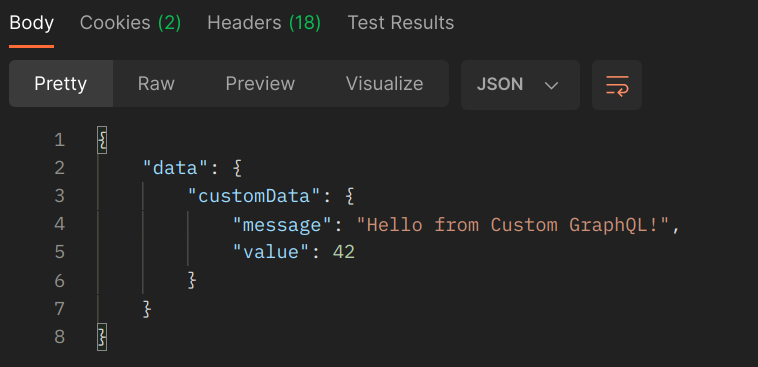
- Expected Response:

Conclusion
By following the steps outlined in this tutorial, you’ve built a custom GraphQL query in Adobe Commerce. With this setup, you can now create more advanced and tailored queries for your store. Remember, the world of GraphQL with Adobe Commerce is huge & this is just the beginning.

