Building a Text Recognition App Using CameraX and ML Kit in Android
With the increasing demand for intelligent apps that can process and understand visual data, text recognition is becoming a key feature in many applications. This blog will walk you through building a powerful text recognition app using Google’s MLKit, CameraX APIs, and Jetpack Compose. MLKit offers a robust Machine Learning solution for on-device text recognition, while CameraX provides an easy way to integrate camera functionality. Combining these with Jetpack Compose’s modern UI toolkit, we’ll create a seamless and responsive app. Before we start diving into the implementation, let’s first understand the Key components used for the implementation.
Why Use ML Kit for Text Recognition?
ML Kit is a machine learning framework provided by Google, designed to bring powerful machine learning capabilities to mobile apps without needing in-depth knowledge of ML algorithms. One of its key features is text recognition, which allows developers to extract text from images with high accuracy. It’s a cloud-independent solution, meaning it works even offline, making it highly suitable for mobile apps that need robust and quick text recognition.
Read More: Web Speech API
Using CameraX for Capturing Image
CameraX is an Android Jetpack library that simplifies the camera implementation for developers. It supports various use cases such as preview, image capture, and video recording. In our app, we are using CameraX for image capture, but it could also be adapted for continuous recognition.
Single Image Capture
CameraX can be used to capture a single image for processing. This is the approach used in our app, where the user manually captures an image by pressing a button. This method is better suited when you’re capturing static documents or screenshots for text recognition. Alternatively, if you don’t need Single Image Capture you can consider Continuous Recognition.
Continuous Text Recognition with CameraX
For continuous recognition, CameraX’s ImageAnalysis use case can be used. Instead of capturing a single image and processing it, ImageAnalysis continuously analyzes frames from the camera and sends them to ML Kit for text recognition. This approach is useful when you want to scan text continuously, like in barcode or document-scanning apps. We can use ImageAnalysis for Continuous Text Recognition.
Now Let’s Begin with the project. And understand how we can achieve text Recognition. We will start with the project setup.
Project Setup
Before we begin, ensure you’ve added the necessary dependencies in your build. gradle:
- Added dependency in library libs.versions.toml
#camera
cameraX = "1.3.4"

#MLkit
playServicesMlkitTextRecognitionCommon = "19.1.0"
textRecognition = "16.0.1"

- Implementing dependency in build.gradle(app)

//Dependency for camera
implementation(libs.camera2)
implementation(libs.cameraView)
implementation(libs.cameraLifecycle)

// Dependency For Google ML Kit
implementation(libs.play.services.mlkit.text.recognition.common)
implementation (libs.text.recognition)
Handling Camera Permissions
First, we will add permissions to the AndroidManifest file:
<!-- Permission for using camera -->
<uses-feature android:name="android.hardware.camera.any" />
<uses-permission android:name="android.permission.CAMERA" />
Next, We’d first need to request camera permission from the user. When we get permission then we will proceed further. Here’s how we handle permissions in the CameraPermissionHandler composable:
- Requested user to provide permission for camera.

@Composable
fun CameraPermissionHandler(onPermissionGranted: () -> Unit) {
 val cameraPermission = Manifest.permission.CAMERA
 val context = LocalContext.current

 val permissionLauncher = rememberLauncherForActivityResult(
   contract = ActivityResultContracts.RequestPermission(),
     onResult = { isGranted ->
       if (isGranted) {
         onPermissionGranted()
       } else {
         Toast.makeText(context, "Camera permission denied", Toast.LENGTH_SHORT).show()
       }
   }
 )

// We will be showing permission popup to the user.

 LaunchedEffect(key1 = true) {
   when {
      ContextCompat.checkSelfPermission(
       context,
       cameraPermission
      ) == PackageManager.PERMISSION_GRANTED -> {
        onPermissionGranted()
      }

      else -> {
         permissionLauncher.launch(cameraPermission)
      }
   }
  }
}


- Now when user grant permission then we will start camera

@Composable
fun CameraPermissionScreen() {
   var permissionGranted by remember { mutableStateOf(false) }

    // Handle the permission request
   CameraPermissionHandler(
      onPermissionGranted = {
         permissionGranted = true
      }
   )

   // Show the TextRecognitionScreen only if permission is granted
  if (permissionGranted) {
       TextRecognitionScreen()
  }
}
- CameraPermissionHandler: This composable is responsible for requesting camera permission from the user.
- State Handling: Compose’s remember and mutableStateOf are used to manage the state of whether the permission is granted or not.
Capturing the Image
Once the permission is granted, we can proceed to display the camera preview and capture images. This is handled by the CameraPreview composable:
@Composable
fun CameraPreview(modifier: Modifier, onCapture: (ImageProxy) -> Unit) {
  val context = LocalContext.current
  val lifecycleOwner = LocalLifecycleOwner.current
  val previewView = remember { PreviewView(context) }

  var imageCapture: ImageCapture? by remember { mutableStateOf(null) }


  Box(modifier = Modifier.padding(bottom = 50.dp)) {
    AndroidView({ previewView }, modifier = modifier) { view ->
      val cameraProviderFuture = ProcessCameraProvider.getInstance(context)
      cameraProviderFuture.addListener({
        val cameraProvider = cameraProviderFuture.get()
        val preview = androidx.camera.core.Preview.Builder().build()
        val cameraSelector = CameraSelector.DEFAULT_BACK_CAMERA

        imageCapture = ImageCapture.Builder().build()

        preview.setSurfaceProvider(view.surfaceProvider)

        try {
      // We are here binding the cameraSelector, preview and image capture with lifecycle. So that camera can behaves properly during activity lifecycle events
          cameraProvider.unbindAll()
          cameraProvider.bindToLifecycle(
            lifecycleOwner,
            cameraSelector,
            preview,
            imageCapture
         )
       } catch (e: Exception) {
         Log.e("CameraPreview", "Use case binding failed", e)
       }
      }, ContextCompat.getMainExecutor(context))
    }
// This Btn will be used to capture image.
    FloatingActionButton(
      onClick = {
        imageCapture?.takePicture(
          ContextCompat.getMainExecutor(context),
          object : ImageCapture.OnImageCapturedCallback() {
            override fun onCaptureSuccess(imageProxy: ImageProxy) {
              onCapture(imageProxy)
              imageProxy.close()
            }

            override fun onError(exception: ImageCaptureException) {
              Log.e("CameraCapture", "Capture failed: ${exception.message}")
            }
          }
        )
      },
    modifier = Modifier
       .padding(32.dp)
       .align(Alignment.BottomCenter)

    ) {
       Text("Capture Image")
     }
   }
}
We are creating a camera preview and Button to capture images. We are preparing camera functionality with the UI we want to show to the user.
- Camera Preview: Displays the camera feed using PreviewView from CameraX, embedded in a Compose UI via AndroidView.
- Capture Button: A floating action button captures an image when clicked.
- Image Capture: CameraX captures the image and passes it to the callback (onCapture), where further processing can occur (e.g., text recognition).
- Lifecycle Management: Camera use cases are bound to the lifecycle of the composable, ensuring the camera behaves properly during activity lifecycle events (e.g., backgrounding or closing the app).

Camera Preview With Button
Processing the Image for Text Recognition
Once an image is captured, it’s passed to the ML Kit text recognizer in the TextRecognitionViewModel. This is where the core functionality of the app lies.
class TextRecognitionViewModel : ViewModel() {
  private val _recognizedText = mutableStateOf<String?>(null)
  val recognizedText = _recognizedText

  fun recognizeText(bitmap: Bitmap) {
    val recognizer = TextRecognition.getClient(TextRecognizerOptions.DEFAULT_OPTIONS)
    val image = InputImage.fromBitmap(bitmap, 0)

    recognizer.process(image)
      .addOnSuccessListener { visionText ->
        _recognizedText.value = visionText.text
      }
      .addOnFailureListener { e ->
        _recognizedText.value = "Error: ${e.message}"
      }
   }
}
The recognize text function takes a Bitmap as input and uses the TextRecognition.getClient() method to recognize text from the image. The recognized text is then stored in the _recognizedText state.
Displaying the Recognized Text
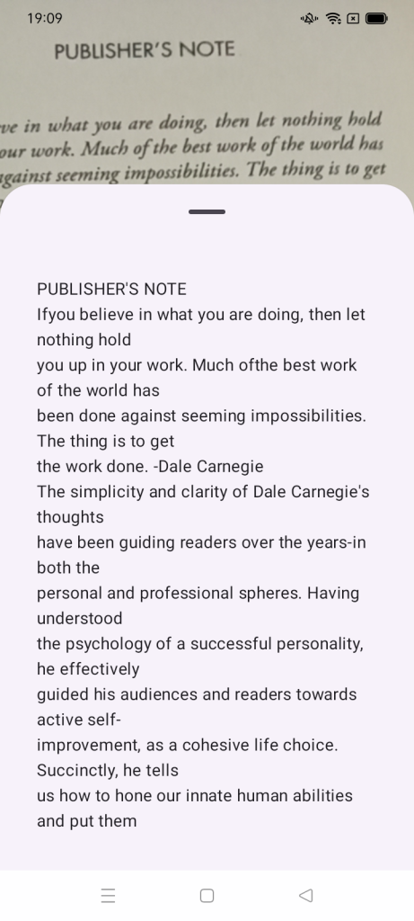
The recognized text is displayed on a bottom sheet. The user can copy the recognized text by clicking on it.
Now, Here we will Implement TextRecognitionScreen which will use the camera preview.
@OptIn(ExperimentalMaterial3Api::class)
@Composable
fun TextRecognitionScreen(viewModel: TextRecognitionViewModel = viewModel()) {
  val recognizedText by viewModel.recognizedText
  val context = LocalContext.current


    // Bottom Sheet State
  val sheetState = rememberBottomSheetScaffoldState()
  val coroutineScope = rememberCoroutineScope()
  val clipboard: ClipboardManager = LocalClipboardManager.current

// We will be using BottomSheetScaffold for getting the text and showing it on bottom sheet.
  BottomSheetScaffold(
    sheetContent = {
    recognizedText?.let {
      // Content of the bottom sheet
    LazyColumn(
      modifier = Modifier
        .fillMaxWidth()
        .padding(16.dp)
        .padding(bottom = 60.dp)
        .heightIn(max = 500.dp) // Limiting the height for the bottom sheet
      ) {
        item {
             // If the text extracted is not empty then we will be able to copy the text which is returned from viewModel.
           if (it.isNotEmpty()) {
              Text(
                text = it,
                modifier = Modifier
                  .fillMaxWidth()
                  .padding(16.dp)
                  .clickable {
                      clipboard.setText(AnnotatedString((it)))
                      Toast.makeText(context,"Text Copied!",Toast.LENGTH_SHORT).show()
                   }
            )
          } else {
            Text(
              text = "No text recognized yet",
              modifier = Modifier
                .fillMaxWidth()
                .padding(16.dp)
                .padding(bottom = 100.dp)
            )
        }

      }
    }
  } ?: Text(
        text = "No text recognized yet",
        modifier = Modifier
          .fillMaxWidth()
          .padding(16.dp)
          .padding(bottom = 100.dp)
       )
  },
  scaffoldState = sheetState,
  sheetPeekHeight = 0.dp,
  modifier = Modifier.fillMaxSize()
  ) {
    Box(
      modifier = Modifier.fillMaxSize()
    ) {
      CameraPreview(modifier = Modifier.fillMaxSize()) { imageProxy ->
      val bitmap = imageProxy.toBitmapImage()
      if (bitmap != null) {
        viewModel.recognizeText(bitmap)

        coroutineScope.launch {
          sheetState.bottomSheetState.expand()
        }
      }
     }
    }
  }
}
The camera preview is displayed using PreviewView, and a floating action button (FAB) is provided to capture the image. The captured image is passed as an ImageProxy object to the onCapture callback.
Converting ImageProxy to Bitmap
The ImageProxy object needs to be converted to a Bitmap before being passed to MLKit. Here’s how it’s done:
private fun ImageProxy.toBitmapImage(): Bitmap? {
  val buffer: ByteBuffer = planes[0].buffer
  val bytes = ByteArray(buffer.remaining())
  buffer[bytes]
  return BitmapFactory.decodeByteArray(bytes, 0, bytes.size, null)
}
Now at the end you just need to add the method in your project where you want to implement:
// This method is implemented in oncreate in this blog.
setContent {
  TextVisionTheme {
    Surface(
      modifier = Modifier.fillMaxSize(),
      color = MaterialTheme.colorScheme.background
    ) {
      CameraPermissionScreen()
    }
  }
}

Screen After Getting Text- Final Output.
Conclusion
This app demonstrates how to integrate CameraX for capturing images and ML Kit for recognizing text from images in real time. The use of Jetpack Compose makes UI development modern and efficient. With these tools, building a powerful text recognition app is straightforward and seamless. TO THE NEW’s Advanced Analytics offering enables your business to mitigate risk by letting you make decisions instantly to help your business grow.


