
Biometric Authentication in Android Using BiometricManager
Introduction
Asking for biometric verification, such as face or fingerprint recognition, is one way to safeguard private data or premium content inside your app. It’s crucial, particularly for apps related to finance and healthcare that demand authentication each time a user launches them. This guide covers how to enable biometric login flows in your application.
The AndroidX Biometric Library, a support library that replaces all earlier versions of the API, was just made available by the Android Framework and Security team. Thanks to the library, All the features announced for Android 10 (API level 29) are now available for Android 6 (API level 23). These are the main benefits of the support library:
- Because the library manages all API matching inside, developers no longer need to account for various API levels in their code. For example, the support library uses BiometricPrompt on API level 28 and above and FingerprintManager on API levels 23 to 27 flawlessly.
- Developers can now design their own authentication user interface (UI). The library offers a standardized and recognizable user interface (UI) that corresponds with a user’s form factor for biometric authentication, like face or fingerprint authentication.
- With just one API call, developers may determine whether a device supports biometric authentication.
The BiometricPrompt and BiometricManager classes enable you access to the vast array of conveniences offered by the library!
This post will walk you through the migration process if your app is still not using the AndroidX Biometric Library.
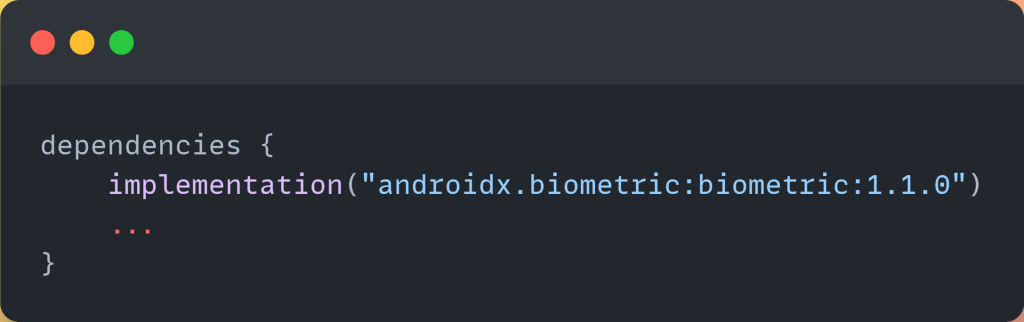
1. Declare the dependency:
You can check the latest release here.
…
2. List the authentication methods that your application supports:
Use the BiometricManager.Authenticators interface to declare the authentication types that your app supports. You can specify the following forms of authentication using the system:
- BIOMETRIC_STRONG – Use a Class 3 biometric for authentication, as specified on the definition page for Android compatibility.
- BIOMETRIC_WEAK – Use a Class 2 biometric for authentication, as specified on the definition page for Android compatibility.
- DEVICE_CREDENTIAL – Use the user’s PIN, pattern, or password as a screen lock credential for authentication.
I’ll leave it up to the readers to refer to the Android version’s documentation to understand the difference between the Strong and Weak authentication types.
3. Verify that the authentication is accessible
Once you’ve determined which authentication components your app supports, make sure these components are accessible. To accomplish this, call the canAuthenticate() function with the same bitwise combination of types that you declared using the setAllowedAuthenticators() method. Use the ACTION_BIOMETRIC_ENROLL intent action if required. Provide the list of authenticators that your app allows in the intent extra. This goal asks the user to set up login information for an authenticator that your application accepts.
Make sure you’re using androidx.biometric.*
The BIOMETRIC_STRONG will be used in the ensuing instances. Some devices may lack biometric authentication. There are four options here:

…
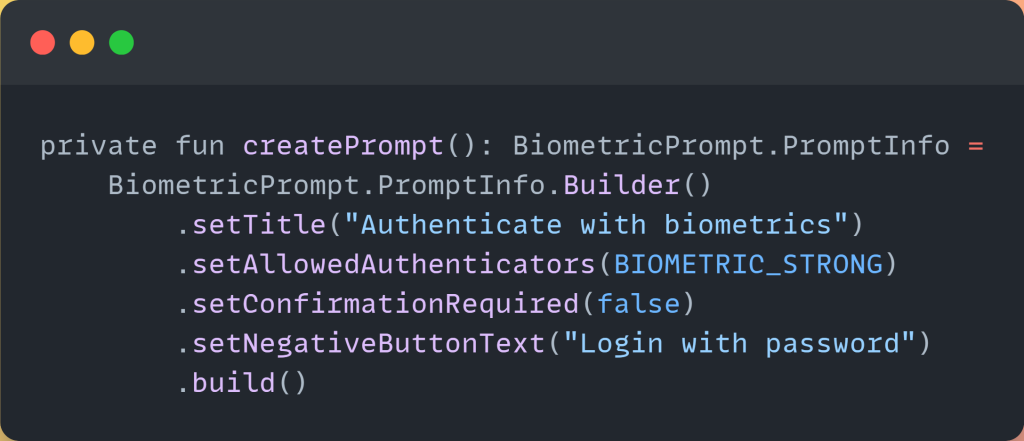
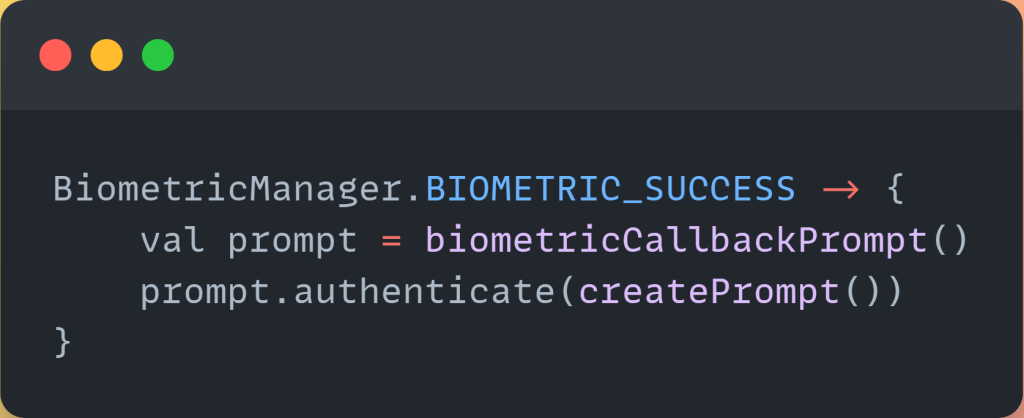
4. Create the Prompt
If BIOMETRIC_SUCCESS was received, The biometric authentication dialog box shall be used to prompt the user. Two things are required:
- The PromptInfo dialog box
…
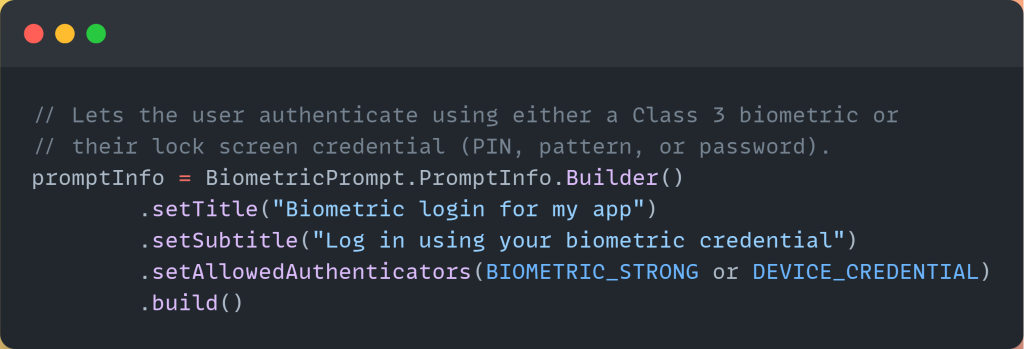
A PIN, pattern, or password must be created by the user before they may start utilizing an authenticator. The biometric enrollment procedure prompts the user to create one if they don’t already have one.
Pass an authentication type, or a bitwise mixture of types, into the setAllowedAuthenticators() method to specify the kinds of biometric authentication that your application supports. The code sample that follows demonstrates how to enable screen lock credentials or a Class 3 biometric for authentication.
…
Note: You can’t call setNegativeButtonText() and setAllowedAuthenticators(… or DEVICE_CREDENTIAL) at the same time on a BiometricPrompt.PromptInfo.Builder instance.
On Android 10 (API level 29) and below, the following combinations of authenticator types are not supported: BIOMETRIC_STRONG | DEVICE_CREDENTIAL and DEVICE_CREDENTIAL. The KeyguardManager.isDeviceSecure() function can be used to determine whether a password, PIN, or pattern is present on Android devices 10 and below.
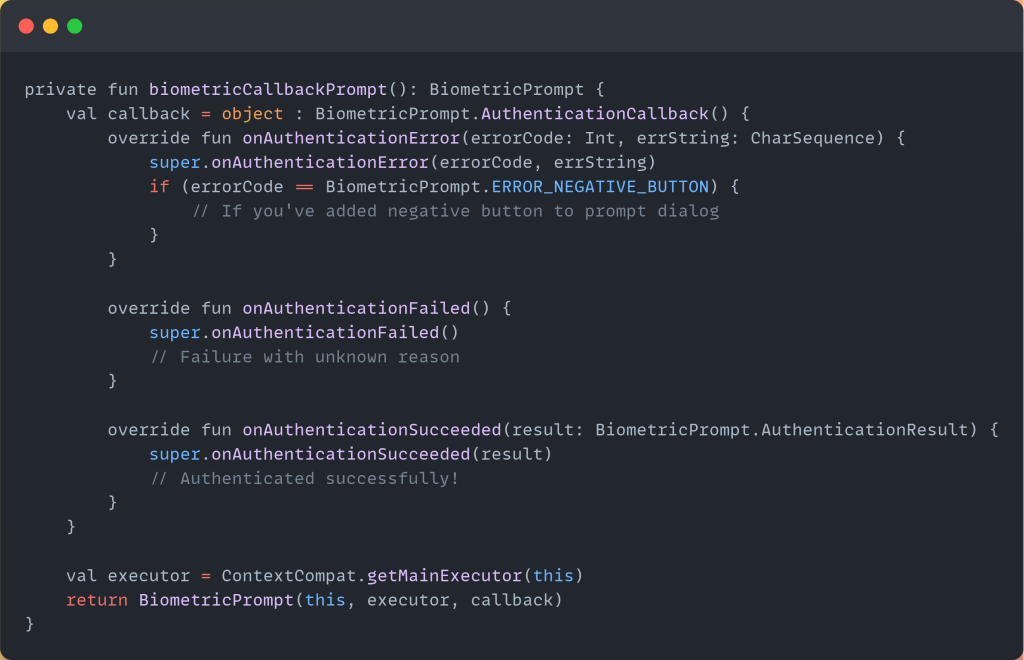
- Prompt with Callback
…
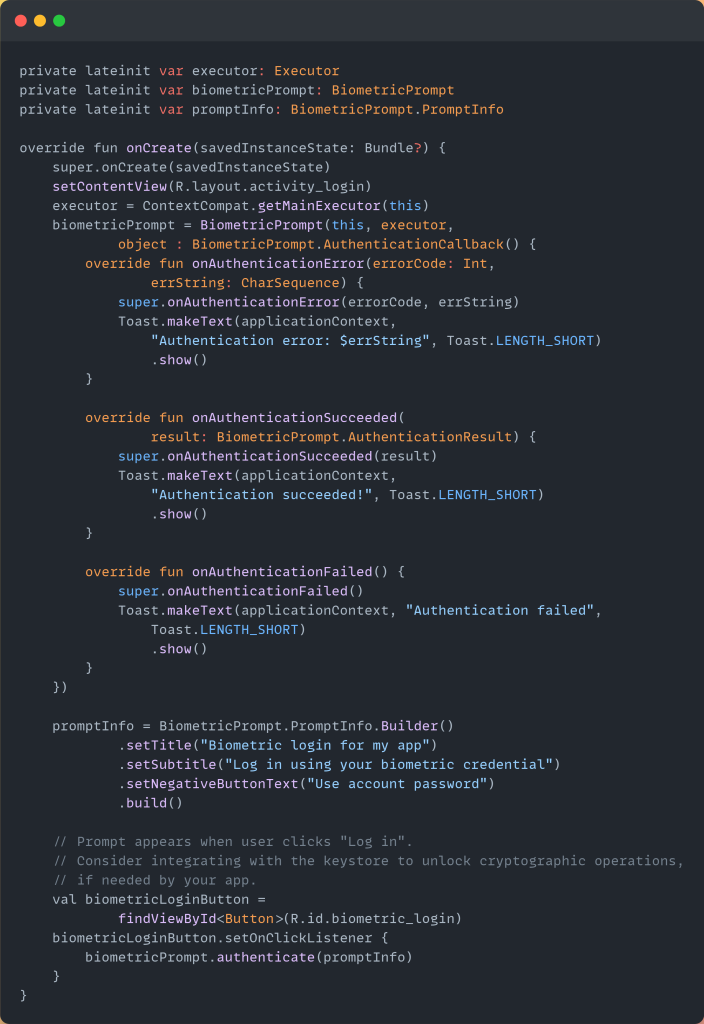
5. Show the prompt
Now that everything is in place, you can display the prompt:
…
The callback’s onAuthenticationSuceeded function will be triggered if the user successfully authenticates.
Present the login prompt.
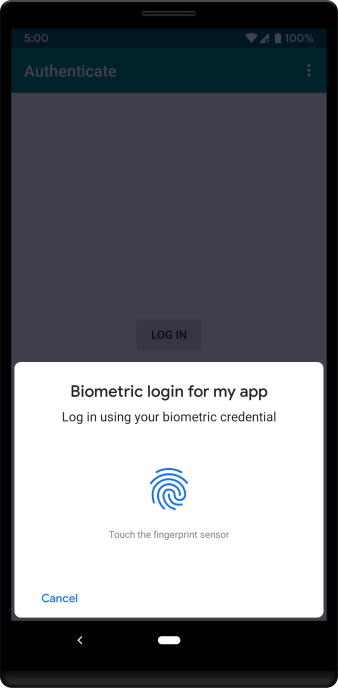
A system prompt asks for authentication via a biometric.
Follow these steps to integrate biometric authentication into your app using the Biometric library:
- Add the androidx.biometric library as a dependency in the build.gradle file for your app module.
- Use the following code snippet’s logic to display the biometric login dialog in the activity or fragment that hosts it:
…
Note: Utilizing BiometricAuthentication with CryptoObject is an additional option. Check out this guide if that’s what you require.
Summary:
- Within your onCreate() or onCreateView() lifecycle method, instantiate BiometricPrompt and pass it an instance of BiometricPrompt.Callback for Authentication().
- Build a PromptInfo object
- Call BiometricPrompt.authenticate().
This blog is based on – https://developer.android.com/identity/sign-in/biometric-auth?source=post_page—–8e804781a884——————————–#available
Thank You!
Keep Learning! Keep Coding!


