
AEM SAML Integration – Step by Step Guide
In the dynamic landscape of digital experience management, security and user convenience are paramount. Adobe Experience Manager (AEM) stands out as a leading solution, empowering organizations to create, manage, and deliver engaging digital experiences. However, with the increasing importance of security, integrating robust authentication mechanisms like Security Assertion Markup Language (SAML) with Single Sign-On (SSO) capabilities becomes essential. In this blog post, we’ll delve into the world of AEM SAML integration, unraveling the complexities of SSO and authentication to streamline user experiences while fortifying digital defenses.
We will be using the SP initiative for authentication in our case. Below is the diagram to help understand the authentication process:
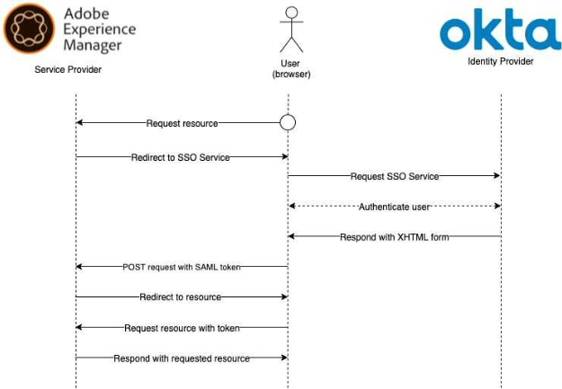
AEM SAML Authentication Flow
Configuration of Identity Provider (IdP)
- Register for Okta trial account
- Navigate to Admin dashboard
- Navigate to Application ➝ Create App Integration
- Choose SAML 2.0
- Add Application Configs:

Application Config
Profile Attributes
- Single Sign-on URL – An authentication request from AEM to Okta first goes to https://<domain>/<Service Provider Entity ID>/saml_login
- Service Provider Entity ID – Identifier for Service provider, same to be defined in SAML Authentication Handler)
- Signature Certificate – Locally generated certificate
- Single Logout URL – URL to redirect to while logging out
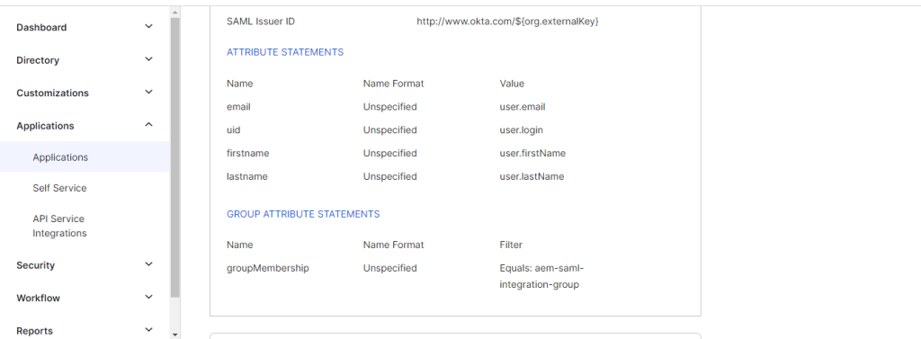
- Attribute Statements – add attributes to sync value with AEM like uid → user.login etc
- Group Attributes – attribute to add a user to the desired group in AEM
- Create the desired groups in Okta and assign the relevant users to it
- Add relevant users to your app
- Once the setup is complete, navigate to Sign On, and on the right rail click on View SAML Setup Instructions and save the following:
- Identity Provider Single Sign-On URL
- Identity Provider Single Logout URL
- Certificate
Configuration of Service Provider (SP)
- Map a demo hostname for localhost
- Generate local certificate and private key
- Generate a private key using OpenSSL
- Create a CSR
- Generate local certificate using private key and CSR
- Convert private key to DER format
- Add locally generated certificate and private key to authentication-service user’s Keystore
- Add Okta certificate to AEM Trust Store and get Okta alias
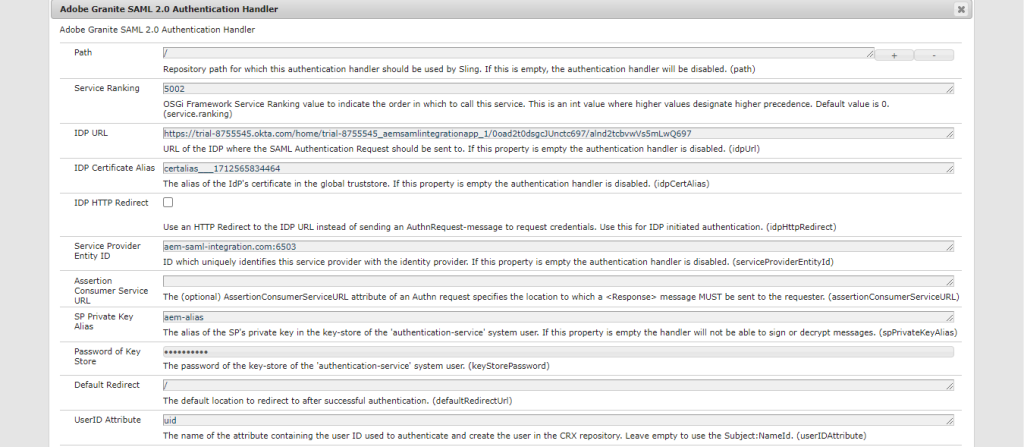
- Navigate to the AEM config manager open Adobe Granite SAML 2.0 Authentication Handler and update the following fields:
- Path – Root path that is to be authenticated
- IDP URL – URL where authentication request is sent to (embed URL from okta config)
- IDP Certificate alias – Alias received from Trust Store
- Service Provider Entity ID – Identification ID for the SP (Should match the SP Entity ID from okta config)
- SP private key alias – authentication-service keystore alias
- Key Store Password – authentication-service keystore alias
- User ID attribute – Unique identified for our user coming from Okta
- Use Encryption – Whether or not to encrypt SAML messages
- Auto-create CRX users – Whether we want new users to be created (ones coming from Okta)
- Add to groups – Whether we want to add the incoming users to groups mentioned in the group-membership field
- Group Membership – Attribute in the SAML response that mentions the user’s group name
- Default Group – Default group for users to be added to. It does not pick a value from the SAML response
- Synchronized Attributes – key-value pair which represents (attribute coming from SAML request)=(relative location to user’s profile node in CRX where we want to save the property). Ex. email=profile/email
- Handle Logout – Whether we want the ability for users to logout
- Logout URL – IDP URL to hit to remove logged-in user session
 SAML Config Image
SAML Config Image
- Open the Apache Sling Logging Logger Configuration and update the following fields (Custom SAML logging):
- Log Level: Debug
- Log File: logs/saml.log
- Logger: com.adobe.granite.auth.saml
- Open the Apache Sling Referrer Filter and update the following fields (Allow SP and IDP referrer endpoints):
- Allow empty – true
- Allow Hosts – Allow IDP(Okta) origin URL
- Allow Regexp Host – Allow SP domain
- Open the Apache Sling Authentication Service and update the following fields:
- Authentication Requirements – Add SP domain prefix-ed by a ‘+’

Authentication Service Config Image
- Authentication Requirements – Add SP domain prefix-ed by a ‘+’
Conclusion:
In conclusion, AEM SAML integration with SSO capabilities represents a significant advancement in enhancing both security and user experience within digital experience management. By leveraging SAML’s authentication mechanisms, organizations can fortify their AEM instances against potential threats while providing users with a frictionless authentication experience. With the above steps, you can integrate SAML authentication capability into your website and enhance user experience significantly.
If you still have questions, comment and join the discussion! Meanwhile, follow us on social media for more updates.
