
AWS Storage Gateway: A Step-by-Step Guide to Setting Up and Configuring an SMB File Share on EC2
AWS Storage Gateway is a service used to connect your on-site storage systems (for example, servers and data centers) to storage on AWS. This means you can store your data in the cloud but still access and manage it as if it were stored locally on your system.
It gives you the advantage of using the cloud’s large storage capacity with cost efficiency, You can quickly access the data you use most often, making it a great solution for businesses that need both the power of the cloud and the convenience of local access.
AWS Storage Gateway has 3 types of gateways:
- File Gateway: Lets you store files in Amazon S3 using common file-sharing protocols like NFS and SMB. It’s great for backups, archives, and moving large files to the cloud.
- Volume Gateway: Connects local servers to cloud-backed storage volumes.
- Cached Mode: Keeps frequently used data locally and stores all data in AWS.
- Stored Mode: Maintains a full data copy on-site with cloud backups.
- Tape Gateway: Helps replace physical tape backups by creating virtual tapes stored securely in Amazon S3 or S3 Glacier for long-term storage.
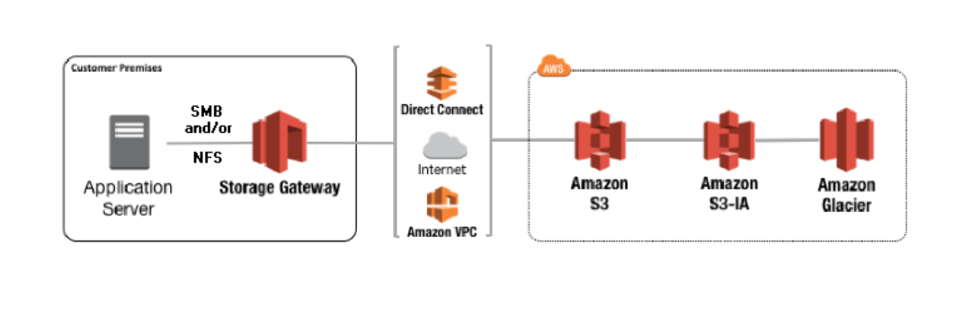
Storage Gateway Architecture
Use Case: Setting up AWS Storage Gateway on an AWS EC2 instance to create an SMB file share and access the S3 (storage) from a Windows client. This setup provides seamless access to cloud storage for legacy applications, reducing infrastructure costs and complexity. It’s ideal for scenarios where cloud storage is needed, but the local file system format must be maintained.
Below are the steps required to set up Storage Gateway to an AWS EC2 instance.
Step 1 – Set Up an Amazon S3 File Gateway
- In the AWS Management Console, choose your desired region and click “Create gateway”.

Create gateway
- Open the “Set up gateway” page. Under Gateway options, select Amazon S3 File Gateway.
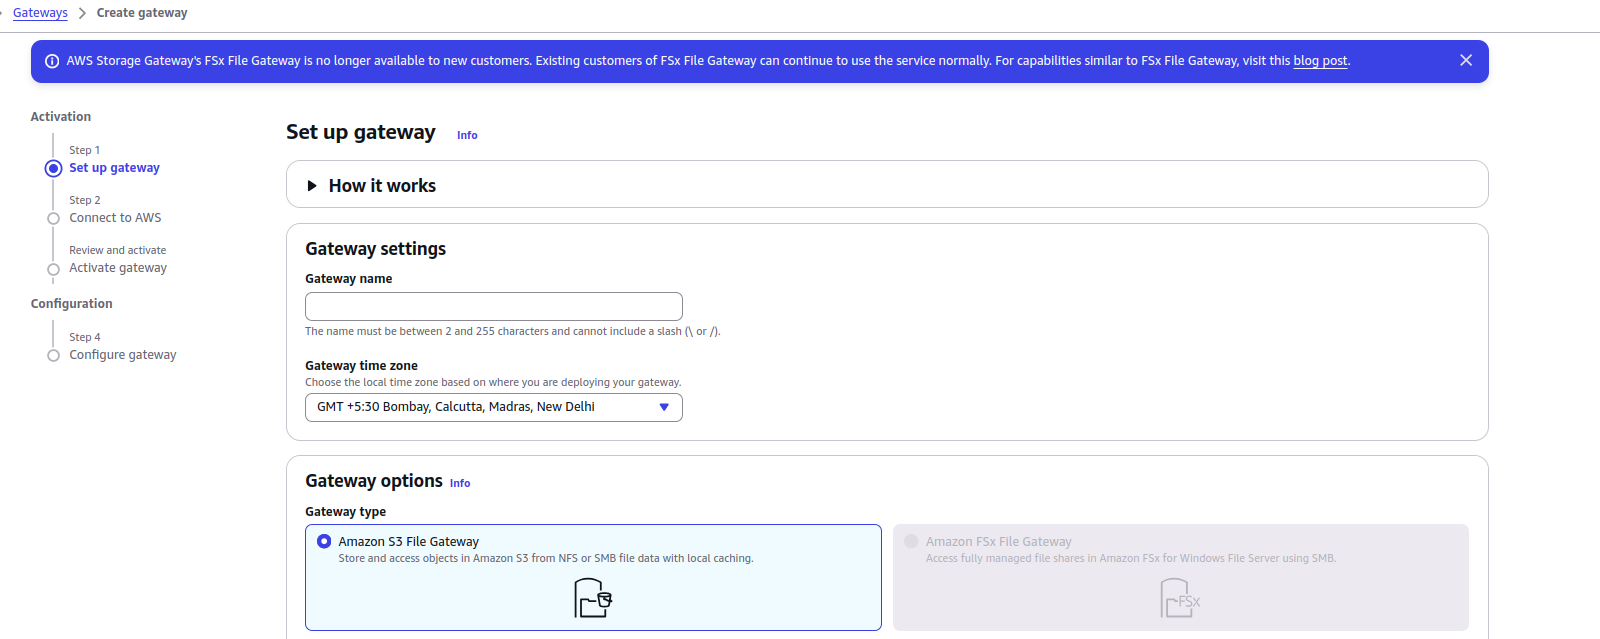
Set Up Gateway
- Under Platform Options, choose Amazon EC2 to Configure and launch an EC2 instance to host your gateway.
- Select the required VPC and subnet. Create the key pair to launch an EC2 machine.
- Click on “Launch Instance.”
- Select the checkbox to confirm that you have completed the ec2 creation steps for the host platform. (This does not apply to the Hardware appliance platform.)
- After the setup is complete, click Next to proceed with connecting your gateway to AWS.
Step 2 – Connect Your Amazon S3 File Gateway to AWS
- Complete the procedure described in “Set up an Amazon S3 File Gateway” and select Next to open the “Connect to AWS” page.
- For Gateway Connection options, choose how to identify your gateway to AWS. We have two options: IP Address and Activation Key.
- IP address: Provide the gateway’s IP address.
- Activation Key: A Unique code for activating the storage gateway.
- For Endpoint Options, you again have 2 options.
- VPC hosted: Communicates through a private connection in your VPC. Provide the VPC endpoint ID or DNS name.
- Publicly Accessible: When the gateway is set as “publicly accessible,” it means that the gateway can be accessed over the internet.
- After configuring the connection, click Next to activate the gateway.
Step 3 – Review Settings and Activate Your Amazon S3 File Gateway
- Review the gateway’s details on the “Review and activate” page.
- After reviewing the details, click Next to activate the gateway and perform the first-time configuration (disk allocation and logging).
Step 4 – Configure Your Amazon S3 File Gateway
- Storage Configuration
- Configure storage: Allocate at least one local disk with a minimum of 150 GiB to Cache.
- CloudWatch Logs Setup
- Create a new log group: Configure the new log group to monitor the logs of the Storage gateway.
- Under CloudWatch Alarms, Create recommended alarms: This automatically creates recommended CloudWatch alarms.
- Add required tags to your gateway.
Cloudwatch alarm
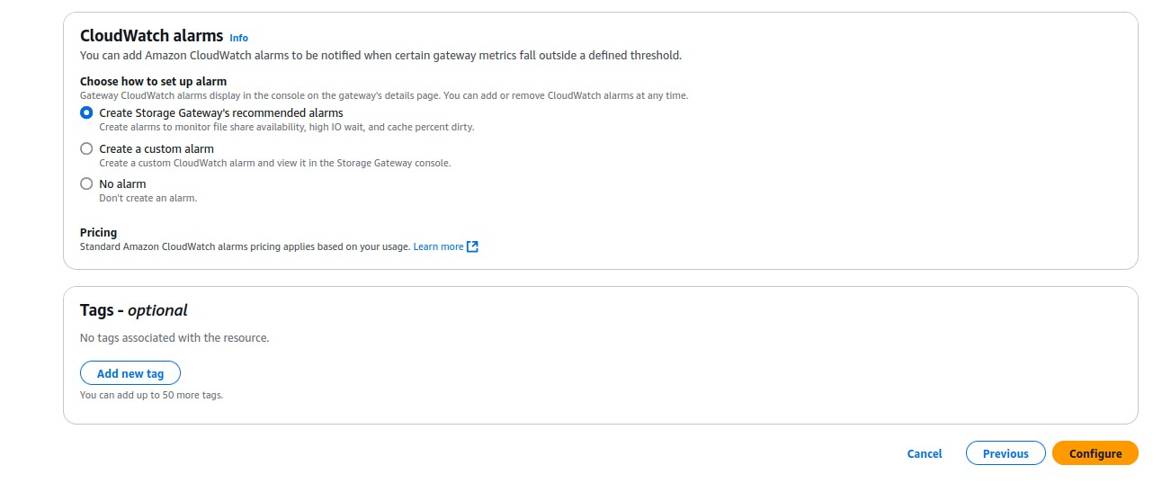
- Click Configure to finalize the gateway setup.
Below are the steps required to create the SMB file share.
Step 1 – Steps to Create a SMB File Share.
- Log in to AWS Console, go to AWS service Storage Gateway.
- Select File shares under your gateway from the left-hand panel, and click Create file share. Click Create file share.
- Select SMB as the file share type.
- Configure File Share Settings:
- Gateway: Select the existing gateway(which you have created above) for the file share.
- File Share Name: Provide a name to your file share.
- S3 Bucket: Give the S3 bucket name that will be linked to this file share. Select “A bucket in another account” if your bucket is in another account.
- Under User authentication, choose the authentication method. To use your corporate Microsoft Active Directory, choose Active Directory.
- Mention all the details below to join AD.
- Click on “Customize configuration”.
- Under Customize configuration, select the Gateway created above.
- Select the appropriate CloudWatch log group after enabling the Audit Log.
- For “Connection options, ” select Private link.
- Enter the VPC endpoint or the DNS name of the endpoint.
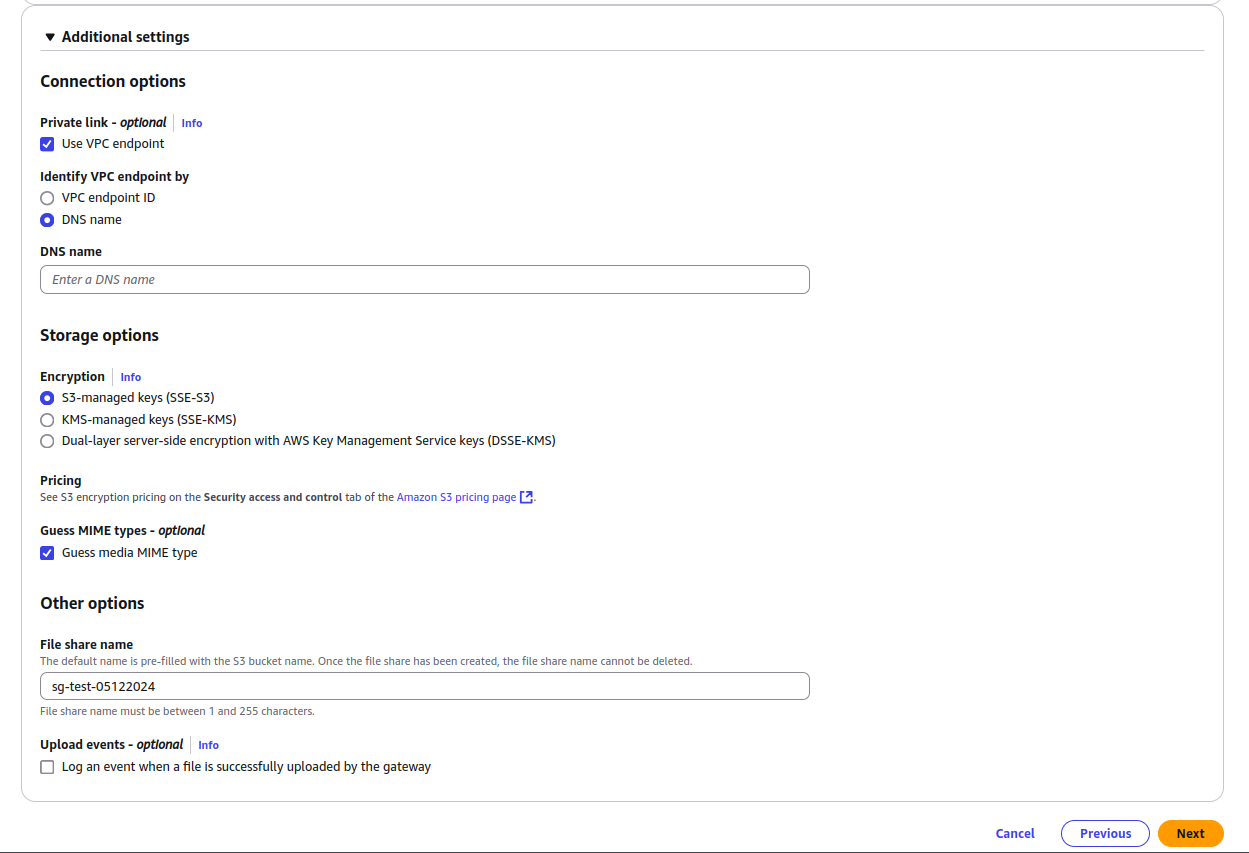
Connection options
- After completing the above configurations, proceed further by clicking “Next”.
- To manage user access, select “Specific AD-authenticated users or groups” to allow or deny access to particular users or groups. Then proceed with the following steps:
- Select Add allowed user or Add allowed group, then enter the Active Directory user or group you wish to grant file share access. Repeat this process to add additional users and groups as needed.
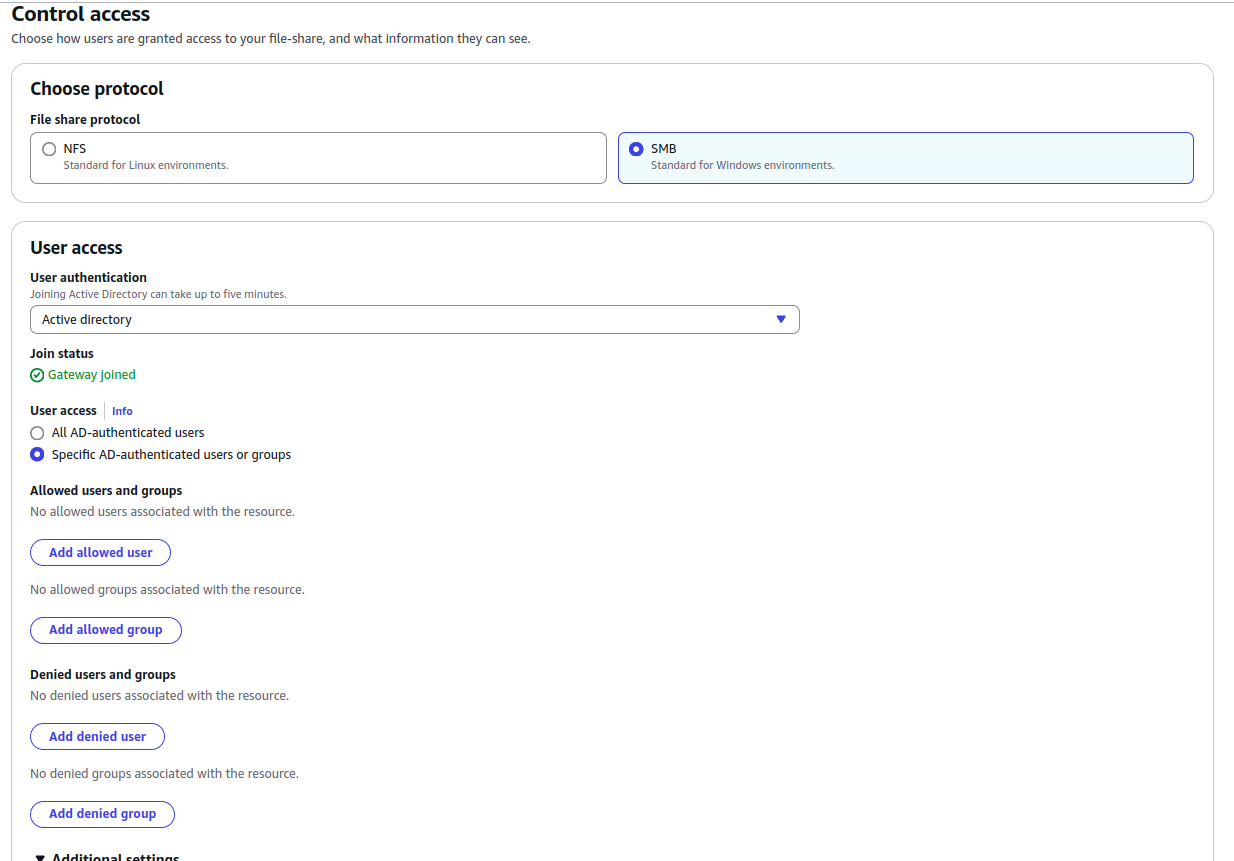
control access
- Select Add allowed user or Add allowed group, then enter the Active Directory user or group you wish to grant file share access. Repeat this process to add additional users and groups as needed.
- For Admin users, enter the comma-separated list of Active Directory users and groups. Groups must be prefixed with the @ character, for example, @test.
- Under Access type, select one of the following:
- Select Read/Write, to enable clients to read and write files on the file share.
- Select Read-only, to allow clients to read files but not write to the file share.
- To automate the cache refresh from S3, select “Set cache refresh interval” and set the TTL to 5 minutes.
- Select “Next”.
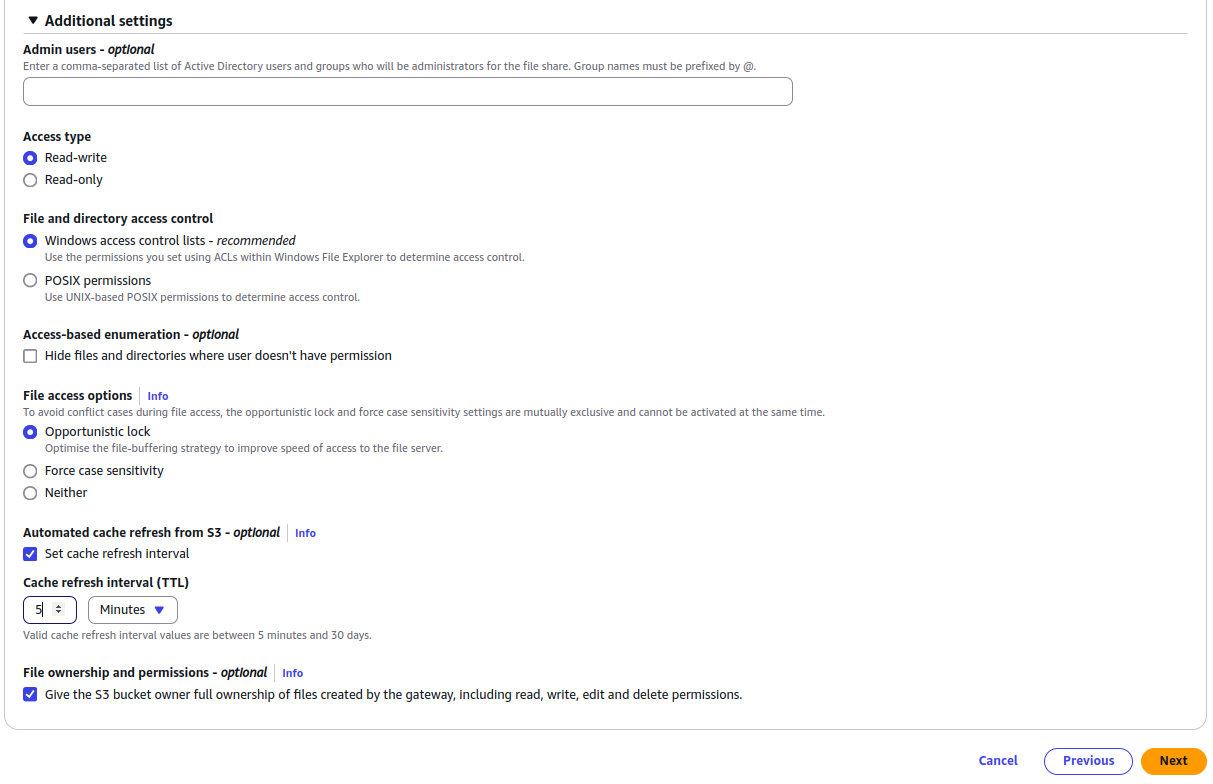
Additional Items
- Review the file share configuration and choose Edit to modify the settings for any section that you want to change.
- When finished, choose Create.


