
Understanding Flutter Isolates – A Guide to Concurrency and Parallelism in Flutter
Introduction
In modern mobile application development, performance is crucial. Flutter, Google’s UI toolkit for building natively compiled applications, provides a way to create highly performant apps. One of the core aspects of performance in any app is handling concurrency and parallelism. This is where Flutter Isolates come in.
In this article, we’ll take a deep dive into Flutter isolates, explaining what they are, why they are useful, and how you can use them in your Flutter applications.
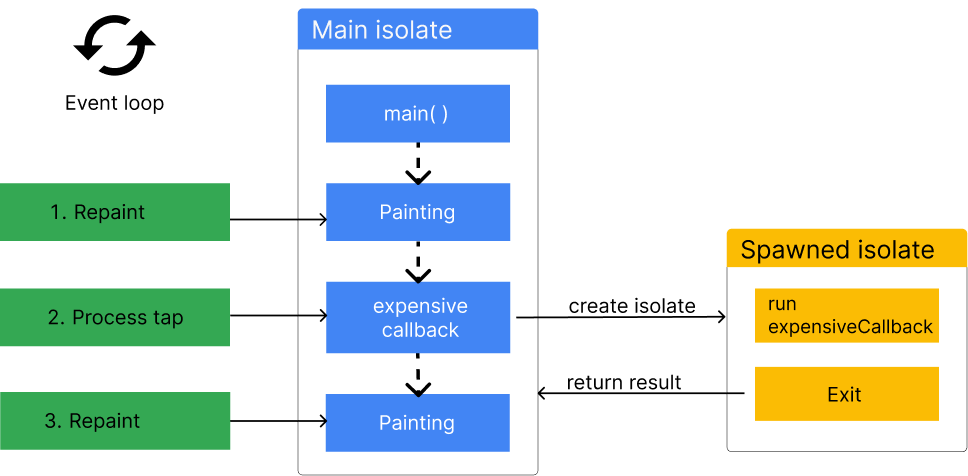
Isolates image courtesy by (https://docs.flutter.dev/perf/isolates)
What Are Flutter Isolates?
In Flutter, an Isolate is a separate thread of execution. It allows you to run code concurrently, meaning that you can perform tasks in parallel without blocking the main thread (UI thread). This is particularly useful for running CPU-intensive or long-running operations that could otherwise freeze or slow down the UI.
However, unlike traditional threads in other programming languages, isolates in Flutter do not share memory with each other. Each isolate has its own memory heap, and they communicate with each other through message passing.
Key Features of Flutter Isolates:
- No shared memory: Each isolate has its own independent memory space, which helps to avoid race conditions and issues that often arise in multithreading environments.
- Message passing: Communication between isolates occurs by sending messages (data), which ensures that the isolates remain decoupled and don’t directly interfere with each other’s memory.
- Concurrency, not parallelism: While isolates run concurrently, they don’t necessarily run in parallel unless you have multiple processors or cores available on the device. On single-core devices, isolates may appear to run sequentially but still provide concurrency.
Why Use Flutter Isolates?
Flutter uses a single-threaded event loop to run the UI code. While this is efficient in many cases, certain tasks—such as complex computations, data processing, or long-running I/O operations—can block the UI thread and cause the app to become unresponsive. Flutter isolates can help solve this issue.
When to Use Isolates:
- Heavy computations: If you’re doing resource-intensive calculations (e.g., image processing, encryption, etc.), using isolates ensures that these operations don’t interfere with the UI thread.
- Network or database queries: Performing lengthy I/O operations, such as querying a remote API or reading from a large database, in an isolate prevents the UI from freezing.
- Multitasking: When your app requires simultaneous tasks (like handling multiple background tasks), isolates allow you to handle them concurrently without blocking the UI.
How to Use Flutter Isolates
Now that we know what isolates are and why they’re useful, let’s look at how to implement them in Flutter.
Step 1: Import Required Packages
First, you’ll need to import the dart:async and dart:isolate libraries. These libraries provide the necessary classes and functions for creating and managing isolates.
import 'dart:isolate';
import 'dart:async';
Step 2: Create the Isolate Function
The function you want to run in an isolate should not directly reference any external variables from the main thread. Instead, it should receive all its data via message passing.
void isolateFunction(SendPort sendPort) {
  // Perform heavy computation here
  int result = 0;
  for (int i = 0; i < 10000000; i++) {
    result += i;
  }

  // Send the result back to the main isolate
  sendPort.send(result);
}
Step 3: Spawning an Isolate
Next, spawn a new isolate and pass data to it. You’ll need to use a ReceivePort to communicate back with the main isolate.
void startIsolate() async {
  // Create a ReceivePort to receive messages from the isolate
  final receivePort = ReceivePort();

  // Spawn the isolate and pass the SendPort of the ReceivePort
  await Isolate.spawn(isolateFunction, receivePort.sendPort);

  // Listen for messages from the isolate
  receivePort.listen((message) {
  print('Result from isolate: $message');
  });
}
Step 4: Run the Isolate
Finally, you can call startIsolate() in your Flutter app to run the isolate.
void main() {
startIsolate();
}
Example Use Case: Performing Heavy Computation
Here’s a full example of how you might use isolates to perform a time-consuming computation in the background:
import 'dart:async';
import 'dart:isolate';

void isolateFunction(SendPort sendPort) {
  // Simulate heavy computation
  int result = 0;
  for (int i = 0; i < 100000000; i++) {
    result += i;
  }

  // Send result back to main isolate
  sendPort.send(result);
  }

void startIsolate() async {
  final receivePort = ReceivePort();

// Spawn a new isolate
await Isolate.spawn(isolateFunction, receivePort.sendPort);

// Listen to the result from the isolate
receivePort.listen((message) {
  print('Computation result from isolate: $message');
 });
}

void main() {
  startIsolate();
}
Step 5: Handling Isolate Errors
Just like any other asynchronous operation, isolates can encounter errors. You can handle these errors by listening to the ReceivePort for error messages and performing error handling within the isolate.
void isolateFunction(SendPort sendPort) {
  try {
  // Simulate an error
  throw Exception('Something went wrong!');
  } catch (e) {
    sendPort.send('Error: $e');
  }
}
Best Practices for Working with Isolates
- Avoid Shared Data: Isolates don’t share memory, so you must pass data between isolates using message passing. Avoid trying to share state between isolates directly.
- Use Isolates for CPU-bound Tasks: Use isolates for operations that involve heavy CPU computation (e.g., data processing, encryption). For tasks that involve heavy I/O (e.g., network requests), consider using async operations and Futures instead.
- Minimize Communication Between Isolates: Since message passing can incur some overhead, try to minimize the frequency of communication between isolates. Grouping related tasks together can help reduce the need for constant message exchanges.
- Close Ports: Always close SendPort and ReceivePort when you’re done using them to avoid memory leaks and ensure that resources are freed correctly.
Limitations of Isolates
While isolates are powerful, there are some limitations you should be aware of:
- No Shared State: Isolates cannot share memory, which makes it more challenging to share mutable data between them. You need to use message passing to send data back and forth.
- Performance Overhead: Creating and managing isolates incurs some performance overhead, especially when communicating between isolates. For tasks that don’t require true parallelism, consider using other concurrency techniques like Future or Stream.
- No Direct UI Access: Since isolates run on separate threads, they cannot directly modify the UI. All UI updates must occur on the main isolate (UI thread) by sending messages back to the main thread.
Conclusion
Flutter isolates are a powerful tool for improving the performance and responsiveness of your Flutter applications. By running CPU-intensive tasks or long-running operations in separate isolates, you can keep the main UI thread free to handle user interactions without any lag or stuttering.
By understanding how isolates work and when to use them, you can take your Flutter apps to the next level in terms of performance and responsiveness. If you need to run parallel tasks or handle background processes, isolates are the perfect solution.
So, go ahead, start exploring isolates in Flutter, and create smoother, more responsive apps that provide a better experience for your users!


