Part 2 | Understanding Annotations: Basics and Custom Solutions in Java/Kotlin
In Part 1, we discussed the fundamentals of annotations in Java and Kotlin, including an overview of what annotations are, the various types of built-in annotations like @Override, @Deprecated, etc., and how they simplify common programming tasks. We also explored the basic structure of annotations, how to define them, and the importance of using them effectively in your code.
If you haven’t checked out Part 1 yet, please do so first to get a strong foundation on annotations before moving into more advanced concepts like Retention Policies, Annotation Targets & Custom Annotation Solutions discussed here in Part 2.
Annotation Retention Policies
As we have covered the basics and types of annotations, let’s now delve deeper into Retention Policies, which play a critical role in annotations in both Java and Kotlin. Retention policies determine how long an annotation’s metadata is retained and where it is accessible during the application’s lifecycle. This choice is essential because it impacts how annotations are used and processed and can ensure that they serve their intended purpose without introducing unnecessary overhead in your application.
There are three types of retention policies: SOURCE, CLASS, and RUNTIME.
- RetentionPolicy.SOURCE or AnnotationRetention.SOURCE (Kotlin)
Retention Scope: Annotations are discarded after the code is compiled and are not included in the compiled .class files.
Purpose: Used primarily for compile-time checks and code generation. These annotations are invisible at runtime.
Example Use Case: @Override ensures a method overrides a superclass method, but it’s not needed beyond compilation.
@Retention(RetentionPolicy.SOURCE)
public @interface ExampleSourceAnnotation { }
- RetentionPolicy.CLASS or In Kotlin AnnotationRetention.BINARY
Retention Scope: Annotations are included in the .class files but are not retained in memory at runtime.
Purpose: Useful for bytecode-level processing or tools that manipulate .class files, such as obfuscators or certain static analysis tools.
Default Retention in Java: If no retention policy is specified, annotations default to CLASS.
Example Use Case: Annotations used during compilation that don’t need runtime processing.
@Retention(RetentionPolicy.CLASS)

public @interface ExampleClassAnnotation { }
- RetentionPolicy.RUNTIME AnnotationRetention.RUNTIME (Kotlin)
Retention Scope: Annotations are included in the .class files and are retained in memory at runtime, making them accessible via reflection.
Purpose: These annotations are essential for frameworks and libraries that rely on runtime metadata, such as dependency injection or ORM frameworks.
Example Use Case: Annotations like @Entity in Hibernate or @GET in Retrofit, which require runtime processing.
@Retention(RetentionPolicy.RUNTIME)
public @interface ExampleRuntimeAnnotation { }
Why Does Retention Policy Matter?
Choosing the right retention policy is crucial for the efficient use of annotations in your project. Here’s a summary to help you decide which retention policy to use based on your needs:
- SOURCE: Use this when the annotation is only for compile-time checks or code generation. The annotation will not impact runtime behavior.
- CLASS: Choose this when the annotation needs to be included in the bytecode for tools that manipulate .class files but is not required at runtime.
- RUNTIME: This should be used when the annotation affects runtime behavior or needs to be accessible via reflection. It’s ideal for frameworks that perform dependency injection, serialization, and other runtime tasks.
By understanding and applying the correct retention policy, you can make sure your annotations are both effective and efficient, ensuring they fulfill their intended roles without causing unnecessary overhead.
Annotation Targets
Now that we’ve covered how long annotations stick around with retention policies, let’s talk about where we can apply them. This is where annotation targets come into play. Annotation targets define the specific elements in your code where an annotation can be used. Think of it like putting a sticker — you can place it on a book, a page, or maybe just on a specific word. Annotation targets specify exactly where the annotation is allowed to go.
In both Java and Kotlin, you can control the placement of annotations by specifying the appropriate target. These targets are defined using the @Target meta-annotation.
Here are some common targets you’ll encounter:

Annotation Target
When an annotation is created without specifying targets using the @Target meta-annotation, it can be applied to almost any element in the code. This includes classes, methods, fields, constructors, parameters, and more.
General Syntax
In Java, targets are defined using the @Target meta-annotation and constants from ElementType
import java.lang.annotation.ElementType;
import java.lang.annotation.Target;

@Target({ElementType.TYPE, ElementType.METHOD})
public @interface ExampleAnnotation { }
In Kotlin, targets are defined using the @Target meta-annotation with constants from Annotation Target.
@Target(AnnotationTarget.CLASS, AnnotationTarget.FUNCTION)
annotation class ExampleAnnotation
If you apply an annotation to an element that is not allowed by the @Target specification: The compiler will raise an error like: annotation type not applicable to this kind of declaration
Why Define Targets Explicitly?
Clarity: Explicit targets make the intended use of an annotation clear to developers, reducing the risk of misuse.
Maintainability: Restricting where an annotation can be applied helps avoid confusion when the project grows or involves multiple contributors.
Best Practices
Define Targets Explicitly: Always specify @Target to prevent accidental misuse.
Use Meta-Annotations: Combine @Target with @Retention to control the lifecycle and scope of your annotation.
Creating Custom Annotations
Creating custom annotations in Java and Kotlin allows you to define the metadata that can be used to influence the behavior of your code. Custom annotations are useful for implementing cross-cutting concerns like logging, validation, or even custom behaviors in frameworks. A custom annotation is a user-defined annotation that can be applied to classes, methods, fields, or other elements to provide metadata that can be used by the compiler or runtime. Just like built-in annotations (@Override, @Deprecated), you can create your own annotations with specific properties, retention policies, and targets.
Key Steps for Creating Custom Annotations:
- Define the Annotation: Use @interface in Java or annotation class in Kotlin. Specify metadata such as retention policy and targets using @Retention and @Target.
- Add Elements: Define elements (similar to methods) within the annotation interface to store values. Provide default values for elements, if needed.
- Process the Annotation: Write annotation processors to handle your custom annotation, either at compile time (using tools like APT) or runtime (via reflection).
- Apply the Annotation: Annotate classes, methods, or fields with your custom annotation.
Example 1: Custom Annotation for View Binding @BindView
Let’s take an example where we create a custom annotation similar to ButterKnife’s @BindView, which simplifies view binding.
Purpose:
- Simplifies view binding: This annotation will reduce the need to write boilerplate findViewById calls.
- Usage Scenario: Reduce Boilerplate Code: Instead of manually calling findViewById() every time, use @BindView to annotate your fields. The utility method will automatically handle the binding.
- Retention Policy: @Retention(RetentionPolicy.RUNTIME) Keeps the annotation at runtime so it can be accessed via reflection.
- Target: @Target(ElementType.FIELD) will be applied to fields where views are being bound
Step 1: Define the @BindView Annotation in Java
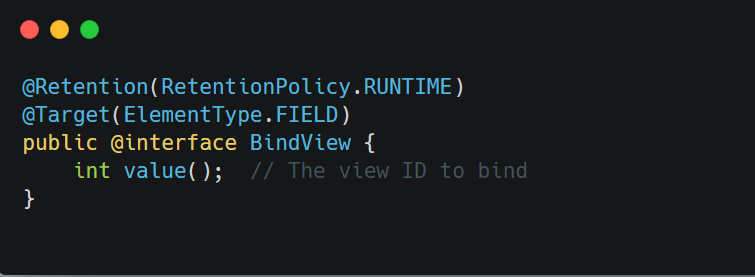
Define the @BindView Annotation
Step 2: Implement the Bind Method by Processing It
Here’s a method that processes the @BindView annotation and binds the views
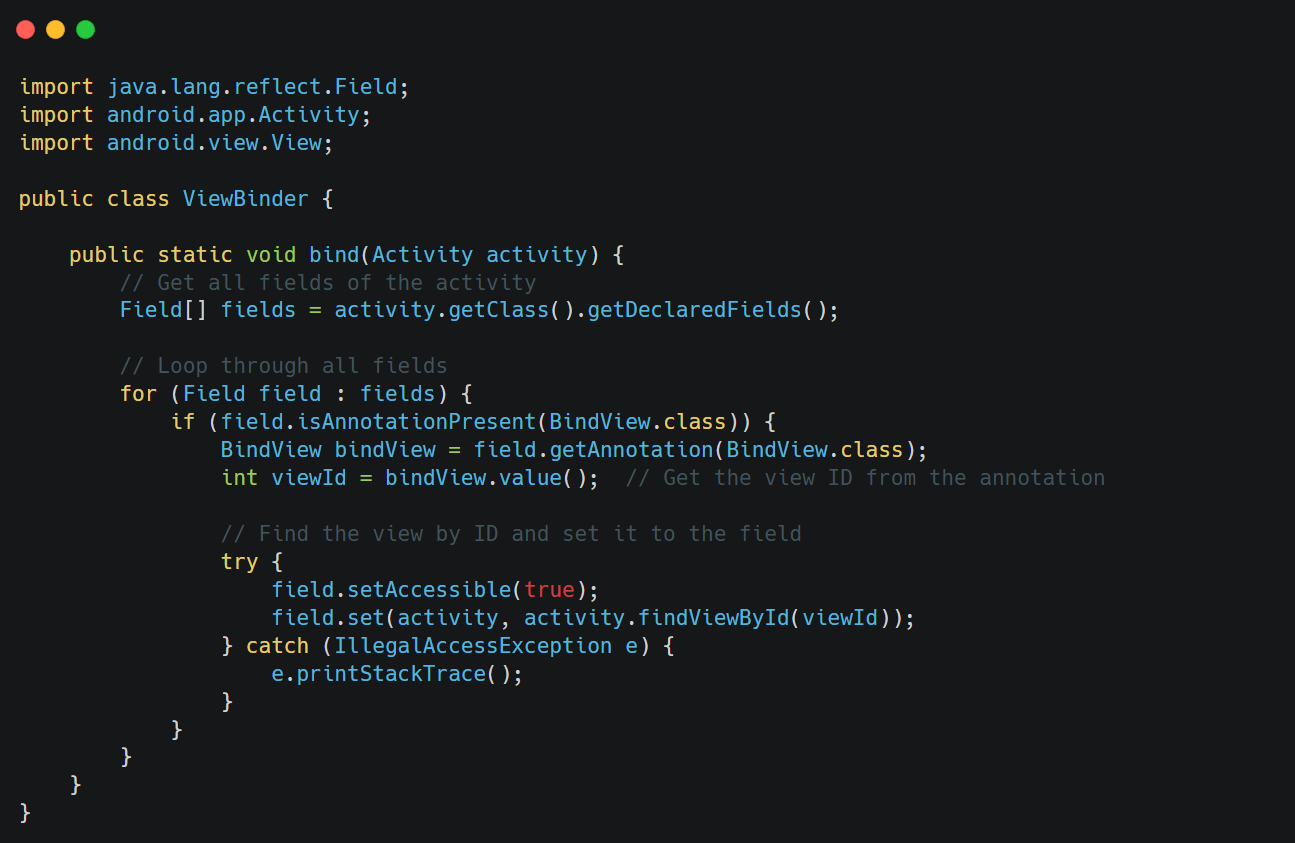
Implement the Bind Method
Step 3: In your Activity, you can now use the custom @BindView annotation to bind views:
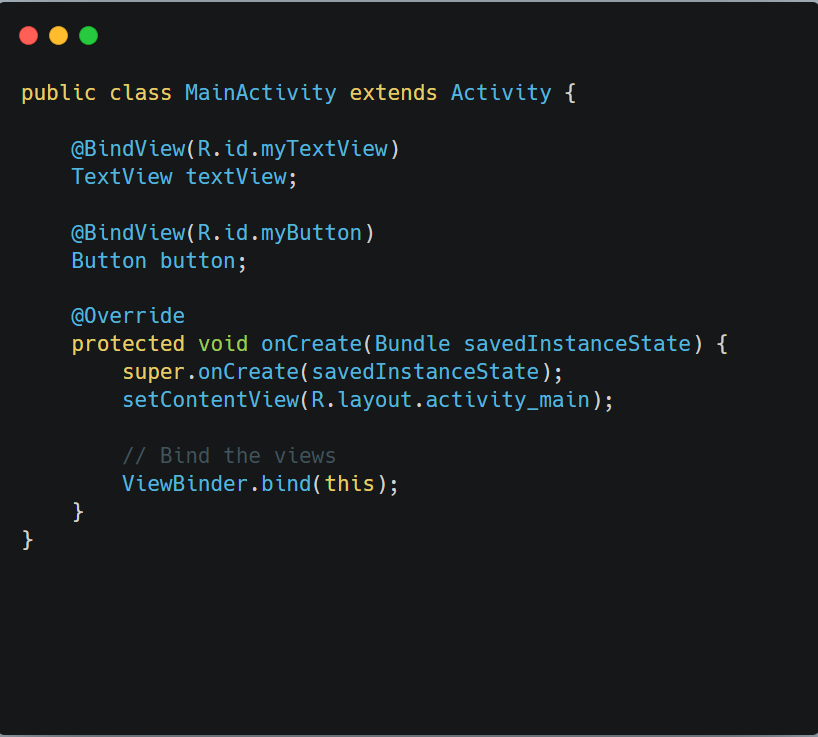
Apply the Annotation
Advantages of Using Custom Annotations
- Reduces Boilerplate Code: Writing findViewById() for every view can clutter your code. Annotations like @BindView reduce the number of lines significantly.
- Cleaner Code: Using annotations keeps the code clean by making the UI binding logic implicit. This improves readability and maintainability.
- Reusable Utility: Once you’ve written a utility method (like bind()), it can be reused across multiple activities or fragments without additional effort.
Let’s take another example to demonstrate integrating custom annotations into frameworks.
Example 2: Creating a Simple Dependency Injection Framework
Purpose: We’ll create a basic custom annotation, @Inject to demonstrate how frameworks like Dagger handle dependency injection.
1. Defining the @Inject Annotation
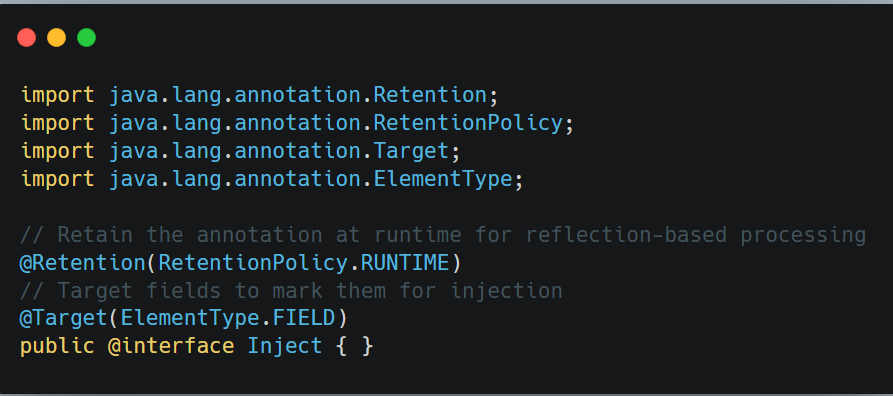
Defining the @Inject Annotation
2. Setting Up a Simple Service Let’s define a service that we want to inject into a client class
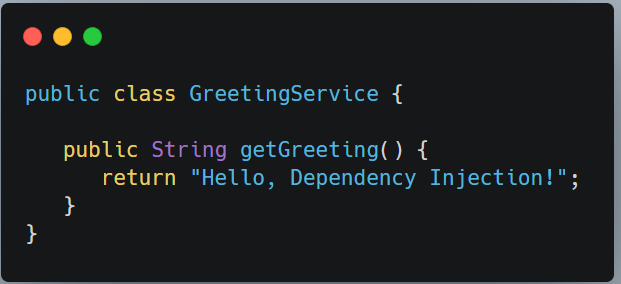
Setting Up a Simple Service
3. Using @Inject in an Activity Here’s how you can use the @Inject annotation to mark a field in an Activity
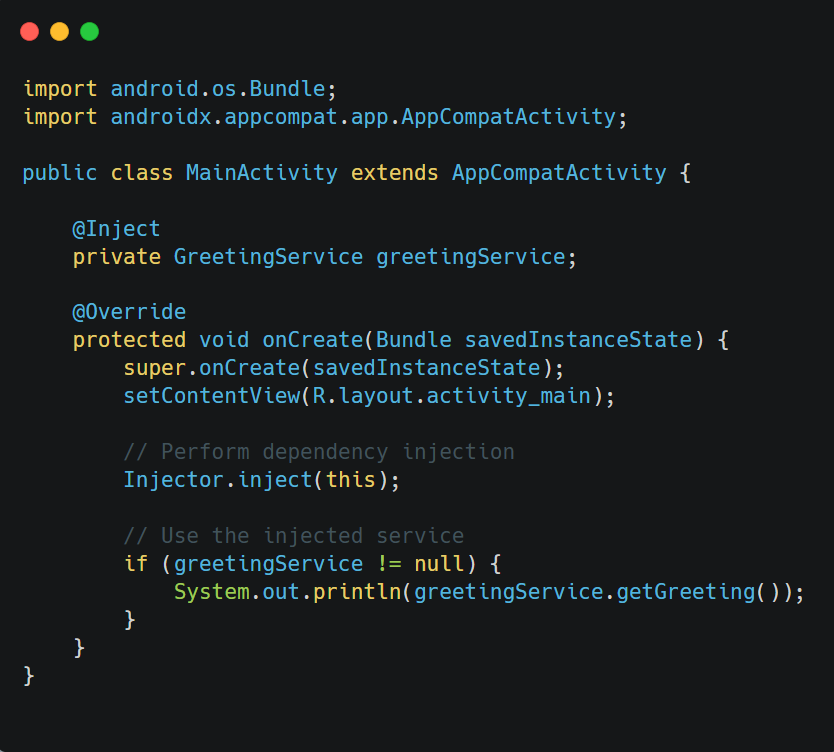
Using @Inject in an Activity
4. Writing the Dependency Injection Processor The Injector class scans fields of the given object (in this case, the MainActivity) and injects dependencies for fields annotated with @Inject
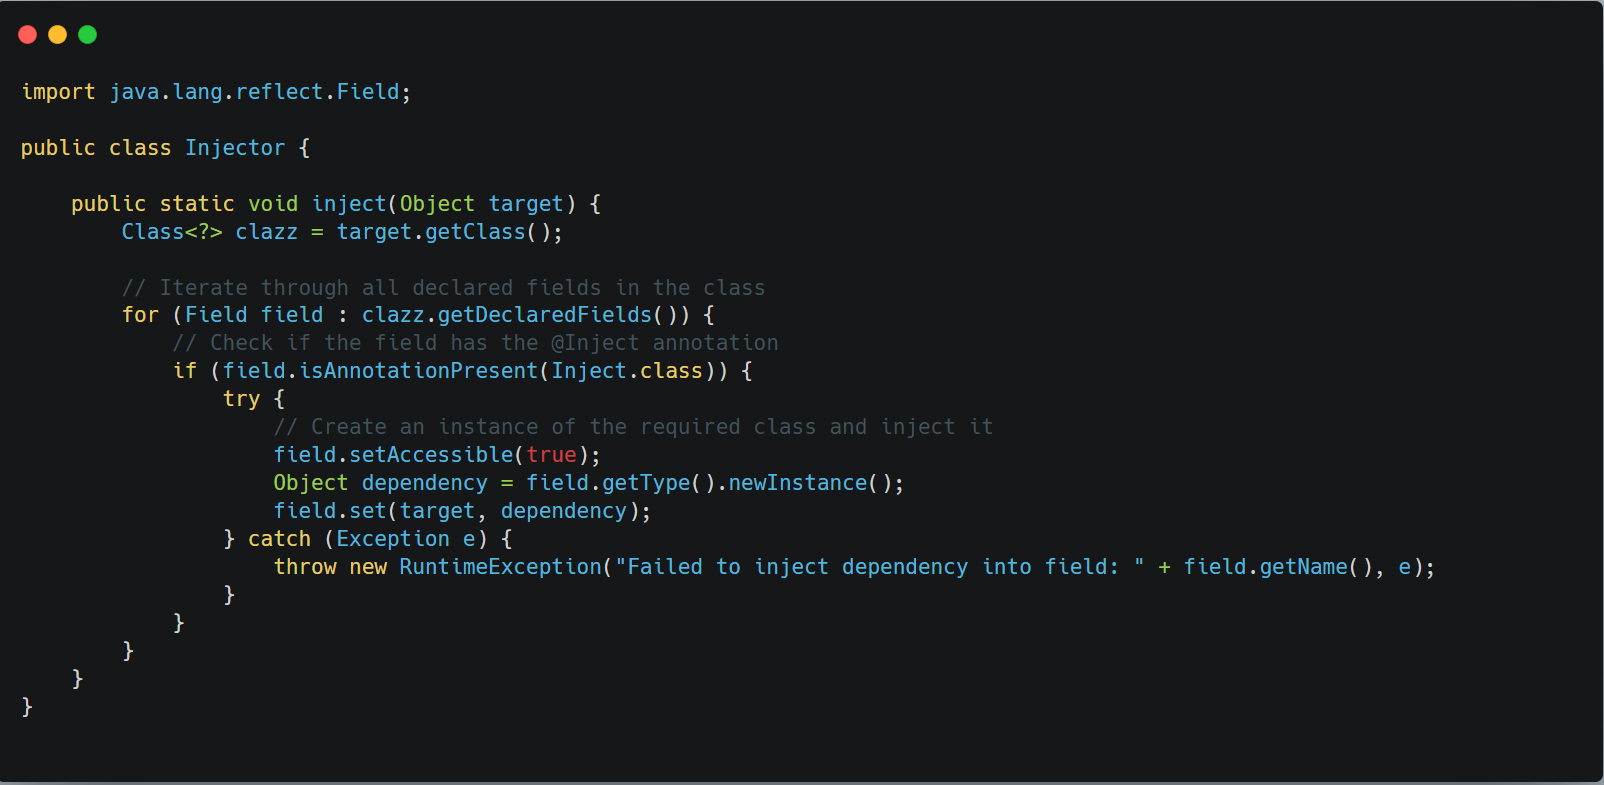
Writing the Dependency Injection Processor
Advantages of Using @Inject Custom Annotations in Android
- Eliminates Boilerplate Code: The @Inject annotation removes the need for manual initialization of fields.
- Improves Readability: Annotated fields clearly indicate their purpose and reduce clutter in the onCreate() or initialization code.
- Scales Well: As the app grows, dependency injection ensures better modularity and testability.
- Framework Compatibility: This approach can be extended and refined to implement advanced DI patterns, such as those used in Dagger or Hilt.
Keep Learning! Keep Coding!
Custom annotations offer a lot of flexibility in your development process. Follow along as we dive deeper into annotation processing and more advanced use cases in the future!


