
Safely Remove Kafka Brokers from Amazon MSK Provisioned Clusters
Introduction
As companies grow and their data streaming needs change, it’s important to optimize resources to stay efficient and control costs. AWS has rolled out a new feature for Amazon Managed Streaming for Apache Kafka (Amazon MSK) that enables the removal of brokers from MSK clusters. This capability enables you to adjust the size of your clusters to better fit your needs without compromising availability. In this blog, I’ll guide you through the steps to safely remove brokers from an Amazon MSK provisioned cluster, complete with detailed instructions and screenshots.
AWS Announcement: Broker Removal Capability
Amazon MSK’s broker removal feature is introduced to simplify cluster management and provide flexibility for dynamic workloads. AWS announced this feature to address customer needs for cost optimization and better resource management.

Amazon MSK
By allowing users to safely remove brokers from an existing MSK cluster, AWS has made it easier to adjust to changing traffic patterns and business requirements without downtime or risking data loss. Official Announcement here.
Why Remove Brokers?
With time, you may find that your Kafka cluster is over-provisioned due to reduced data traffic or changes in business requirements. Keeping extra brokers unnecessarily not only increases costs but also complicates management. Removing over-provisioned brokers helps to reduce costs, optimize resource utilization, and simplify infrastructure management. Amazon MSK’s broker removal capability ensures that the process is safe and non-disruptive, allowing your streaming applications to continue running smoothly. Now we have understood Why let’s jump to How. Follow the steps given below:
Prerequisites
- An Amazon MSK cluster.
- Kafka CLI tools installed on a client machine.
- AWS CLI is configured with the necessary permissions to manage MSK.
- A basic understanding of Kafka topics, partitions, and brokers.
Step-by-Step Demo: Removing a Broker from an Amazon MSK Cluster
This guide uses a demo cluster setup with 6 brokers across 3 Availability Zones (AZs), with 2 brokers per AZ. Your cluster configuration may vary; the steps remain the same. There are 3 topics: topic1,topic2 and topic3. All 3 of these topics have 30 partitions each.

Architecture Diagram
Important Note
Before removing brokers from a MSK cluster, it’s important to ensure that no user partitions are assigned to them. This includes reassigning partitions to other brokers in the cluster.In case user partitions exist on brokers amazon doesn’t allow us to remove brokers and you will see the below error.

Broker Removal
Step 1: List All Topics in the MSK Cluster
First, list all topics in your MSK cluster. This helps identify user topics that need reassignment when brokers are removed.
./bin/kafka-topics.sh --bootstrap-server "<CLUSTER_BOOTSTRAP_STRING>" --list
Replace <CLUSTER_BOOTSTRAP_STRING> with your cluster’s bootstrap server URL.
topics list
Step 2: Prepare a JSON File with Topics to Move
Create a file named ‘topics.json’ to include all user topics that you want to move, excluding internal Amazon MSK topics such as __amazon_msk_canary. This file will guide the reassignment process.
{
  "topics": [
    {"topic": "topic1"},
    {"topic": "topic2"},
    {"topic": "topic3"},

    {"topic": "__consumer_offsets"}
  ],
  "version": 1
}
Step 3: Generate Partition Reassignment Proposal
Use the ‘Kafka-reassign-partitions.sh’ script to generate a reassignment proposal that excludes the brokers you want to remove. This step ensures that partitions are correctly redistributed before executing any changes.
What is Kafka-reassign-partitions.sh?
This script is used to manage Kafka partition assignments. It helps you balance partitions across brokers, or safely move partitions away from brokers you plan to remove.
./bin/kafka-reassign-partitions.sh --bootstrap-server "<CLUSTER_BOOTSTRAP_STRING>" --topics-to-move-json-file topics.json --broker-list 1,2,3 --generate
- –bootstrap-server <CLUSTER_BOOTSTRAP_STRING>: Connects to your Kafka cluster. Replace with your cluster’s URL.
- –topics-to-move-json-file <FILE_PATH>: Specifies the topics and partitions to reassign.
- –broker-list <BROKER_IDS>: Lists the brokers to keep in the reassignment process.
- The –generate option creates a proposal file detailing how partitions will be redistributed. Review this proposal before moving on to the next step.
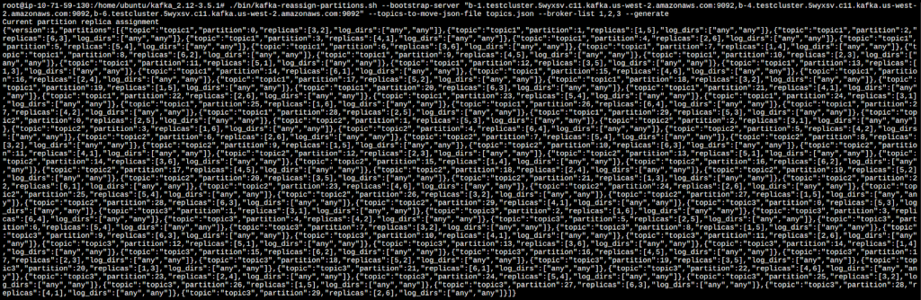
Output: Current Partition Replica Assignment
Current Partition Replica Assignment
The current partition replica assignment is spread across six brokers (1 to 6). Each partition of topic1, topic2, and topic3 has two replicas distributed across different brokers, such as:
- topic1 Partition 0: [3,2]
- topic2 Partition 0: [2,5]
- topic3 Partition 0: [5,3]
The goal of the reassignment is to move all replicas to brokers 1, 2, and 3.
Proposed Partition Reassignment Configuration
Proposed Partition Reassignment Configuration
The proposed configuration redistributes all partition replicas across brokers 1, 2, and 3. For each partition, the replicas are transferred to brokers 1, 2, and 3 only. Here are some examples of how the reassignment affects the partitions:
topic1:
- Partition 0: Moves from [3, 2] to [1, 3]
- Partition 1: Moves from [1, 5] to [2, 3]
- Partition 2: Moves from [6, 3] to [3, 1]
This pattern continues for the remaining partitions of all the topics.
Summary
Brokers Involved: Brokers 1, 2, and 3 will host all replicas.
Brokers Removed: Brokers 4, 5, and 6 are being removed from the replica assignment.
Reassignment Pattern: The reassignment distributes partitions evenly among brokers 1, 2, and 3, repeating a pattern where each partition’s replicas move to a combination of these three brokers.
Each partition is being reassigned such that the replica set falls within the broker list [1, 2, 3]. The reassignment will help maintain even distribution across the selected brokers and remove dependency on brokers 4, 5, and 6.
Step 4: Execute the Partition Reassignment
Create a reassignment-file.json with the proposed configuration from the previous step. Then, execute the reassignment command:
./bin/kafka-reassign-partitions.sh --bootstrap-server "<CLUSTER_BOOTSTRAP_STRING>" --reassignment-json-file reassignment-file.json --execute
This command will start moving partitions from the brokers being removed to the remaining brokers. The last part of the output confirms that the partition reassignment process has started successfully for all the listed partitions across all topics. It mentions topics and their respective partitions that have started the reassignment process:
Step 5: Verify the Reassignment
After executing the reassignment, verify it to ensure all partitions have been moved as planned:
./bin/kafka-reassign-partitions.sh --bootstrap-server "<CLUSTER_BOOTSTRAP_STRING>" --reassignment-json-file reassignment-file.json --verify
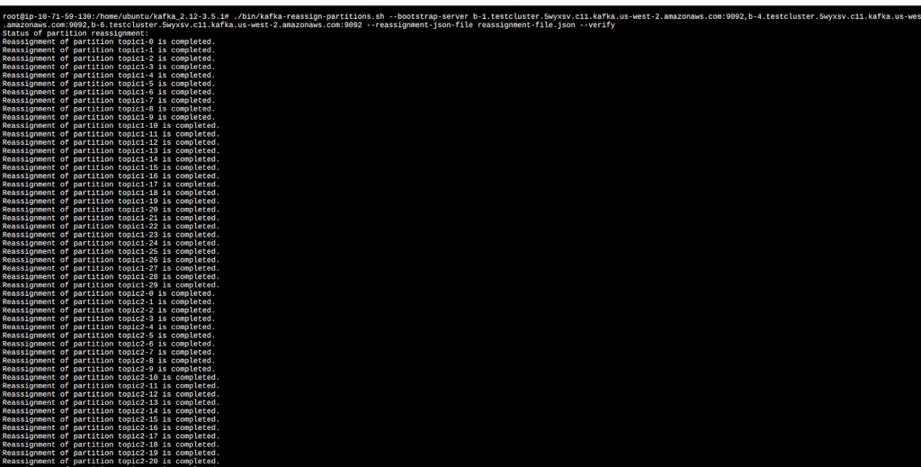
verify-reassignment
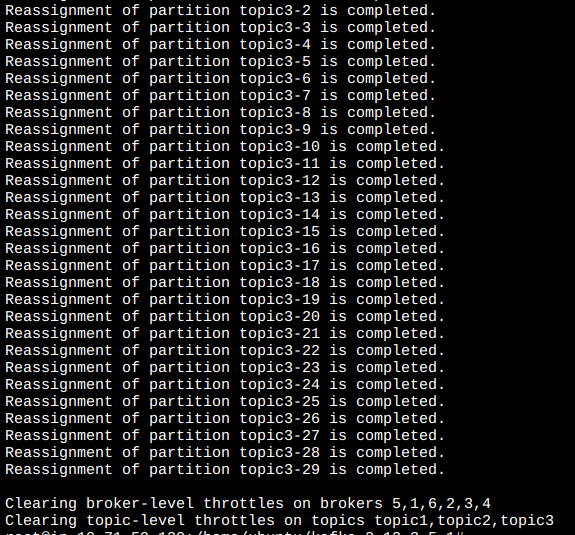
verify-reassignment
This verification step is crucial to confirm that the reassignment has been completed successfully.
Step 6: Monitor Metrics and Remove Brokers
We can now see disk utilization for brokers 4, 5, and 6 is reducing as we moved partitions from the brokers.
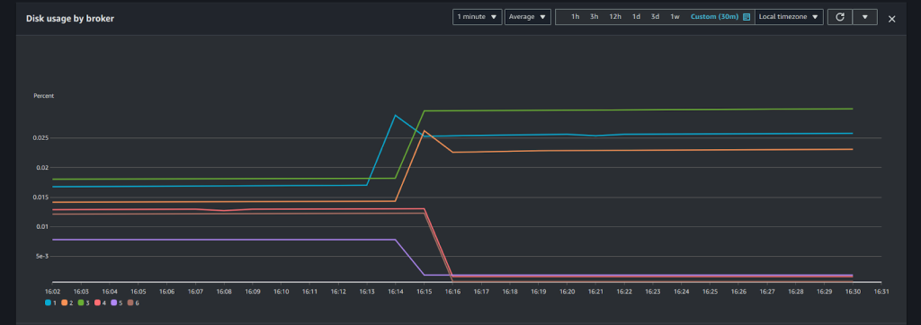
Disk usage by Brokers
Once the partition movement is confirmed, you can safely reduce the number of brokers in your cluster. Use the AWS Management Console CLI, or API to reduce the number of brokers.
From AWS Console:
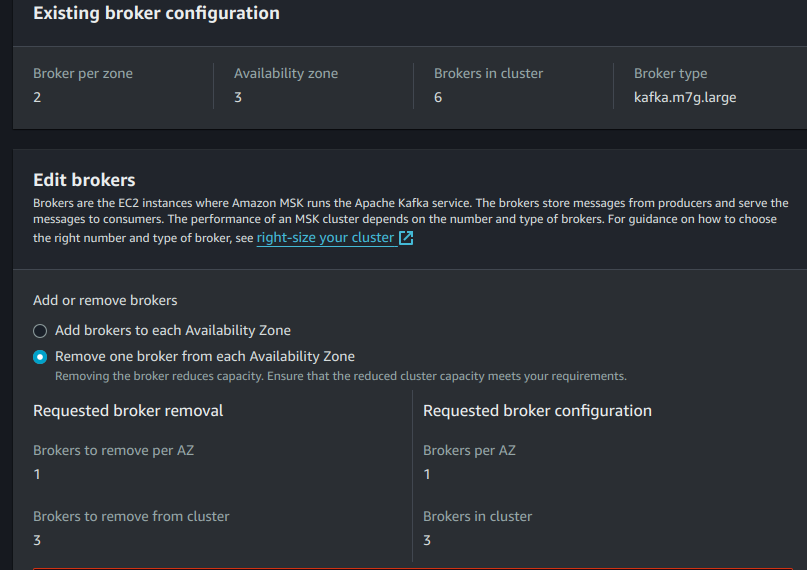
broker removal

broker removal
AWS CLI:
aws kafka update-broker-count --cluster-arn <ClusterArn> --current-version <Current-Cluster-Version> --target-number-of-broker-nodes <Target-Number-of-Brokers>
Replace <ClusterArn>, <Current-Cluster-Version>, and <Target-Number-of-Brokers> with the correct values for your cluster.
Things to Take Care Of
- Traffic Patterns: Before removing brokers, carefully observe traffic patterns to ensure that the remaining brokers can handle the load without a negative impact on performance.
- Monitor Partition Distribution: Uneven distribution can result in impacted performance.
- Data Replication: It is important to make sure that the replication factor for topics is sufficient to tolerate the loss of a broker. Adjust replication factors if needed to maintain high availability.
- Backup Critical Data: Although Amazon MSK provides strong guarantees for data durability, it’s a good practice to have a backup plan for critical data.
- Monitor Cluster Health: Regularly monitor cluster metrics like broker CPU utilization, network throughput, partition distribution, and consumer lag. These metrics are critical to ensuring that your cluster remains healthy after removing brokers.
- Plan for Rollback: Understand the impact on your Kafka clients, especially regarding consumer group rebalances and potential increases in consumer lag during the broker removal process. Ensure that applications consuming from Kafka are resilient to these changes.
- Test in a Non-Production Environment: To be on the safer side, test the broker removal activity in a lower environment first to understand the impact and ensure all steps work as expected.
Conclusion
Removing brokers from an Amazon MSK cluster is now simpler than ever with Amazon MSK’s new broker removal feature. With careful planning and execution, you can optimize your Kafka clusters, reduce costs, and ensure high availability and performance for your streaming applications.
At TO THE NEW, our expert DevOps team specializes in AWS MSK and related tasks, offering solutions to dynamically scale your Kafka workloads and maintain performance. Contact us today to learn how we can help elevate your cloud infrastructure and DevOps practices! If you are interested in migration to AWS MSK do check out this blog.


