
Sharding: Distributing Data Across Multiple Machines with Spring Boot and MongoDB

Imagine your coffee shop is thriving, but one location can’t keep up with the growing demand. To fix this, you open more shops across the city, easing the load.
Sharding works similarly for databases. When one MongoDB server can’t handle the volume, data is distributed across multiple machines (shards), making your system more efficient.
In this blog, we’ll walk through what and how to implement Sharding in MongoDB and access it using a Spring Boot application. The goal is to provide a beginner-friendly, hands-on experience with sharding in MongoDB, all while creating a scalable system. We’ll also walk through the steps of setting up sharding with MongoDB Community Edition on Linux.
Read More: Should You Choose AWS DynamoDB for Your Next Project?
What is Sharding in MongoDB?
MongoDB uses sharding to distribute large datasets across multiple servers, called shards. This ensures that the database can grow as your data grows, keeping performance high without hitting bottlenecks. Each shard holds a portion of the entire data collection, so queries and operations can be split across different shards for faster results.
Why Sharding Matters?
When your database grows beyond the capacity of a single server, things get slow. That’s where sharding comes in to:
- Scale horizontally: Add more servers to handle more data.
- Maintain performance: By distributing data, MongoDB ensures that no single server is overwhelmed.
- Handle large datasets: Even with massive data, operations remain quick and efficient.
Key Terminologies Before Diving In
- Shard: A single server (or replica set) that holds part of the data.
- Shard key: A field or combination of fields used to decide how to split the data across shards.
- Config servers: Special servers that store metadata and manage how data is distributed.
- Mongos: The router that directs queries to the right shards.
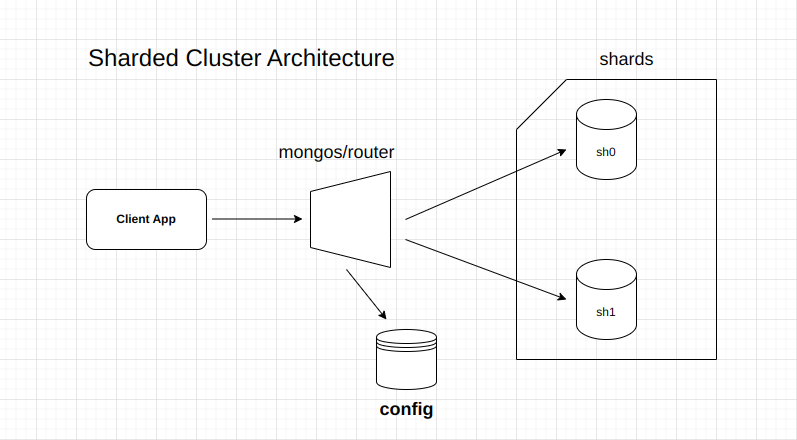
Sharded Cluster Architecture
Types of Sharding in MongoDB
Now, let’s talk about the types of sharding and how MongoDB decides where to put your data.
1. Range-Based Sharding
In range-based sharding, MongoDB divides data based on a shard key value, splitting it into ranges (like dividing numbers from 1-100 into smaller chunks). Each shard is responsible for a particular range of data.
How It Works:
If your shard key is a date field, for example, MongoDB could split data into shards like:
Shard 1: 2010–2015
Shard 2: 2016–present
2. Hash-Based Sharding
In hash-based sharding, MongoDB applies a hash function to the shard key to ensure an even distribution of data. The data is then randomly spread across all shards based on this hash value.
How It Works:
Let’s say your shard key is a customer ID. MongoDB would hash these IDs, ensuring they are distributed evenly across all shards, regardless of the ID value.
3. Zone-Based Sharding (or Tag-Aware Sharding)
Zone-based sharding is a combination of the two methods mentioned above but adds the flexibility of defining zones for specific ranges of data. You can “tag” certain shards to handle specific data ranges based on the shard key, which is useful for geographical distribution or regulatory compliance.
How It Works:
You might set up zones like:
Shard 1: Data for customers from the India.
Shard 2: Data for customers from U.S.
How to Choose the Right Sharding Strategy?
Choosing a sharding method depends on how you plan to query the data:
- Range-Based Sharding: Best for applications that run range queries often, like “find all orders placed between certain dates.” However, beware of imbalanced data.
- Hash-Based Sharding: Ideal when you want an even data distribution and you’re not running range queries. Great for large-scale systems where performance and balance are critical.
- Zone-Based Sharding: If you have regulatory constraints or need geographical data distribution, zone-based sharding offers flexibility while controlling where your data lives.
Setting Up MongoDB Sharding Locally
Prerequisites:
MongoDB Community Edition installed on Linux
Spring Boot and Java are set up locally
Now, let’s walk through the step-by-step process of configuring MongoDB sharding on your local machine.
Step 1: Set Up a Config Server
In a MongoDB sharded cluster, the config server stores metadata and routing information. To start a config server, we need to run :
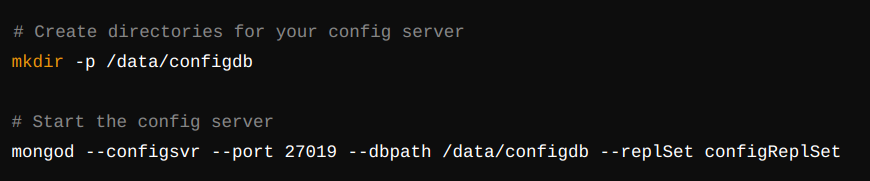
Once the config server is running, connect to it:

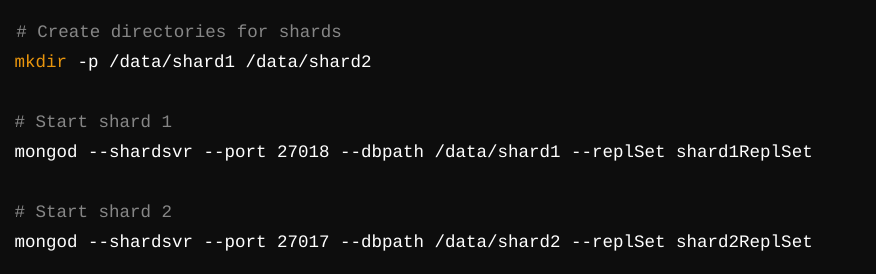
Step 2: Set Up Shards
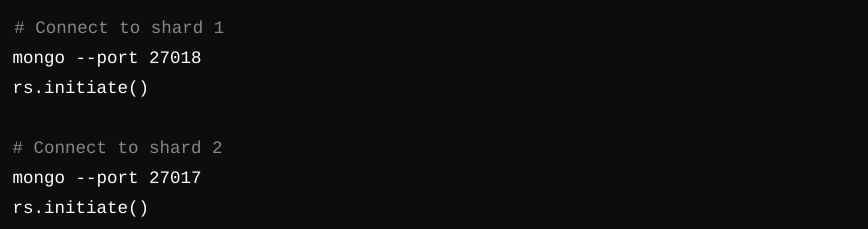
Each shard is an individual MongoDB instance or replica set. For simplicity, let’s create two shards:
Now, initiate the replica sets for both shards:
Step 3: Start the Mongos Router
The mongos process acts as the query router for the sharded cluster, directing operations to the correct shard.

Step 4: Add Shards to the Cluster
Now, connect to the mongos instance and add both shards to the cluster:

Now, How Sharding is Applied to Collections?
In MongoDB, sharding is applied at the collection level. To shard a collection, follow these steps:
Enable sharding for the database: You first need to enable sharding on the database that contains the collection.
Note :- use coffeeShop, before enabling sharding.

Shard the collection: We’ll be using range sharding, which divides the data into continuous value ranges based on the shard key. This allows efficient querying of specific data ranges.

The collection coffeeShop.orders is now sharded based on the customerId field.
Important: Once the collection is sharded, MongoDB will distribute the data into chunks across different shards based on the specified shard key.
Split the Data at customerId: 100
To distribute data across shards, split the data at customerId: 100. This will create two ranges:
customerId ≤ 100 (will go to shard1ReplSet)
customerId > 100 (will go to shard2ReplSet)
Execute the following command to split the data:

Move Chunks to the Appropriate Shards
Now, move the chunks based on customerId:
Move customerId ≤ 100 to shard1ReplSet
Move customerId > 100 to shard2ReplSet
Move data for customerId values up to 100 to shard1ReplSet:

whereas customerId values greater than 100, move to shard2ReplSet.
Summary of the Approach
Split at customerId: 100 creates two logical ranges in the orders collection.
Moving chunks ensures that: Orders with customerId values less than or equal to 100 are stored in shard1ReplSet. Orders with customerId values greater than 100 are stored in shard2ReplSet.
Modifying the shard key in MongoDB
It is not directly supported. Once a collection has been sharded using a specific key, it cannot be changed. If you need to change the shard key, you have a few options:
Resharding (since MongoDB 4.4):
MongoDB has introduced resharding in newer versions, where you can define a new shard key and MongoDB will redistribute the data according to the new key.
Example:
![]()
Manual Approach:
If you’re using an older version, the alternative is to create a new collection with the desired shard key and migrate the data manually. This is cumbersome and should be avoided in production environments.
For a comprehensive list of all commands and steps involved in setting up sharding, please refer to the README file.

meme
Spring Boot Application for Sharded MongoDB
Now that we have MongoDB sharding set up, let’s build a Spring Boot application to interact with this sharded setup.
Step 1: Create a Spring Boot Project
First, create a new Spring Boot project with the necessary dependencies.
Step 2: MongoDB Configuration in application.properties
Now, configure your Spring Boot application to connect to the Mongos router:
![]()
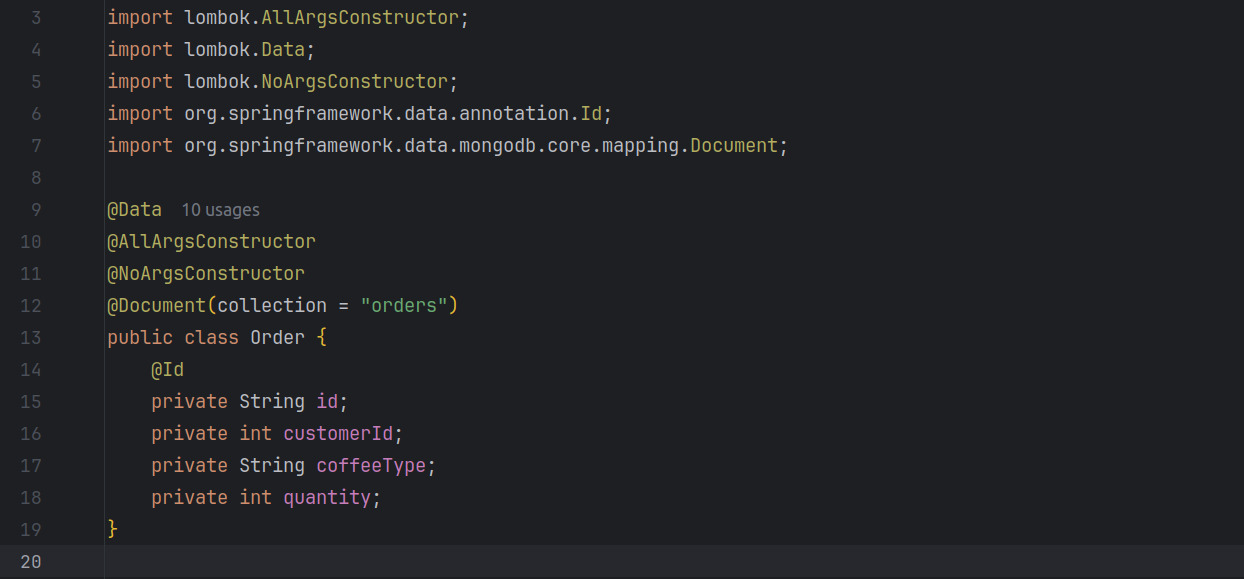
Step 3: Create MongoDB Entity
Create an entity class to represent orders in your database:
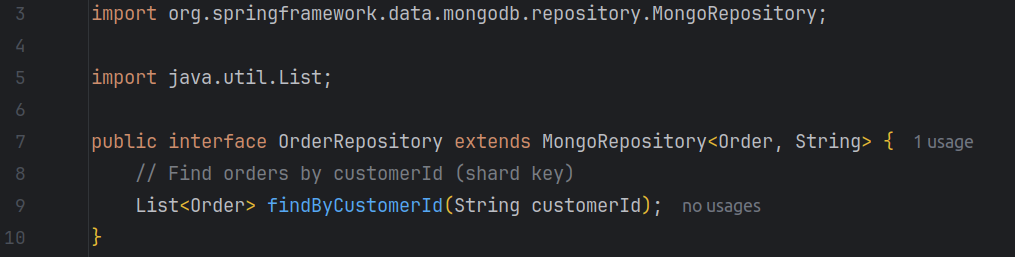
Step 4: Create a Repository
Define a repository to handle CRUD operations for Order:
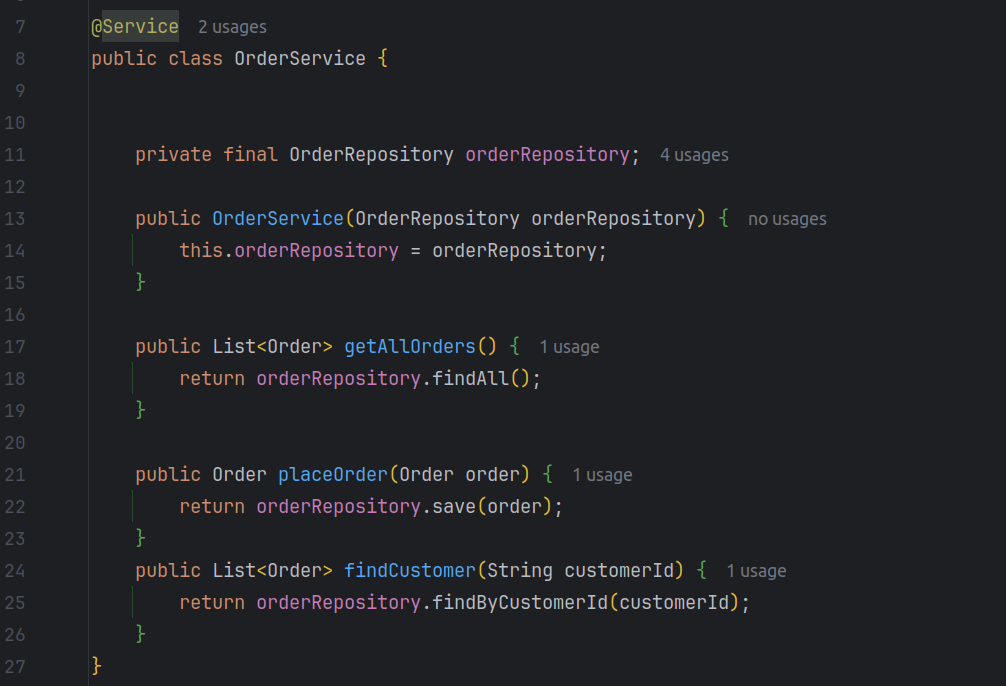
Step 5: Service Layer
Now, let’s create a service that interacts with the repository:
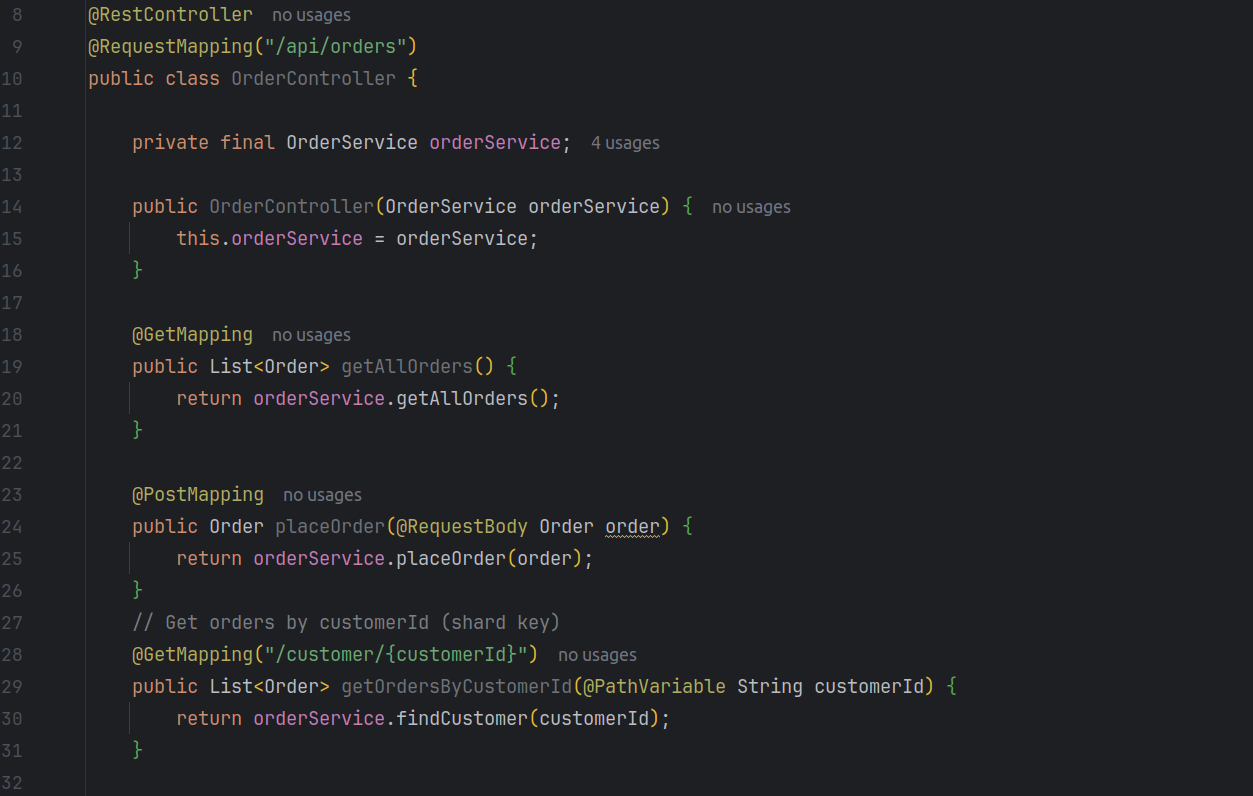
Step 6: REST Controller
Lastly, expose the service through a REST API:
Testing the Sharded Application
Start your Spring Boot application and test it using hitting post API on Postman.
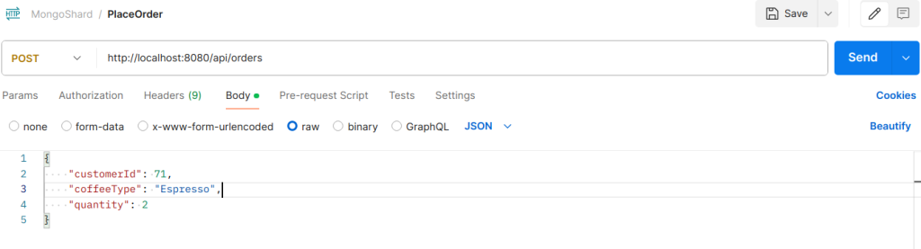
postman
MongoDB will automatically route your data to the appropriate shard based on the customerId.
for e.g. Added 11 data entries, with 7 moving to the shard2ReplSet and 4 to the shard1ReplSet, as shown in the snapshot below.
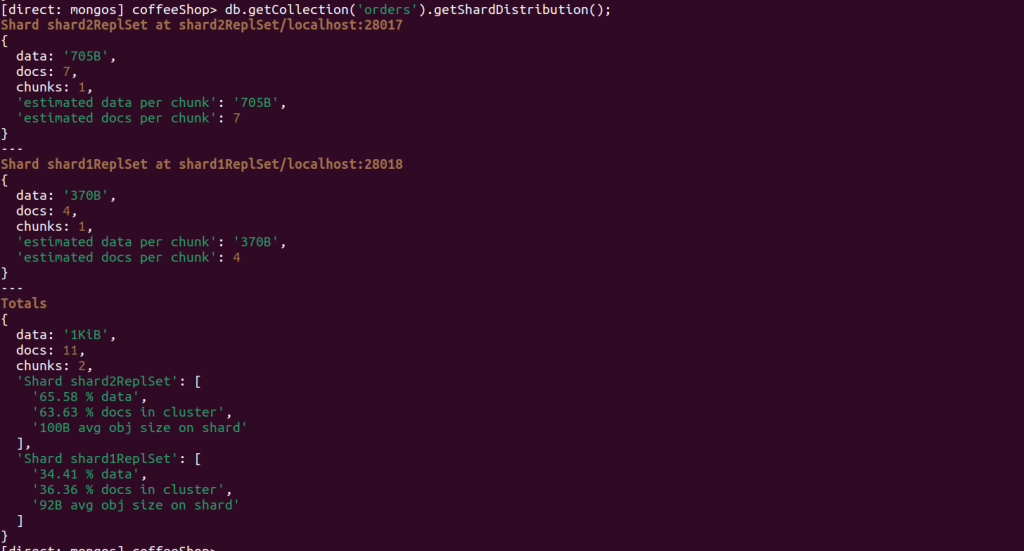
data distribution
Conclusion
With sharding, you’re essentially splitting your coffee shop into multiple locations. Each MongoDB shard handles part of the data, and your application seamlessly interacts with the entire dataset. Whether you’re dealing with a small application or planning for large-scale growth, sharding ensures MongoDB can scale with your needs.
By setting up a sharded MongoDB cluster and connecting it to a Spring Boot application, you’ve taken the first steps toward building scalable, distributed systems.
To access the project repository, visit here. TO THE NEW offers end-to-end Data & Analytics services to help our customers leverage the power of Data and unlock actionable business insights. Click here to start your project with us.
Happy Coding! 🙂


