
How WireGuard Outshines Traditional VPNs: A Practical Implementation Guide
As organizations continue to prioritize secure and reliable connectivity, choosing the right VPN solution becomes critical. Traditional VPNs like OpenVPN and IPSec have been trusted for years, but they often come with complexities that make them cumbersome to configure and manage. WireGuard, a newer VPN protocol, offers a simpler, faster, and more secure alternative. This blog explores why WireGuard stands out from conventional VPN solutions and how its modern architecture can benefit your infrastructure.
WireGuard is a great, open-source VPN (Virtual Private Network) that’s designed to be quicker, easier to use, and more efficient than older ones like OpenVPN or IPsec. It’s made to be simple and perform really well, so it cuts out extra stuff and just concentrates on being fast and secure.
Why WIreGuard is gaining traction?
WireGuard is getting more popular because it’s really fast and provides robust security. Unlike older VPNs which often involve complex setups and larger codebases, it has less code, which reduces the attack redius and makes it easier to check for security problems. It works efficiently, so you get faster connections and less delay, which is important for people who need a VPN for safe and smooth internet access.
Why do we Implement this VPN on our Project?
We are using WireGuard on top of Pritunl VPN in our project.
The problem we faced:
Earlier, the dev team was experiencing low speed issues while querying the databases running on AWS accounts with Pritunl OpenVPN configuration. We wanted to cut the time even if just by 1 second per query.
How Wireguard resolved it:
WireGuard uses UDP, which makes it much faster. Additionally, WireGuard employs state-of-the-art encryption algorithms designed for high performance. After setting up WireGuard for one of the servers, the dev team experienced better performance and faster querying.
Overview of the Rest of the Article
- Key Principles
- WireGuard vs. OpenVPN
- Known Limitations of WireGuard
- How to Set Up WireGuard
Let’s begin
WireGuard is a new VPN that’s really simple, fast, and safe. Unlike older VPNs like IPsec and OpenVPN, which can be hard to use and slow, WireGuard is made to be easy and just what you need for a good VPN.
1. Key Principles:
- Performance: WireGuard gives you really fast connections using the latest encryption tricks.
- Security: The code and its design keep your things safe
- Public and Private Keys: Every user has two keys to keep their messages secure.
- Handshake and Key Exchange: It makes a safe connection by sharing public keys.
- Lightweight and Fast: Its simple design means less extra stuff and quicker data transfer.
2. WireGuard vs. OpenVPN
| Feature / Aspect | WireGuard | OpenVPN |
| Background | Relatively new, designed for simplicity, speed, and security. Cross-platform support | Established in 2001, widely used, open-source, cross-platform. |
| Speeds | Generally faster than OpenVpn with lower latency Tested Result: 120mbps / 40mbps |
Generally slower than WireGuard, especially on high-latency connections.
Tested Result: 50mbps / 30mbps |
| Encryption | Fixed set of algorithms: ChaCha20, Poly1305, Curve25519, BLAKE2s. | Flexible algorithms: AES, Blowfish, Camellia, ChaCha20, Poly1305, DES, Triple DES, etc. |
| Security | Very secure, minimal codebase, modern algorithms. | Secure, audited, no known vulnerabilities. |
| Versatility | Cross-platform support (Linux, Windows, macOS, BSD, iOS, Android). | Cross-platform support (Linux, Windows, macOS, Android). |
| Community Support | Growing community support. | Well-established community support. |
| Overall Performance | Faster speeds, quicker connection establishment, and more reliable on mobile devices. | May have slightly slower speeds, especially on high-latency connections |
3. Known Limitations of WireGuard
- Deep Packet Inspection: Lack of focus on obfuscation; requires external implementation.
- TCP Mode: Not supported; performance issues arise with tunneling over TCP.
- Hardware Crypto: Limited support; not critical due to fast software encryption.
- Roaming Mischief: Potential man-in-the-middle risk; future revisions may address this.
- Identity Hiding Forward Secrecy: Forward secrecy provided, but with certain risks.
- Post-Quantum Secrecy: Not inherently post-quantum secure.
- Denial of Service: Resistant to abuse but can consume significant CPU resources.
- Unreliable Monotonic Counter: System time issues can disrupt operations.
- Routing Loops: Detection has challenges; workaround techniques in place.
4. How to Setup WireGuard
Creating a connection to resources in a private subnet with WireGuard VPN installed in a public subnet involves several steps. Below is a detailed guide.
- Create an EC2 Instance in the Public Subnet
To serve as the WireGuard VPN server, create an EC2 instance in the public subnet of your AWS VPC.
Method 1: Using wg-easy Docker Image
Requirements:
A host with Docker installed.
Installation Steps
1. Install Docker:
| curl -sSL https://get.docker.com | sh sudo usermod -aG docker $(whoami) |
2. Run WireGuard Easy:
| docker run -d \ –name=wg-easy \ -e WG_HOST=SR_IP \ -e PASSWORD=AD_PASS \ -v ~/.wg-easy:/etc/wireguard \ -p 51820:51820/udp \ -p 51821:51821/tcp \ –cap-add=NET_ADMIN \ –cap-add=SYS_MODULE \ –sysctl=”net.ipv4.conf.all.src_valid_mark=1″ \ –sysctl=”net.ipv4.ip_forward=1″ \ –restart unless-stopped \ weejewel/wg-easy |
💡 Replace SR_IP with your Server IP or a Dynamic DNS hostname, AD_PASS with Admin Password, and access UI on http://YOUR_SERVER_IP:51821.💡 Configuration files are saved in ~/.wg-easy.
3. Check if the Container is Running:
| docker ps |
This lists all running Docker containers. see if a container named “wg-easy” is listed.
4. Check Port Status:
| netstat -tulpn | grep -E ‘51280|51281’ |
5. Now Manage Users via UI & add users through the Web UI.
Configuration on Client Side (Mac and Windows Users)
1. Install WireGuard Application:
Download and install from WireGuard official website or on Mac run:
| brew install wireguard-tools |
2. Import Configuration:
- Get vpn.conf file from the server admin.
- Open the WireGuard app, click “Import tunnel from file” or Add tunnel.
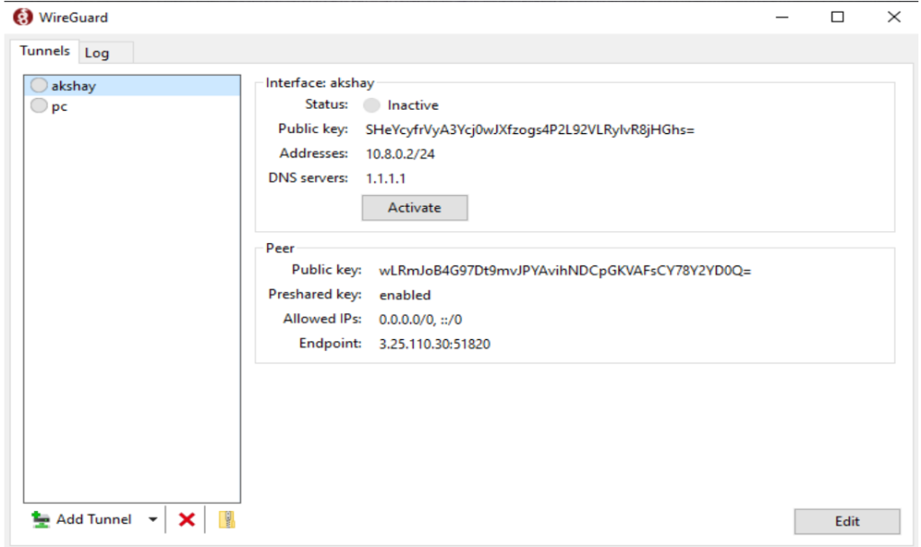
Wireguard-client
3. Select the conf file, then click “Activate.”
3. Connection Established:
Verify that your connection is established.
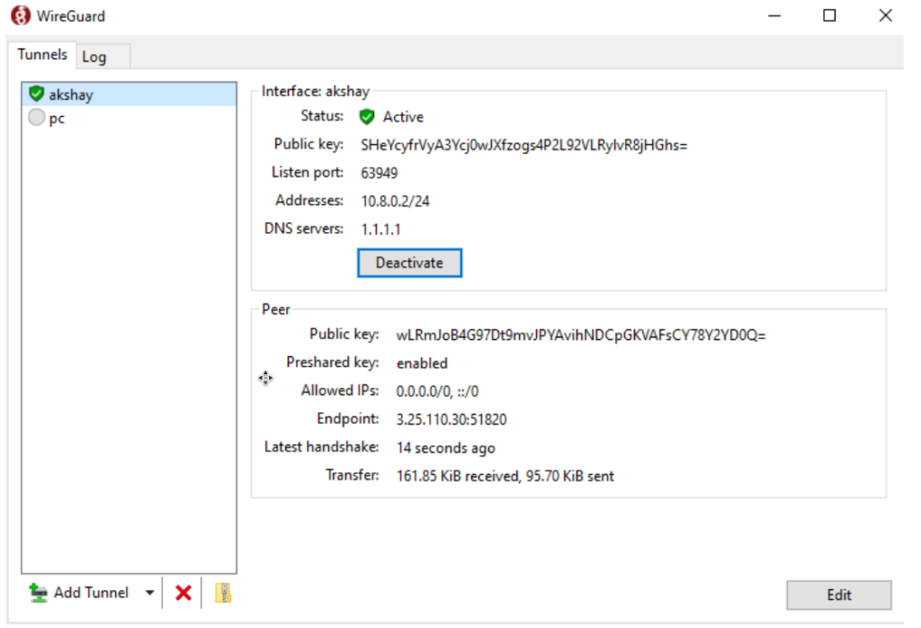
Wireguard-client-Active
For Linux Users ( Client-side):
Manual Configuration:
1. Install WireGuard:
| sudo apt-get update sudo apt-get install wireguard resolvconf |
2. Move vpn.conf to /etc/wireguard/:
| sudo mv vpn.conf /etc/wireguard/ |
3. Enable and Start Service:
| sudo systemctl enable wg-quick@vpn.service sudo systemctl start wg-quick@vpn.service sudo systemctl daemon-reload |
4. (Optional) Reboot if needed:
| sudo reboot |
5. Disable Service (when done):
| sudo systemctl disable wg-quick@vpn.service |
Method 2: Using PiVPN
1. Install WireGuard and PiVPN:
| curl -L https://install.pivpn.io | bash |
2. Creating new client certificate
| pivpn add user_name |
3. Revoking a client certificate
| pivpn revoke user_name |
4. Listing clients
| pivpn list |
5. Creating a server backup
| pivpn backup |
6. Help with troubleshooting
| pivpn debug |
On Client Side:
- Install WireGuard Application
- Download and install from WireGuard official website.
- Follow the same steps mentioned in METHOD 1 to connect VPN.
Method 3: Adding Wireguard on top of Pritunl VPN
1. On the server Install Pritunl
You can install Pritunl from official website.
2. To get the setup-key and default-password
| sudo pritunl setup-key sudo pritunl default-password |
3. You can now access the pritunl dashboard on the web via port 443
Now let’s set the console
ON THE DASHBOARD
1. Setup Your Profile and WebConsole Port
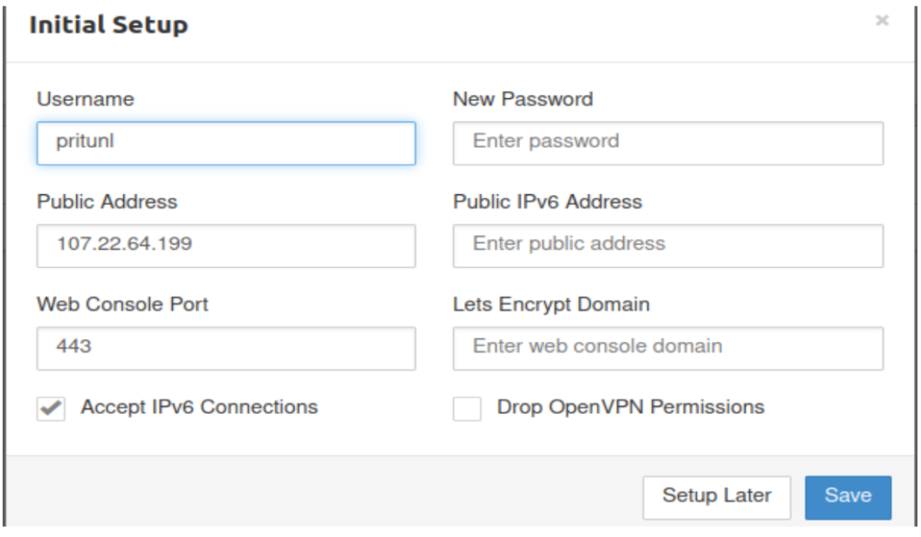
Configure initial setup values in pritunl
2. Internal Setup:
a. Add a Server
- Navigate to the “Servers” tab in the Pritunl web interface.
- Click on “Add Server” and fill in the required parameters.

- Edit Server in Pritunl console to add WireGuard
- Use default ports or customer ones.
b. Setup networking
- Enable WireGuard and set its port to 51280.
- Create a Network for WireGuard:.
- Create a new network specifically for WireGuard. Ensure it is different from the Virtual Network.
- Add the server.
Note: You can edit and already existing server the same way.
c. User setup
- Create Organization:
- Navigate to the “Organizations” tab.
- Click on “Add Organization” and fill in the required details.
- To add a user, Inside the organization, click on “Users.”
- Add a user with the necessary credentials.
d. Import User Profile
- You can import the user profile either by downloading a tar file or by using the link.
To get the link, click on the link icon left to the download icon on the user you just created.

Import Profiles from here
e. Client Machine Setup
- Download and install the Pritunl Client on your client machine from the official Pritunl website.
Note: If you are on Mac or Windows, install Wireguard first from here - For Ubuntu, you can run the command below to install wg tools.
| sudo apt-get install wireguard-tools |
f. Configure WireGuard and Pritunl Client
- Open the Pritunl Client.
- Click on “Import Profile” and import the user profile you obtained in step 3.
- Connect to the server via WireGuard
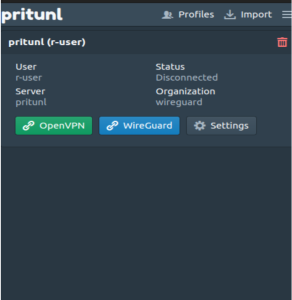
Pritunl Client
Now, your client machine should be connected to the Pritunl server via WireGuard.
Conclusion
WireGuard is a new VPN that is really easy to use, fast, and uses smart encryption. Unlike old VPNs like IPsec and OpenVPN, which can be confusing and slow, WireGuard is made to be simple and efficient. This makes it work better and more smoothly on different devices like Linux, Windows, macOS, BSD, iOS, and Android.
WireGuard’s setup is straightforward, with only the basic features needed for a good VPN. It avoids the extra stuff and setup problems of older VPNs.
Cheers!


