
Understanding Beta Channels on Roku: A Comprehensive Guide to Creating Your Own
Introduction
Roku has become a major player in the streaming world, providing access to thousands of channels. However, for developers, Roku offers a way to test channels before making them publicly available, through beta channels. These channels allow you to run tests and gather user feedback before the final version goes live.
A beta channel is a private, unpublished Roku channel designed for testing purposes. Unlike public channels, beta channels are accessible only to testers with a special code. In this blog, we’ll dive into what beta channels are, why they are essential for developers, and provide a step-by-step guide on how to create one on Roku.
Read More: The Streaming Wars: Why Roku Is Winning the Battle
What is a Beta Channel on Roku?
A beta channel is a private Roku channel that lets developers test their channels in real-world scenarios. The main difference between beta and public channels is that beta channels are not visible in the Roku Channel Store, and users can only access them if they are given an automatically generated access code.
Beta channels are designed to be temporary testing environments, allowing developers to identify bugs, optimize performance, and gather feedback from a small group of testers before launching the final version. After testing, you can create a separate public channel based on the improved version of your beta channel.
Key Benefits of Using Beta Channels
Here are some key benefits of using beta channels:
- Identify Bugs: Running a beta channel allows you to spot issues in real-world scenarios that you may have missed during development.
- Gather Feedback: Early feedback from testers can help you refine the user experience, improve navigation, and address any potential concerns.
- Optimize Performance: Test streaming quality, loading times, and overall performance before releasing the channel to the public.
- Compliance Testing: Ensure your channel complies with Roku’s technical and content guidelines before submitting it for public release.
Step-by-Step Guide to Creating a Beta Channel on Roku
Let’s explore the steps involved in creating a beta channel on Roku.
Step 1: Set Up a Roku Developer Account
The first step to creating any Roku channel, including a beta channel, is setting up a Roku Developer Account.
- Sign Up for a Roku Developer Account: Go to the Roku Developer Portal and sign up for a developer account if you haven’t already. If you have a Roku account, you can upgrade it to a developer account.
- Agree to the Developer Agreement: After signing up, you will be prompted to accept Roku’s Developer Agreement, which grants you access to development tools.
- Provide Payment Information: Even if your channel is free, you must enter payment information to comply with Roku’s developer terms.
Step 2: Create a Beta Channel
Once your account is set up, you can begin creating your beta channel:
- Log in to the Roku Developer Dashboard: Visit the Roku Developer Portal and sign in using your developer credentials.
- Select ‘Beta Channel’: From the main dashboard, go to the side menu, click on “Beta Channel,” and then select “create channel”.
- Enter Channel Details: Fill in the basic information for your beta channel, including:
- Channel Name: A temporary or working title for the channel.
- Description: A description that helps testers understand the content or purpose of the channel.
- Category: The type of content your channel provides (entertainment, sports, etc.).
- Primary Language: The language that your channel will use.
Step 3: Upload Your Channel Package
Next, you’ll need to upload your channel package to Roku. This package contains all the code, images, and other assets required to run your channel. Here’s how to prepare and upload it:
- Prepare the Channel Package: Use the Roku SDK to package your channel into a .pkg file. Ensure that the channel is running in dev and the package includes:
1) Generating a signing key: If you creating the package for the very first time, you will not be able to see the packager option on the SDK tools page then you need to generate a Dev ID and password. Open a telnet session on the terminal (command prompt) use “telnet “Roku Device IP” 8080″ and run “genkey”, you’ll get the password and also its associated Dev ID. Save both, so whenever you are creating the package you can use the password.
2) Manifest file: A manifest that defines the channel’s metadata, such as its version, ID, and the list of supported screen resolutions.
3) BrightScript Code: The scripts responsible for powering your channel’s functionality.
4) Images and Artwork: Any required graphics, such as channel logos or background images.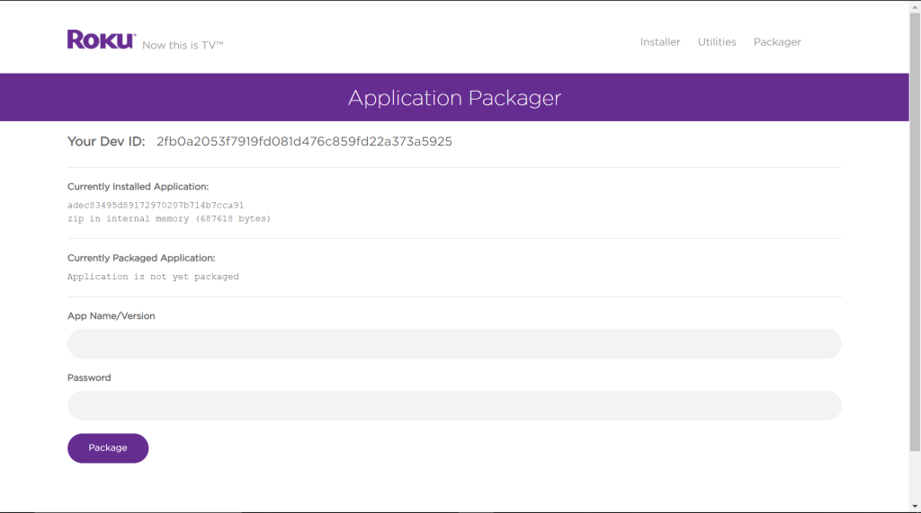
Roku SDK tools to create package
- Upload the Channel Package: In the Developer Dashboard, select your beta channel and upload the .pkg file containing the package. Roku will automatically validate the package to ensure it meets their requirements.
Step 4: Access Code for Beta Testers
Unlike public channels, beta channels are not visible in the Roku Channel Store. Instead, Roku automatically generates a unique Access Code for your beta channel.
- Default Access Code: Roku will automatically generate an access code when the beta channel is created. This access code is unique and can be customized when creating the beta channel. Share the Access Code with Testers: Distribute the access code to the users you want to test your channel. Only those with this code can install the beta channel on their Roku devices.
Beta channel Dashboard
Beta channel Dashboard
Step 5: Install and Test the Beta Channel
Your testers can now install and begin testing the beta channel:
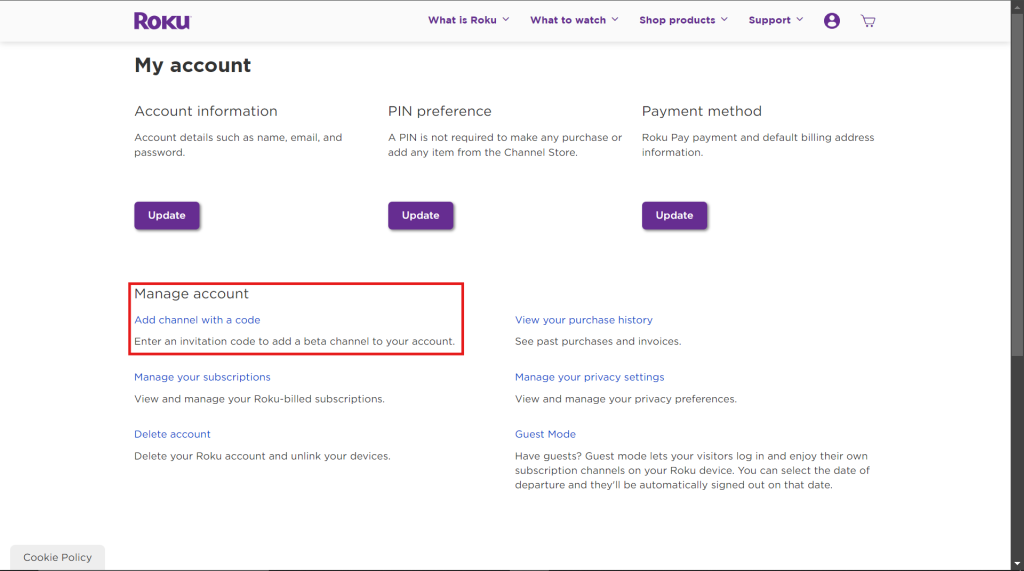
- Install the Beta Channel: Testers can log into their Roku accounts and visit the My Account Page. Here, they will see Add channel with a code option Under Manage account, which allows them to install the beta channel by the access code provided.
My Account
- Test the Functionality: Testers should evaluate the functionality, performance, and overall user experience. Encourage them to explore every aspect of the channel, including content playback, navigation, and any interactive features.
- Provide Feedback: Set up a feedback process, such as a survey or dedicated email, so testers can report bugs, suggest improvements, or highlight any usability issues.
Step 6: Improve the Beta Channel
Using feedback from testers, you can make necessary adjustments to your beta channel:
- Update the Channel Package: Fix any bugs, improve performance, or adjust features based on user feedback. Once updated, package the channel again.
Re-upload the Updated Package: Go to the Roku Developer Dashboard, upload the updated package, and ask your testers update the channel for further evaluation.
Beta channel guidelines
- 120-Day Limit: Beta channels expire 120 days after creation. They are then deleted and disabled for all users.
- 10 Channels Max: Each developer account can have up to 10 beta channels at once.
- 20 Users Max: Each beta channel can have up to 20 testers.
- Package Updates: You can update your beta channel at any time, and testers will automatically receive the updates(once in every 24 hours all the channels in Roku update automatically and you can check for updates manually also) without needing a new access code.
Conclusion
Beta channels are a powerful tool for testing, refining, and preparing your Roku channel for the public. By utilizing a beta channel, developers can test their content in a real-world environment, gather valuable feedback, and ensure a smooth user experience.
To summarize, the steps involved in creating a beta channel include setting up your developer account, creating a new beta channel, uploading the channel package, using the automatically generated access code to invite testers, and iterating based on their feedback. Once the beta testing phase is complete, you will need to create a separate public channel for submission to the Roku Channel Store.
Good luck with your development, and we look forward to seeing your channel go live! Let’s discuss how we can transform your OTT services for maximum impact. Book a meeting with our experts now
