
Accessibility Strategies for iOS: Making apps inclusive for all users
Introduction
Creating accessible apps ensures that everyone, including individuals with disabilities, can use our applications. By integrating advanced accessibility features, we can enhance the user experience and make our app inclusive. This blog covers why accessibility is crucial, how it improves our app, and steps for implementing accessibility modifiers in iOS apps
Why Accessibility is Important
Accessibility ensures that people with disabilities can use our app effectively. It’s not just a legal requirement in many regions but also an ethical obligation to provide equal access to technology for all users. Furthermore, accessibility enhances usability for everyone. For example, clear and easy-to-read text benefits all users, particularly in various lighting conditions or for those with temporary impairments.
How Accessibility Can Help
- User Reach: Expands our app’s user base by including people with disabilities — approximately 15% of the global population.
- User Satisfaction: Improves overall satisfaction and app reviews, showing we care about all users.
- Compliance: Meets legal requirements, avoiding potential lawsuits.
Impact on App Quality: Enhances usability, navigation, and information clarity for all users.
All apps should prioritize accessibility, especially in healthcare, banking, education, and social media. Government and public transportation apps must be accessible to ensure everyone has equal access to vital information.
How to Implement Accessibility Modifiers
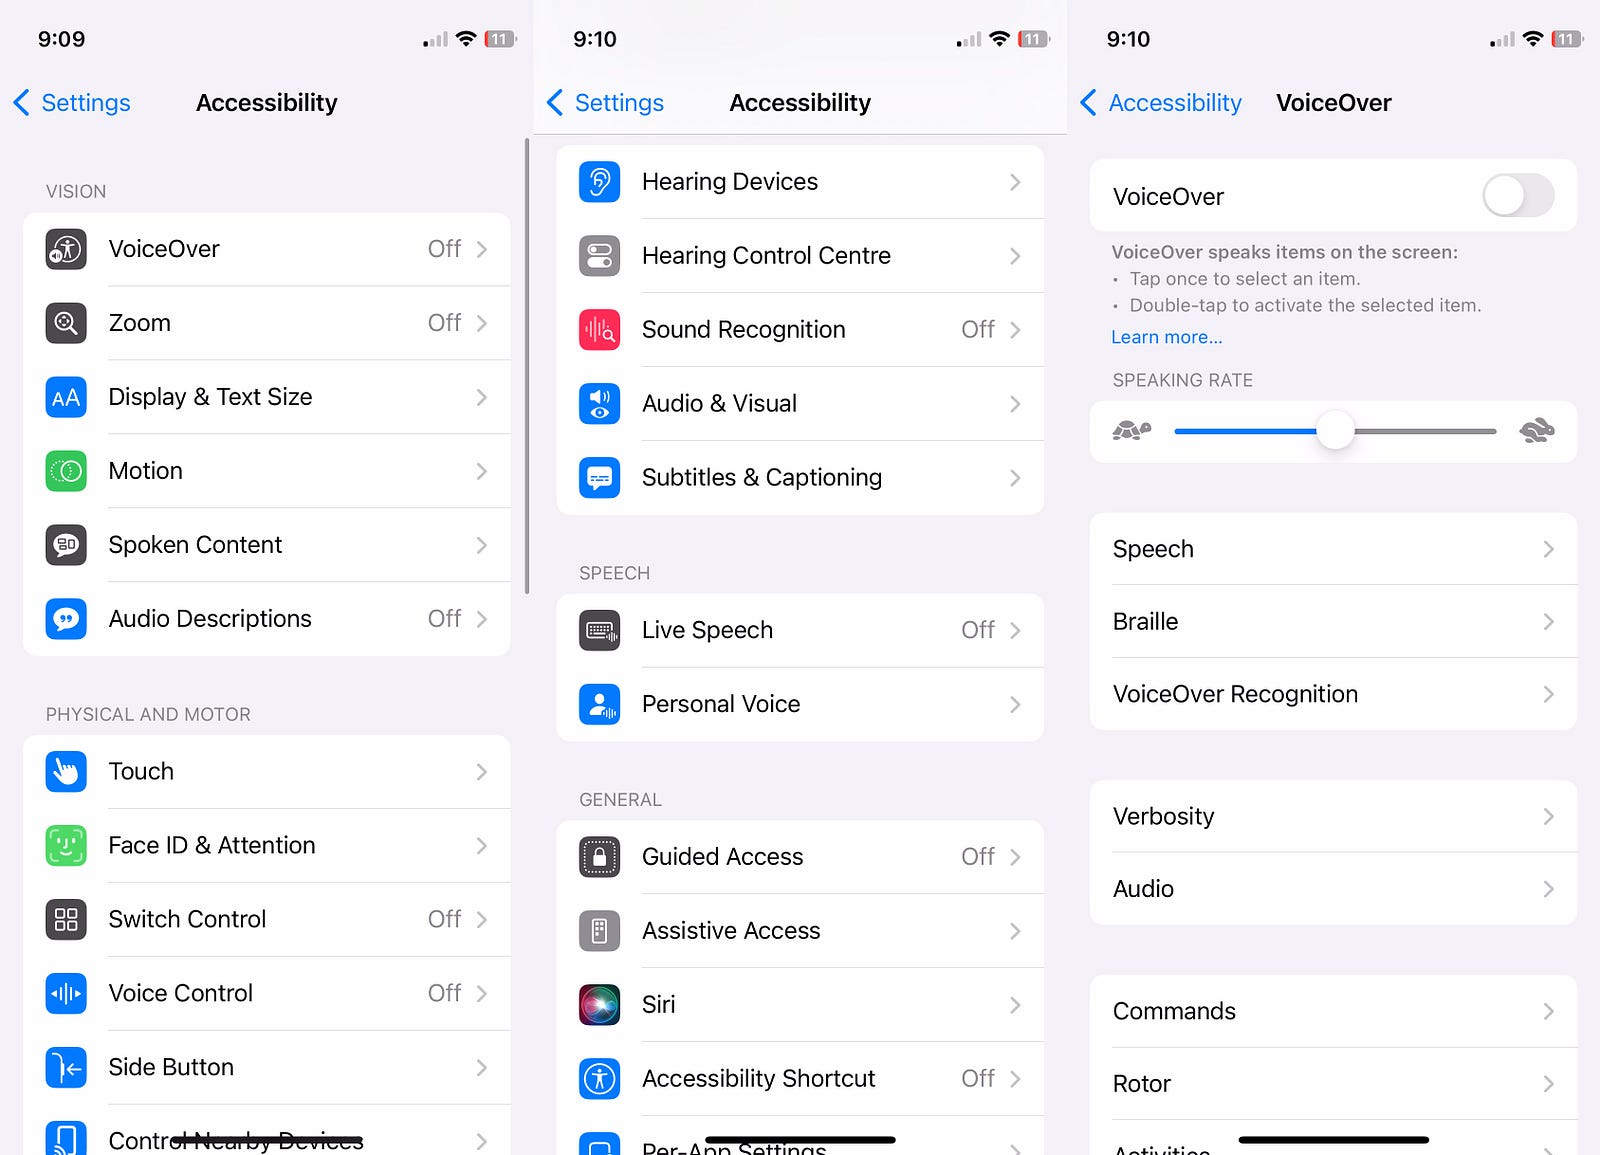
To implement iOS accessibility, we will use modifiers like accessibilityLabel, accessibilityHint, accessibilityValue, and others on UI elements. These provide descriptive information, contextual hints, and actionable behaviors for VoiceOver users. VoiceOver audibly describes content and provides tactile feedback, ensuring users with disabilities can navigate and interact with our app. To activate VoiceOver, go to “Settings” on your iOS device, select “Accessibility,” and toggle VoiceOver to “On.
Code Implementation:
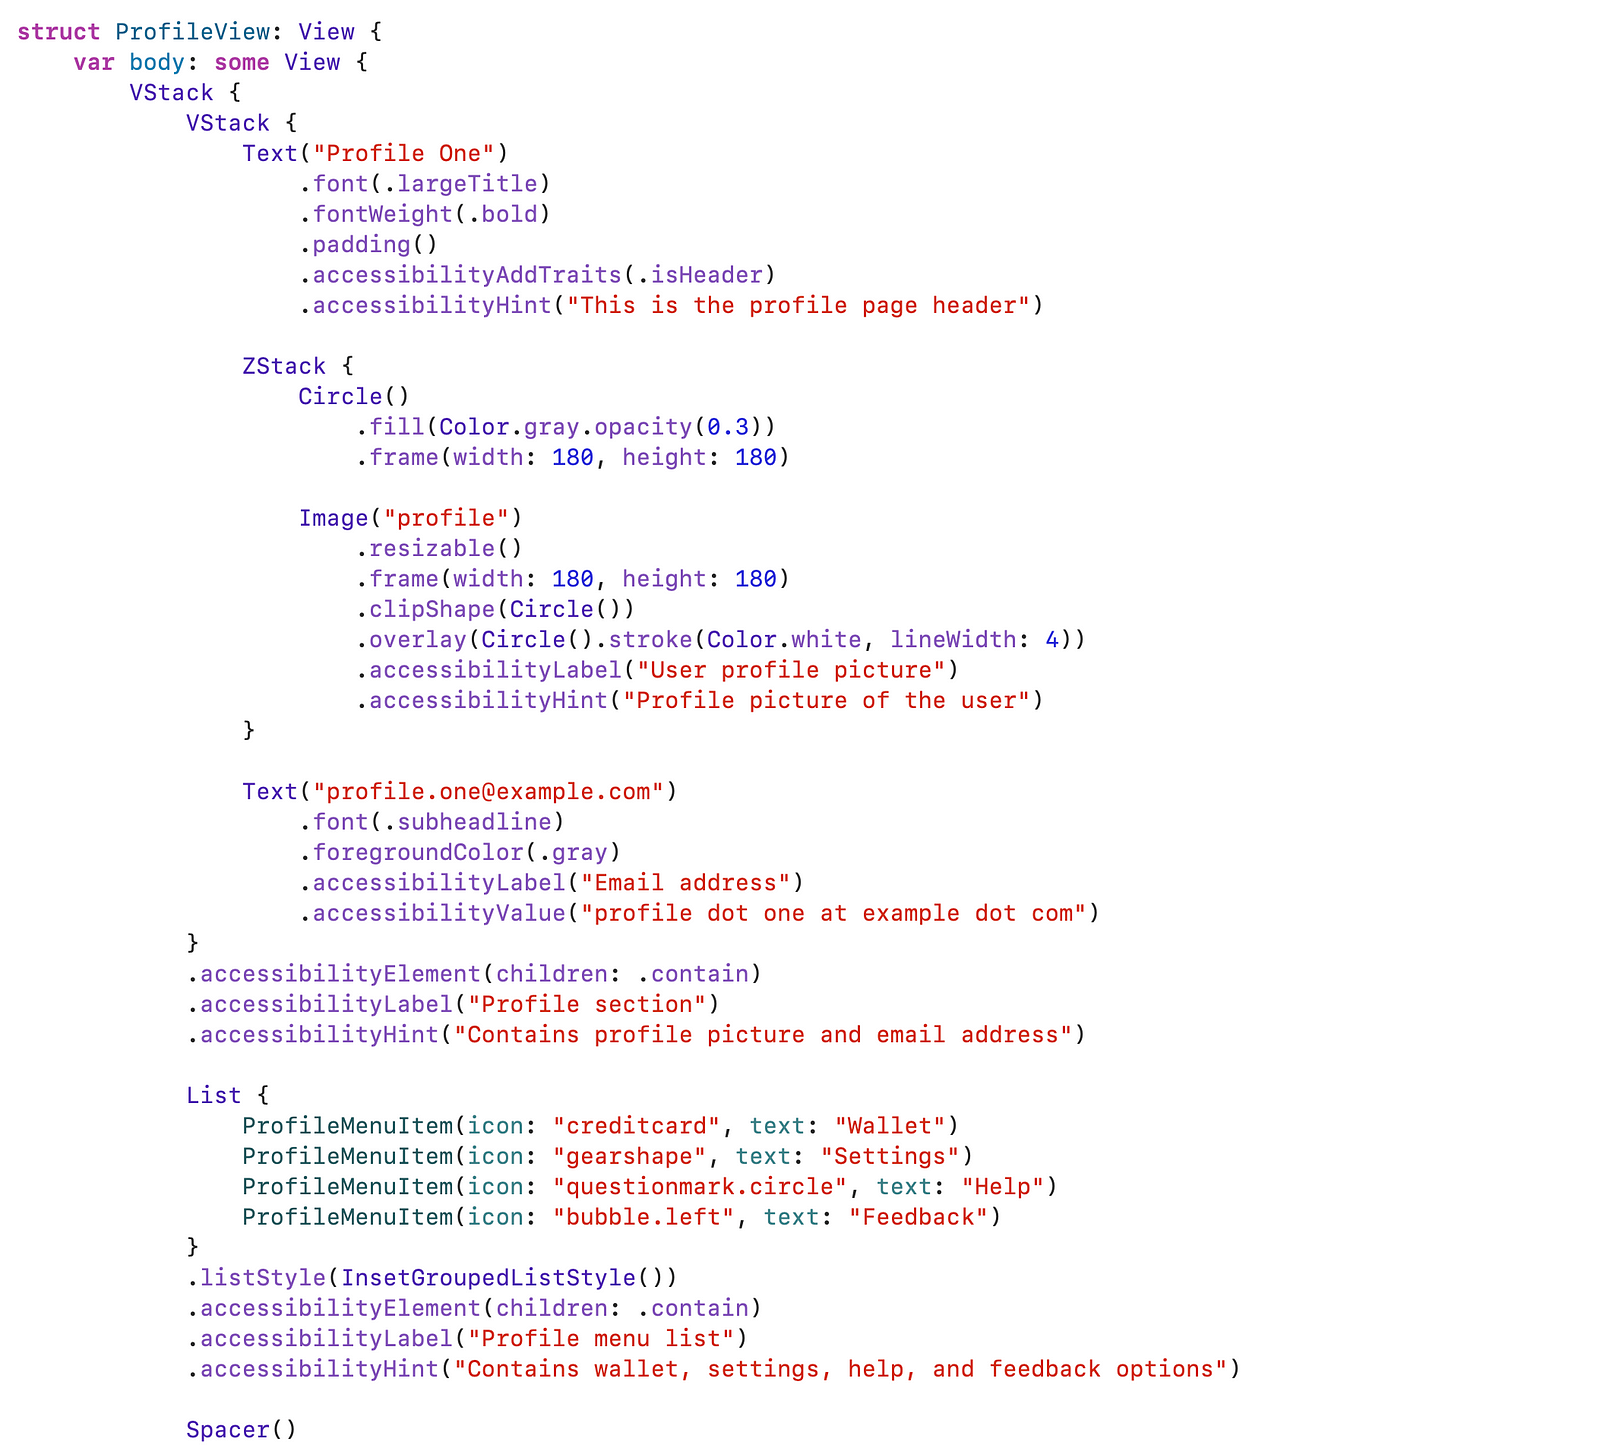
Below is a detailed explanation of all the accessibility modifiers used in the above code. All examples in this blog are presented in SwiftUI, but the principles and techniques discussed are similarly applicable to UIKit.
Accessibility Label (accessibilityLabel):
- Purpose: The Text(“Profile One”) uses .accessibilityLabel(“Profile One”). This label is read aloud by VoiceOver to describe the text to users with visual impairments. It helps them understand that this is the title of the profile page.
- Implementation: Applied directly to the Text element using .accessibilityLabel(“Profile One”).
Accessibility Hint (accessibilityHint):
- Purpose: The Text(“Profile One”) also includes .accessibilityHint(“This is the profile page header”). This hint provides additional context about the text’s purpose or function. VoiceOver users can access this hint to understand more about the profile page header.
- Implementation: Added to the Text element using .accessibilityHint(“This is the profile page header”).
Accessibility Traits (accessibilityAddTraits):
- Purpose: The Text(“Profile One”) is further enhanced with .accessibilityAddTraits(.isHeader). This trait informs VoiceOver that this text serves as a header, indicating its importance and role within the content.
- Implementation: Used to add the header trait to the Text element, helping VoiceOver users navigate and understand the structure of the profile page.
Accessibility Value (accessibilityValue):
- Purpose: The Text(“profile.one@example.com”) includes .accessibilityValue(“profile dot one at example dot com”). This provides the exact email address as a value to VoiceOver users, ensuring they receive accurate information.
- Implementation: Set on the Text element to convey the email address to VoiceOver users.
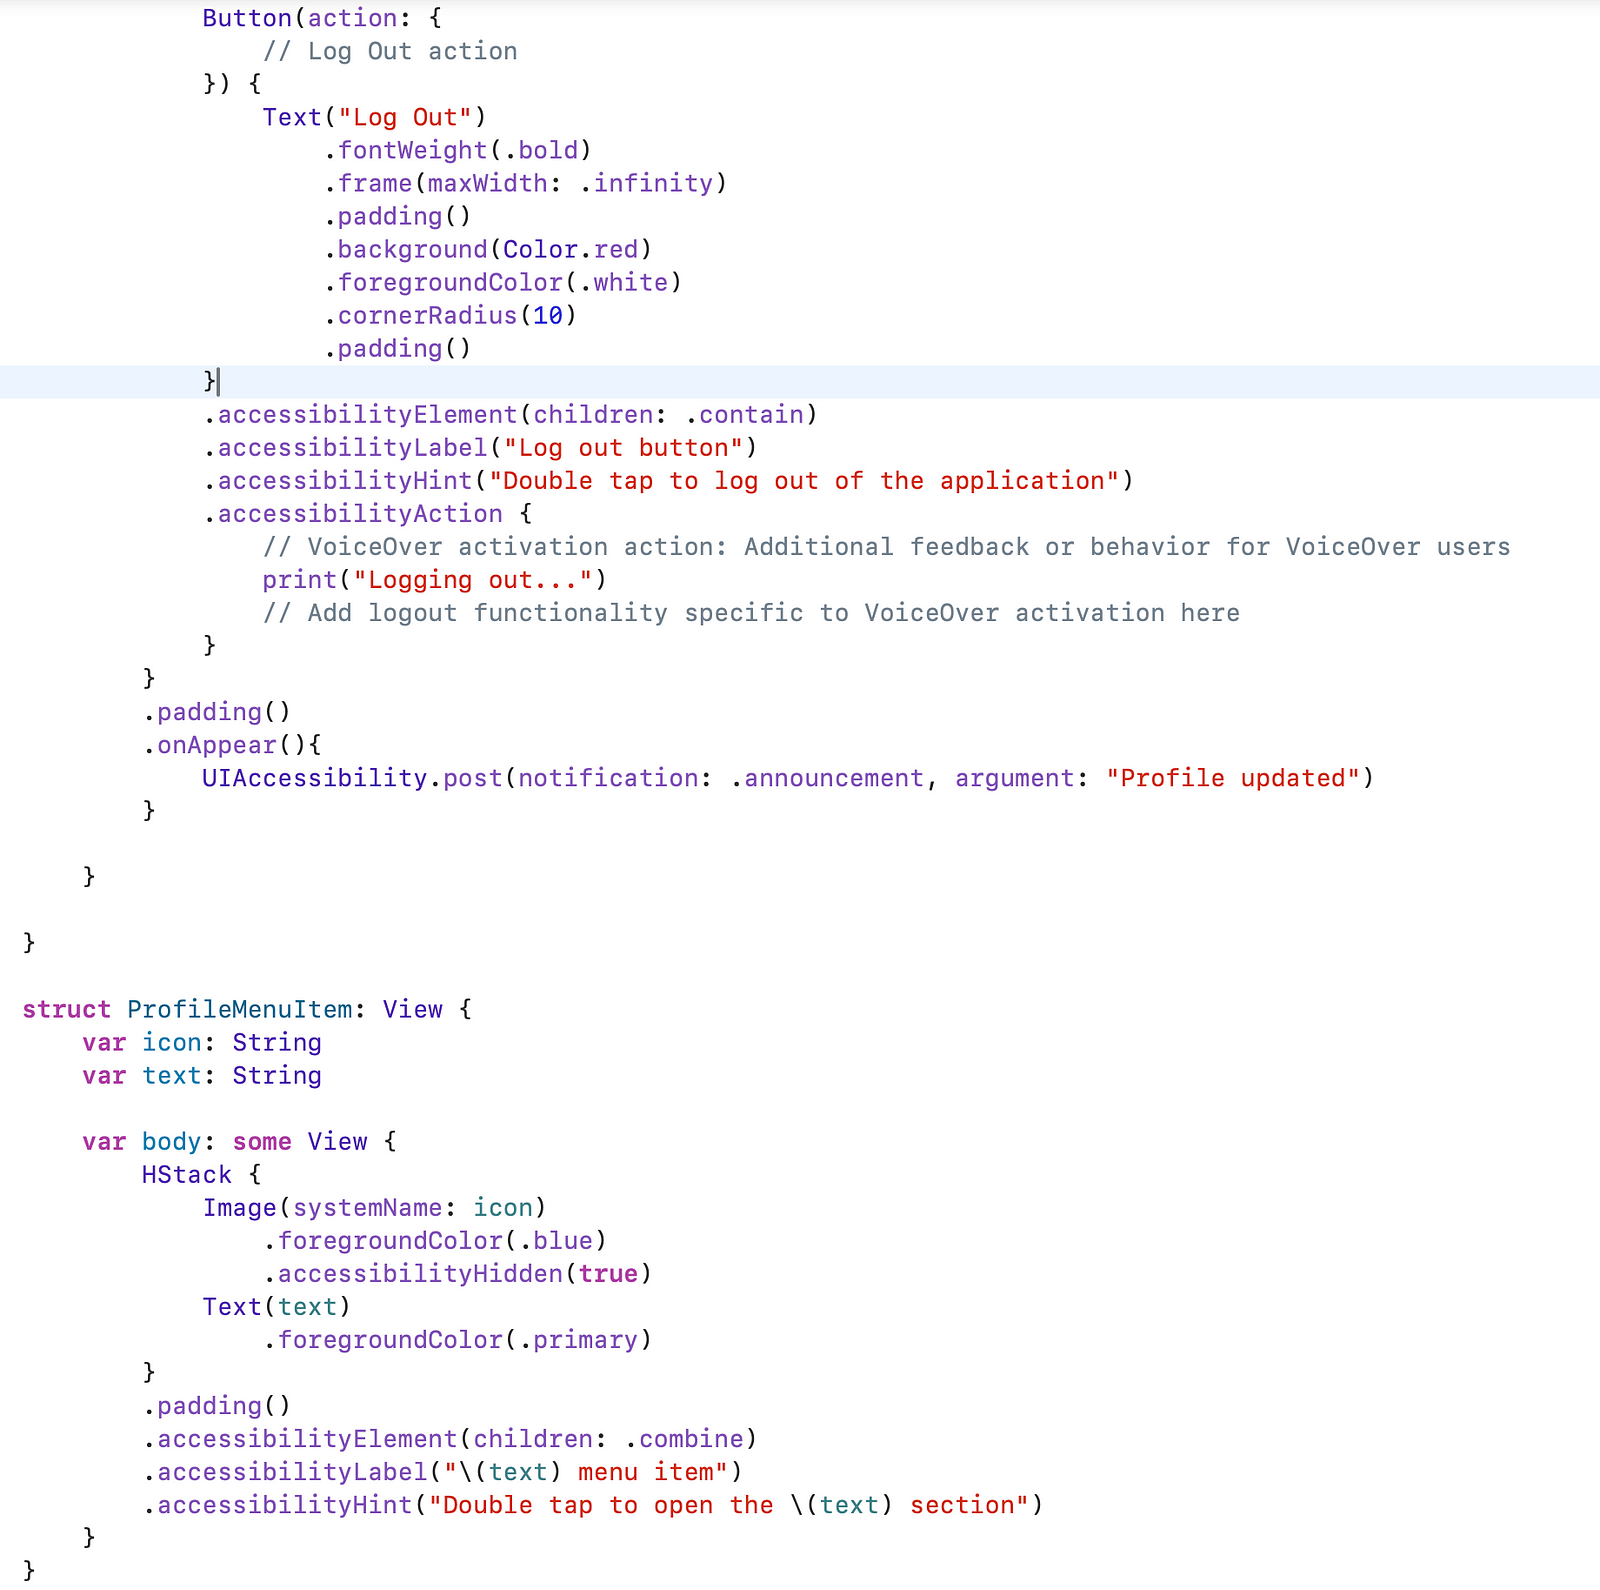
Accessibility Action (accessibilityAction):
- Purpose: The Button(“Log Out”) utilizes .accessibilityAction() to specify actions when activated by VoiceOver. In this context, it’s used to log the user out of the application.
- Implementation: Implemented with .accessibilityAction { /* action code */ } to define the log-out action specifically for VoiceOver activation, enhancing accessibility by providing a direct action for VoiceOver users. In this example, tapping the button logs the user out, while VoiceOver activation triggers specific actions or feedback, enhancing accessibility in apps.
Accessibility Element (accessibilityElement):
- Purpose: Both the profile section and the profile menu list use .accessibilityElement(children: .contain) to group related UI elements for VoiceOver navigation. This helps VoiceOver users understand and navigate these sections as cohesive units rather than individual elements.
- Implementation: Applied to the containers (VStack, List) to indicate that their child elements should be treated together as single accessible units.
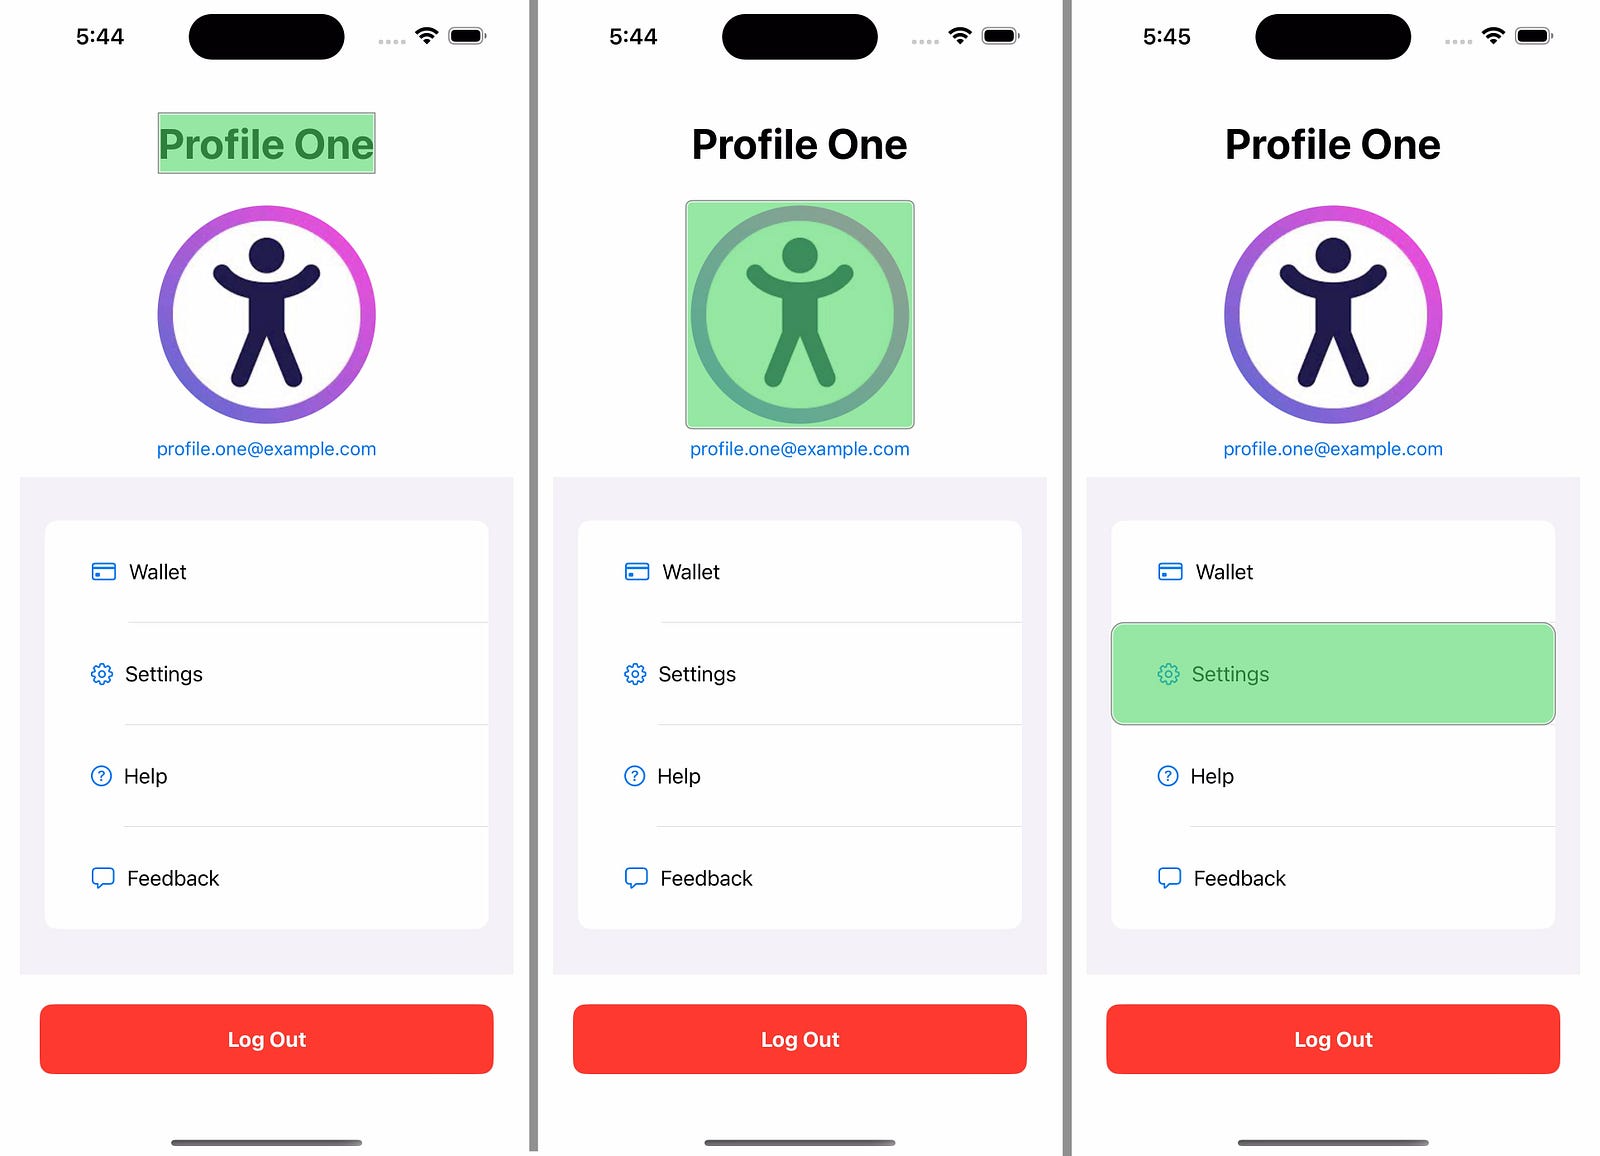
When VoiceOver is enabled and the app is opened, it will audibly describe the elements on the screen. For instance, on the profile page, VoiceOver will read the title “Profile One” and announce it as a header, describe the user’s profile picture, and provide hints such as “This is the profile page header.” It will also describe the email address in a user-friendly manner and provide contextual hints for the menu items and buttons.
By grouping related elements using .accessibilityElement(children: .contain), VoiceOver will treat these groups as single units, making it easier for users with visual impairments to navigate. This helps all users interact with and understand the app’s content more effectively.
Here are some additional accessibility modifiers you can use to enhance the app’s accessibility.
UIAccessibility.post(notification:argument:): Sends notifications to accessibility services like VoiceOver, alerting users about important changes in the UI. This is particularly important in apps with frequently changing content, such as social media feeds or live sports updates.

Ensure that any significant changes in the app’s content are promptly communicated to assistive technologies. For example, if a new message arrives in a chat app, announcing this can help users stay engaged and informed.
Accessibility Sort Priority(accessibilitySortPriority): Controls the reading order of accessibility elements, giving higher priority to more important elements.

Accessibility Custom Rotors(accessibilityCustomRotors) : enhance navigation for VoiceOver users by creating custom options. Users can swipe through lists or collections by rotating their fingers, ideal for efficient data navigation. Useful in apps like contacts, email, or shopping. Example i
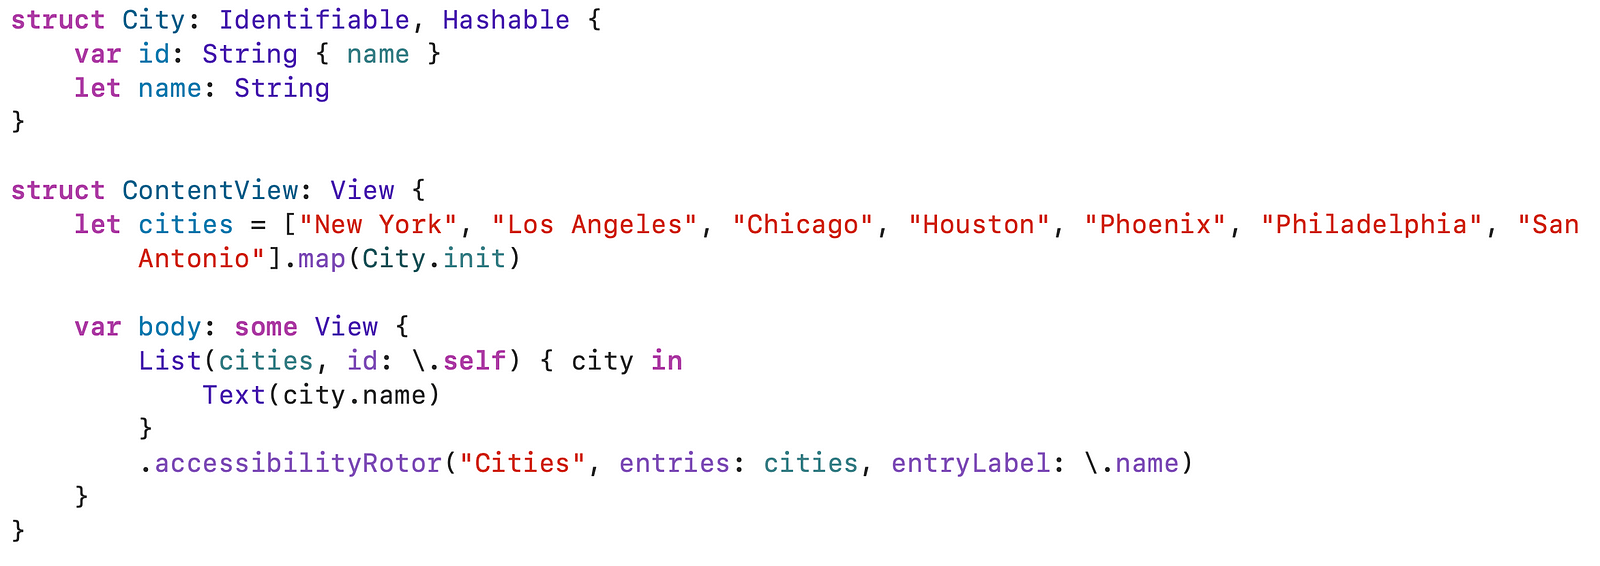
The .accessibilityRotor modifier in SwiftUI creates a “Cities” rotor for VoiceOver users. It enables easy navigation through a list of cities using familiar gestures. Entries from the cities array populate the rotor, using the name property of each City object for navigation clarity and usability.
MagnificationGesture: allows users to perform pinch-to-zoom gestures on views like images or text, adjusting the scale of the content based on their touch input.
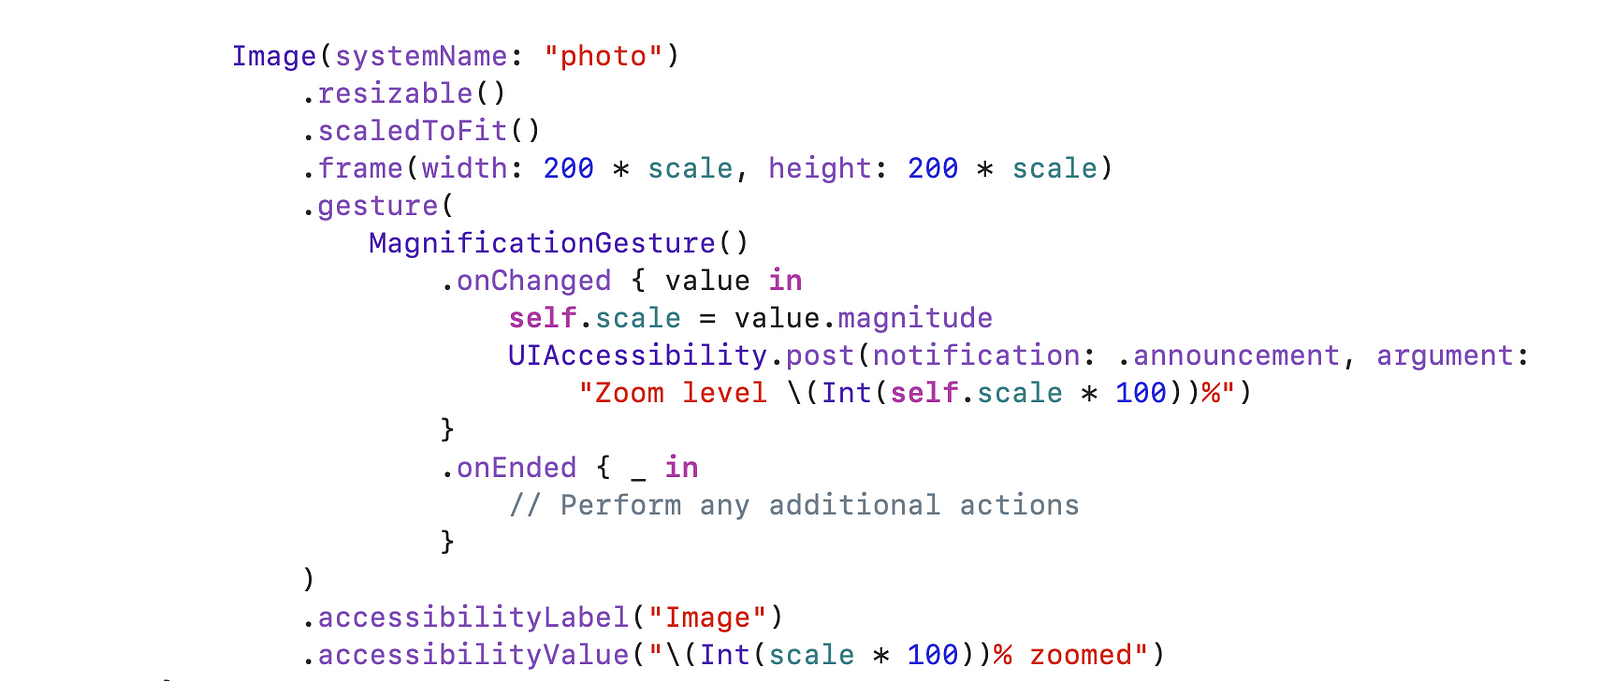
The Image uses MagnificationGesture for pinch-to-zoom. During the gesture (onChanged), it updates the scale state and announces the zoom level for VoiceOver users. The accessibilityValue dynamically reports the zoom level as a percentage. Users with motor impairments can activate this via AssistiveTouch by tapping on-screen controls or using a switch device.
Explore all the settings available under iOS Accessibility to customize your device experience. Noteworthy features include VoiceOver, Zoom, Display & Text Size adjustments, Increase Contrast, and Reduce Transparency, which improve readability and usability system-wide.
Enabling VoiceOver in our app without specific accessibility code reads standard UI elements but may not interpret custom controls fully. Adding attributes like accessibilityLabel and accessibilityHint ensures VoiceOver describes actions and content accurately, enhancing accessibility. For detailed information, refer to our app’s documentation at https://developer.apple.com/documentation/accessibility/.
To activate VoiceOver on a simulator, navigate to Xcode > Open Developer Tool > Accessibility Inspector > select the simulator. When VoiceOver or Zoom is active, navigating with gestures is essential.
Use Siri if stuck or follow the steps at https://support.apple.com/en-in/guide/iphone/iph3e2e2329/ios, if locked out due to accessibility features – https://discussions.apple.com/thread/6513188?answerId=27944447022&sortBy=best#27944447022
For a practical example and to see the implementation in action, you can check out the sample project on GitHub.
Conclusion
Integrating advanced accessibility features into our iOS app isn’t just about compliance, it’s about inclusivity and user satisfaction. Enhancing on-screen typing and managing privacy with audio feedback improve the user experience. While VoiceOver aids accessibility, optimizing navigation remains crucial. Prioritize these enhancements to affirm our commitment to user-centric design and ensure our app is accessible to all.


