
Integration of DevSecOps tools with Jenkins
Introduction
Basically, DevSecOps can be thought of as integrated security practices with DevOps; requiring a variety of tools to ensure security throughout the software development lifecycle.
![]()
Often, we unknowingly add details to our code or use compromised packages, leading to potential breaches in our system. To mitigate this, we use various DevSecOps tools to ensure there is no scope for breaches after the deployment of our deliverables.
In this scenario, We’ll be using Jenkins as our CI/CD tool in a Linux-based server (RHEL) with the following DevSecOps tools:
- Gitleaks
- SonarQube
- OWASP Dependency Check
- Grype image scanner
Prerequisites
- EC2 instance or any cloud VM with at least 2 vCPU and 2 GiB for efficiency.
- Jenkins was installed on the server with a sample pipeline.
- SonarQube is installed on any server.
1. Gitleaks
Gitleaks is a tool designed for secrets detection (like API keys, tokens, passwords, and other sensitive information) and prevention from being committed into versioning control systems, majorly Git repositories. This tool would help developers and security teams ensure that sensitive data does not get added to the code base inadvertently, which may result in security vulnerabilities on exposure.
Steps to install & Integrate:
Run the following commands to install gitleaks:
wget https://github.com/zricethezav/gitleaks/releases/download/v8.10.0/gitleaks-v8.10.0-linux-amd64.tar.gz
tar -xzf gitleaks-v8.10.0-linux-amd64.tar.gz
mv gitleaks /usr/local/bin/
Add the below command to your Jenkins pipeline:
gitleaks detect --source=. --report-format=json --report-path=gitleaks-report.json || true
- –source is the path of the directory that needs to be scanned
- –report-format denotes the format in which we want the report
- –report-path is where the gitleaks will save the reportNote: ” || true” is written at the end because if there are any leaks found then the pipline will stop as the command returns 0, So to bypass this we have mentioned “|| true” here.

Gitleaks Sample Report
2. SonarQube
SonarQube is an open-source platform for continuous inspection of code quality. The system delivers automatic reviews by way of static code analysis for bugs, code smells, and security vulnerabilities in a number of programming languages. SonarQube wants developers to write cleaner and safer code by undertaking in-depth analyses and giving feedback.
Steps to install & Integrate:
Download the sonar scanner cli from this link: https://docs.sonarsource.com/sonarqube/latest/analyzing-source-code/scanners/sonarscanner/
Run the following commands:
sudo mv sonar-scanner-<version>-linux /opt/sonar-scanner
export SONAR_SCANNER_HOME=/opt/sonar-scanner
export PATH=$PATH:$SONAR_SCANNER_HOME/bin
source ~/.bashrc
Run “sonar-scanner -h” to check if it is installed, sometimes it won’t work so may try this command instead – /opt/sonar-scanner/sonar-scanner-4.6.2.2472-linux/bin/sonar-scanner (Edit the version no. as per the downloaded package)
Now go to your SonarQube >> click on your profile >> go to MyAccount and create a token if not already created.

Now Go to your jenkins Pipeline and add the following commands to your pipeline:
/opt/sonar-scanner/sonar-scanner-4.6.2.2472-linux/bin/sonar-scanner
-Dsonar.projectKey=your-project-key
-Dsonar.sources=.
-Dsonar.host.url=https://yoursonarlink.ttn
-Dsonar.login=$SONAR_TOKEN
- -Dsonar.projectKey is your sonarqube project key
- -Dsonar.sources is the directory where the code is present which needs to be analysed
- -Dsonar.host.url is URL of your sonarqube
- -Dsonar.login is where you pass your sonar token which will be used to authenticate your request
You don’t necessarily have to have to edit sonar-project.properties in order to run the sonar scanner. The project key can be anything which will also be shown as the name of your project in SonarQube.

SonarQube Sample Report
3. OWASP Dependency Check
OWASP Dependency-Check is the Security Compliance Assessment tool that identifies project dependencies, checking for the presence of known, publicly disclosed vulnerabilities in those dependencies. This is a freely available, open-source project maintained by the Open Web Application Security Project. It scans project dependencies—that is, libraries and frameworks—and creates a report of all used dependencies. It checks the identified dependencies against its database of known vulnerabilities, including the National Vulnerability Database, for possible security risks.
Steps to install & Integrate:
Run the following commands:
wget https://github.com/jeremylong/DependencyCheck/releases/download/v6.5.3/dependency-check-6.5.3-release.zip
unzip dependency-check-6.5.3-release.zip -d /opt/dependency-check
export PATH=$PATH:/opt/dependency-check/bin
source ~/.bashrc
Run this “dependency-check –version” to check if it is installed, sometimes it won’t work so may try this command instead – /opt/dependency-check/bin/dependency-check.sh –project ‘your-project’
Add the following commands to your pipeline:
/opt/dependency-check/bin/dependency-check.sh --project 'your-project'
--scan '/var/lib/jenkins/workspace/path/to/job'
--out '.'
--format 'HTML'
--format 'JSON'
--data '/var/lib/jenkins/your-custom-path/dependency-check-data'
- –project is your project name
- –scan is the path whose resources need to be scanned
- –out is the directory where the reports will be generated
- –format denotes the format in which you want the report
- –data is the path where the dependency check data will be stored. This data contains the details about the vulnerabilities and will use this data as a reference while scanning your code for vulnerabilities and will generate the report accordingly.

Dependency check Sample report
4. Grype Image Scanner
Grype is a simple tool and library that scans container images and filesystems and generates reports on detected vulnerabilities in software packages and libraries. Grype focuses on detecting vulnerabilities in application dependencies, very much like OWASP Dependency-Check, but specializes in containerized environments.
Steps to install & Integrate:
Run the following commands:
curl -sSfL https://raw.githubusercontent.com/anchore/grype/main/install.sh | sh -s -- -b /usr/local/bin
Add the following command to your Jenkins Pipeline:
grype $IMAGE_NAME:$IMAGE_TAG > grype-report.txt
- $IMAGE_NAME:$IMAGE_TAG, here you can pass the image name and tag that you want to scan
If the “grype” command is not working then you can replace it with “/usr/local/bin/grype”

Grype Sample Report
Note: Grype is resource-heavy and may crash the server while scanning. If this happens, consider using Trivy, Clair, or AWS ECR for scanning images as a replacement if possible.
Sample Execution:

Sample Execution
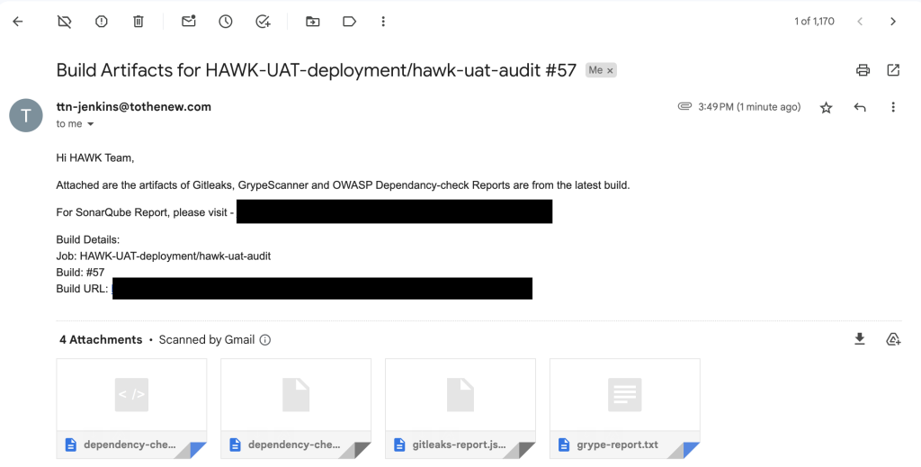
Artifacts sent via mail
archiveArtifacts artifacts: '*.html,*.json,*.txt', fingerprint: true
emailext (
subject: "Build Artifacts for ${JOB_NAME} #${BUILD_NUMBER}",
body: """<p>Hi Team,</p>
<p>Attached are the artifacts of Gitleaks, GrypeScanner and OWASP Dependancy-check Reports are from the latest build.</p>
<p> For SonarQube Report, please visit - <your sonar link><br>
<p>Build Details:<br>
Job: ${JOB_NAME}<br>
Build: #${BUILD_NUMBER}<br>
Build URL: ${BUILD_URL}<br>
""",
to: 'youremail@domain.com',
attachmentsPattern: "**/dependency-check-report.json,**/dependency-check-report.html,**/gitleaks-report.json,**/grype-report.txt",
mimeType: 'text/html'
)
cleanWs()
(Code snippet for the email notification)
Conclusion
DevSecOps ensures that software is secure and trusted all the way through its development. Tools like Gitleaks, SonarQube, OWASP-Dependency-Check, and Grype can, therefore, help organizations catch and reduce security vulnerabilities before they deploy, thereby considerably lowering the risk of a breach and increasing general system security.
Gitleaks prevents sensitive information from getting into version control systems by mistake. SonarQube gives the full code quality analysis, thus detecting bugs, code smells, and security vulnerabilities to ensure a cleaner and safer codebase. OWASP Dependency-Check scans project dependencies against vulnerabilities. This adds a high value to one step of security by ensuring libraries and frameworks are safe for use in a project. Grype, finally, specializes in scanning vulnerabilities in container images and file systems. These tools can be automated as part of the continuous development process in a CI/CD pipeline with Jenkins, allowing continuous monitoring for fast remediation of potential security issues. This way, this approach will not only drive an improvement in the security posture of an organization but also inspire a culture of security awareness among developers and other teams.
A DevSecOps strategy built with these tools or any other security tools makes sure that the process of software development does not consider security as an afterthought, because security was inlaid into the very core of developing more secure and resilient applications.
